workflows using .Rmd documents in the vignettes/ folder
Software Engineering approach
Following conventions allows us to make use of automated tools for:
Checking and testing code
Producing documentation for code and workflows
Publishing, distributing and citing code
Anatomy of an R package
Let’s use pkgreviewr, a package I authored to help automate some aspects of the rOpenSci review process, as an example to examine some elements of what makes a package:
DESCRIPTION file
Capture metadata around the package - Functionality description - Creators - License
Package: pkgreviewr
Type: Package
Title: rOpenSci package review project template
Version: 0.3.9999
Authors@R: c(
    person("Anna", "Krystalli", , "annakrystalli@googlemail.com", role = c("aut"),
           comment = c(ORCID = "0000-0002-2378-4915", "Created the package")),
    person("Maëlle", "Salmon", , "maelle@ropensci.org", role = c("aut", "cre"),
           comment = c(ORCID = "0000-0002-2815-0399"))
  )
Description: Creates files and collects materials necessary to complete an
    rOpenSci package review.  Review files are prepopulated with review
    package specific metadata. Review package source code is also cloned
    for local testing and inspection.
License: GPL (>= 3)+ file LICENSE
URL: https://docs.ropensci.org/pkgreviewr/, https://github.com/ropensci-org/pkgreviewr
BugReports: https://github.com/ropensci-org/pkgreviewr/issues
Imports:
    assertthat,
    brio,
    cli,
    curl,
    desc,
    fs (>= 1.3.1),
    gert,
    gh,
    rlang,
    usethis,
    withr
Suggests:
    knitr,
    rmarkdown,
    testthat (>= 3.0.0)
VignetteBuilder:
    knitr
Remotes:
    hadley/emo
Config/testthat/edition: 3
Config/ropensci/maintainer: staff
Encoding: UTF-8
LazyData: true
Roxygen: list(markdown = TRUE)
RoxygenNote: 7.3.2.9000
To cite package 'pkgreviewr' in publications use:

  Krystalli A, Salmon M (2026). _pkgreviewr: rOpenSci package review
  project template_. R package version 0.3.9999,
  <https://docs.ropensci.org/pkgreviewr/>.

A BibTeX entry for LaTeX users is

  @Manual{,
    title = {pkgreviewr: rOpenSci package review project template},
    author = {Anna Krystalli and Maëlle Salmon},
    year = {2026},
    note = {R package version 0.3.9999},
    url = {https://docs.ropensci.org/pkgreviewr/},
  }
Dependency management
It’s the job of the DESCRIPTION to list the packages that your package needs to work.
Imports are necessary dependencies for the functions in your package to work
Suggests:
    knitr,
    rmarkdown,
    testthat (>= 3.0.0)
Suggests are dependencies that are not necessary for the functions in your package but might be neccessary to run all the vignettes or tests in your package
#' Add together two numbers.#'#' @param x A number.#' @param y A number.#' @return The sum of x and y.#' @examples#' add(1, 1)#' add(10, 1)add<-function(x, y){x+y}
tests/
Tests provide confidence in what the code is doing.
The R package structure can help with providing a logical organisation of files, by providing a set of standard locations for certain types of files.
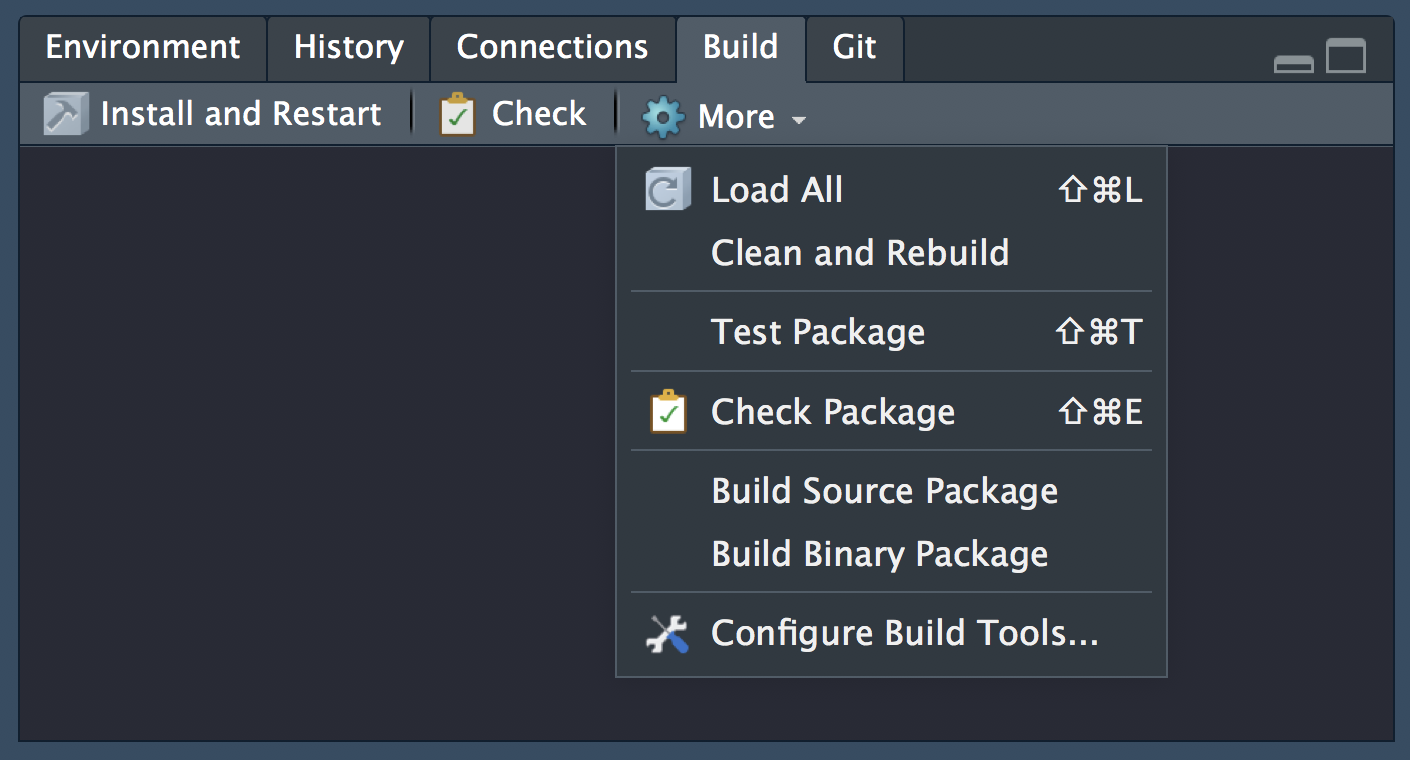
To work with packages in RStudio we use the Build pane, which includes a variety of tools for building, documenting and testing packages. This will appear if RStudio recognises the project as an R package.
💻 Create your first package
Creating a new package locally
To create a new package, you can follow the steps for creating any new project, but this time select R package instead of New Project and call your new package mypackage.
File > New Project… > New Directory > R package > mypackage
Otherwise, you can use function usethis::create_package("mypackage") to create a new package. The argument we provide is the path to here we want our new package created, the last element being the package name. Note that there are restrictions on what characters can be used in a package name.
Copy mypackage Project
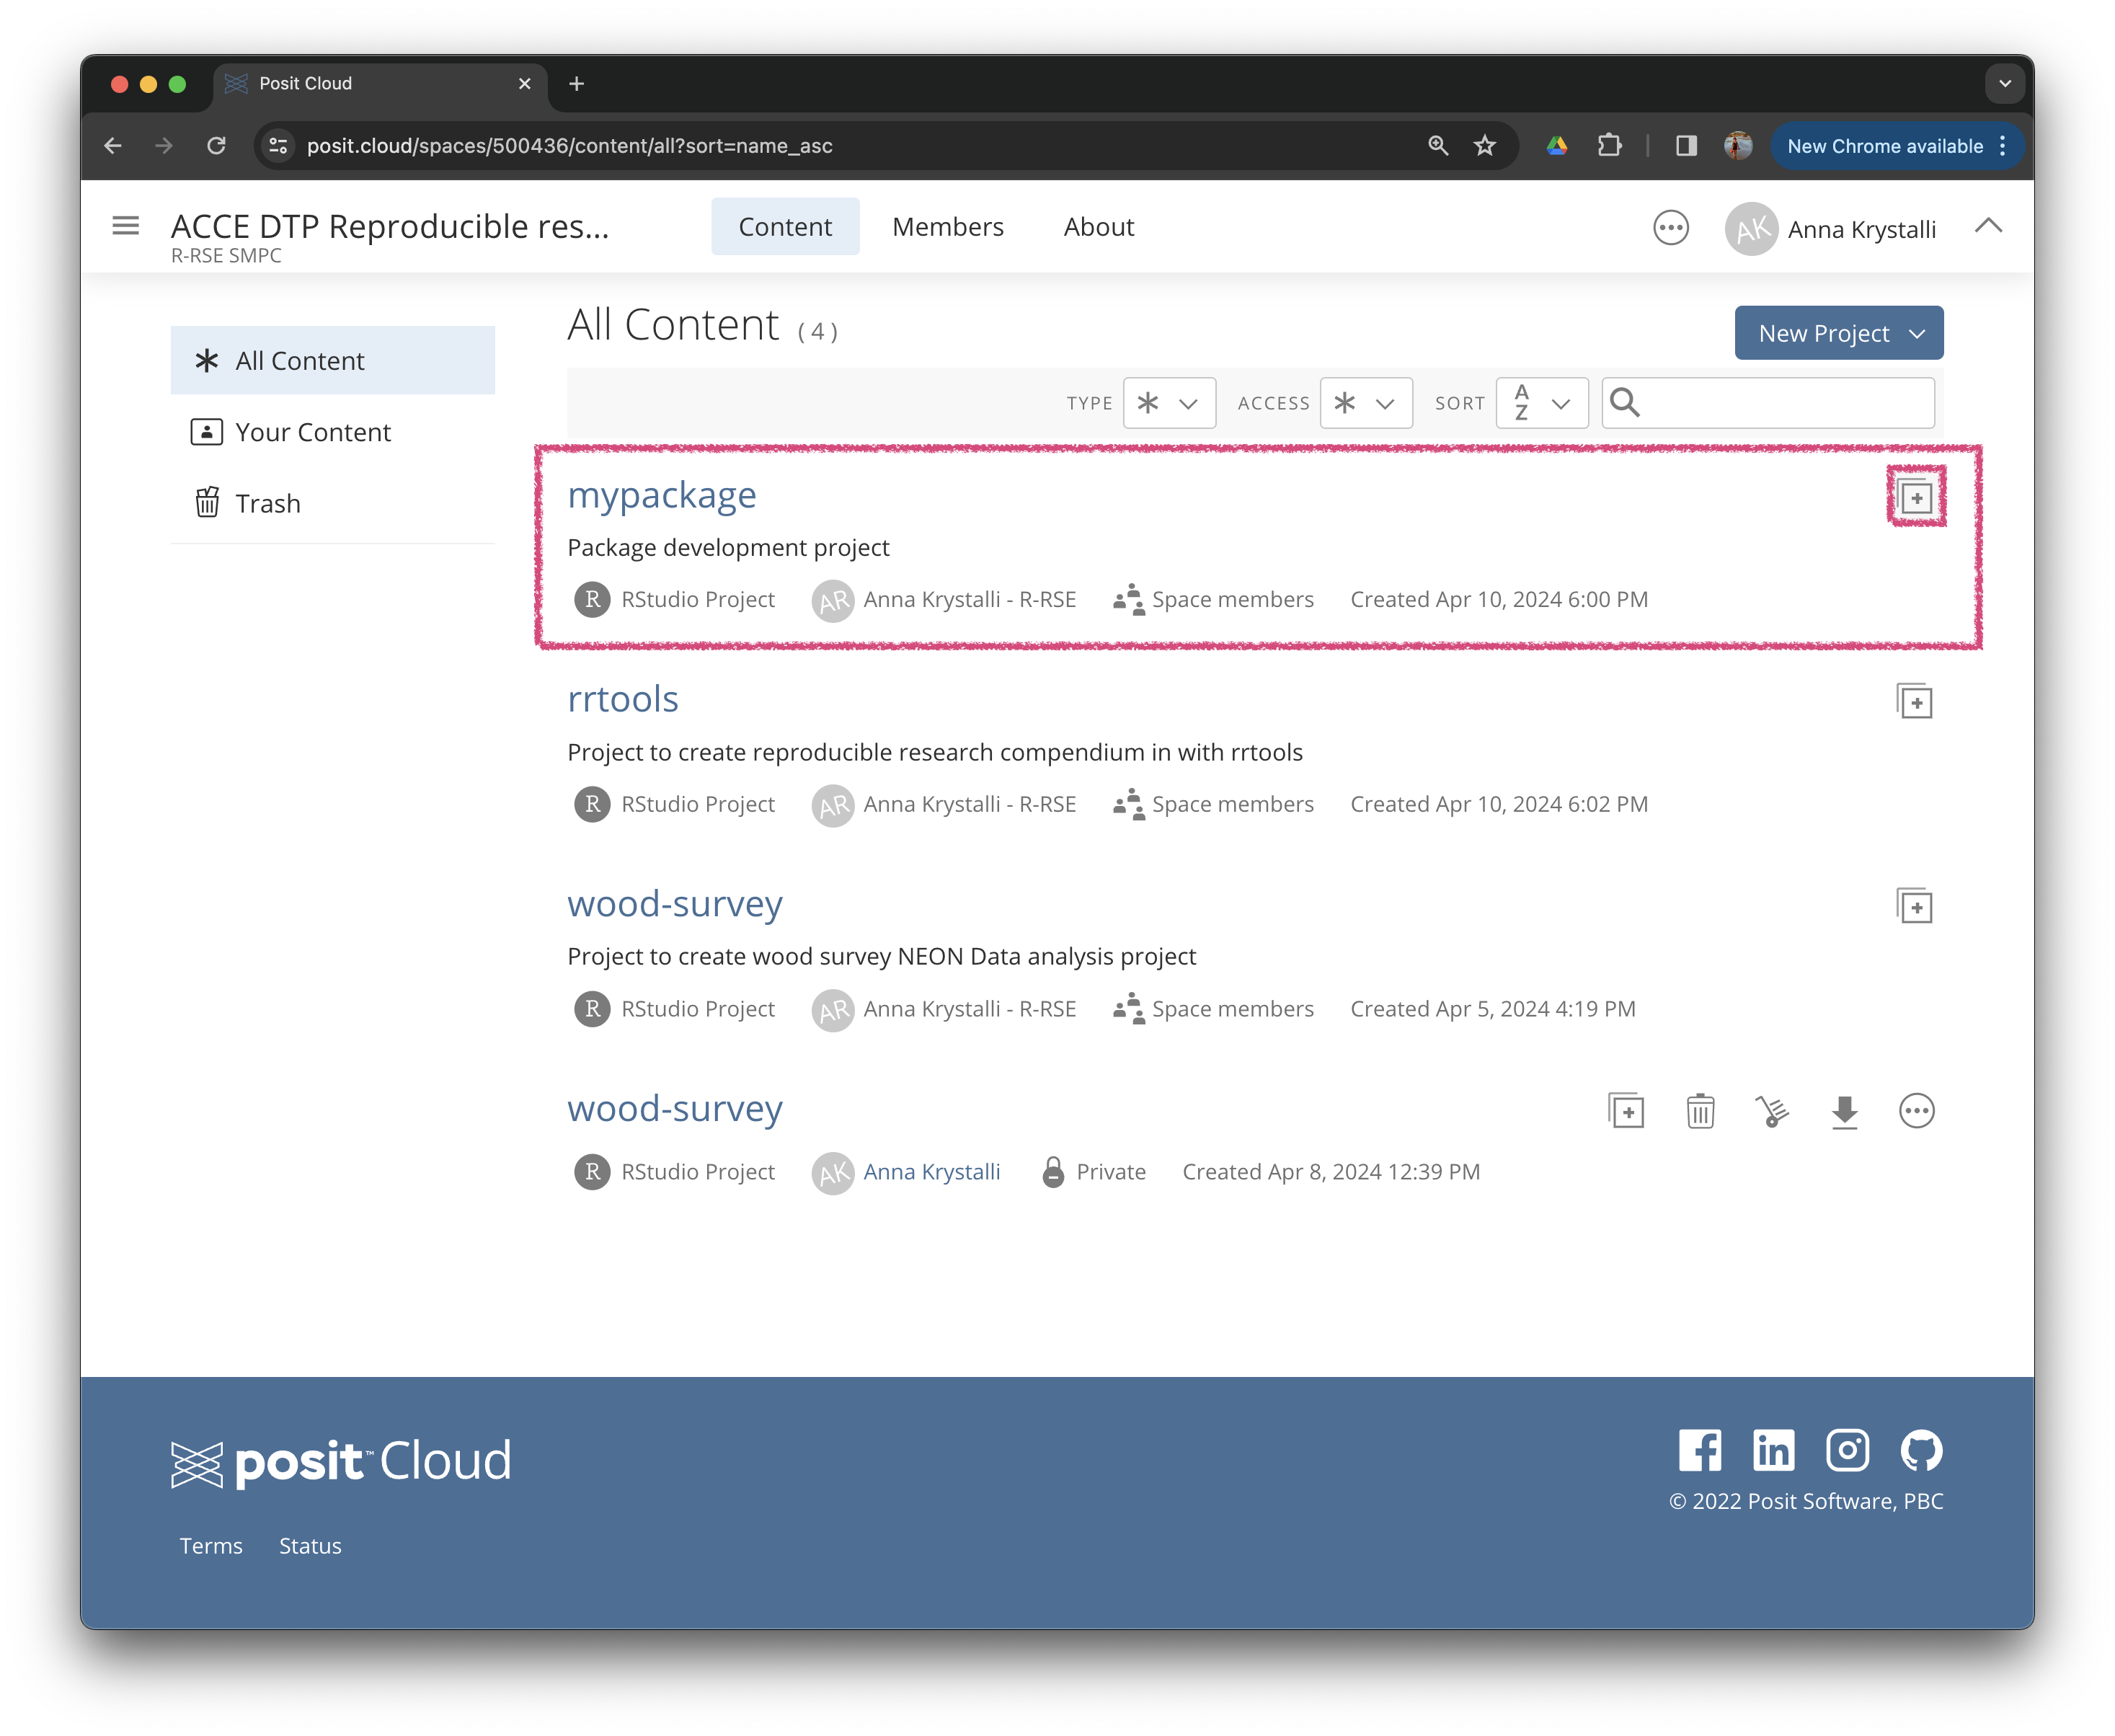
To make things easier, I’ve gone ahead and set up the basic contents of a new package in project mypackage.
In our shared space click on the copy button next to the mypackage Project to copy it.
Your new project should have the following structure.
.
├── DESCRIPTION
├── NAMESPACE
├── R
└── project.Rproj
Fresh Posit Cloud project: re-do your git / GitHub setup
You’re starting in a brand-new Posit Cloud project, which means none of your git or GitHub configuration carries over from previous projects. Before we go any further, run:
# tell git who you areusethis::use_git_config( user.name ="Your Name", user.email ="your.email@example.com")# load your PAT into the credential store and current R sessioncredentials::set_github_pat()
✔ Setting active project to '/cloud/project/mypackage'
✔ Initialising Git repo
✔ Adding '.Rhistory', '.Rdata', '.httr-oauth', '.DS_Store', '.quarto' to '.gitignore'
There are 5 uncommitted files:
* '.gitignore'
* '.Rbuildignore'
* 'DESCRIPTION'
* 'mypackage.Rproj'
* 'NAMESPACE'
Is it ok to commit them?

1: No way
2: Nope
3: I agree

Selection: 3
✔ Adding files
✔ Making a commit with message 'Initial commit'
Rename default branch to main
usethis::use_git() still initialises a git repo with the legacy master branch name. Let’s bring it in line with the modern convention of main.
ℹ Local branch "master" appears to play the role of the
  default branch.
✔ Moving local "master" branch to "main".
☐ Be sure to update files that refer to the default branch
  by name.
  Consider searching within your project for "master".
Create GitHub repo and push to GitHub
Before we start adding functionality, let’s share the package skeleton on GitHub so we have our remote set up from the start.
# create GitHub repository and pushusethis::use_github()
ℹ Defaulting to "https" Git protocol.
✔ Creating GitHub repository 'annakrystalli/mypackage'
✔ Setting remote 'origin' to 'https://github.com/annakrystalli/mypackage.git'
✔ Adding 'https://github.com/annakrystalli/mypackage' to URL
✔ Adding 'https://github.com/annakrystalli/mypackage/issues' to BugReports
There is 1 uncommitted file:
* 'DESCRIPTION'
Is it ok to commit it?

1: Absolutely
2: Not now
3: No way

Selection: 1
✔ Adding files
✔ Making a commit with message 'Add GitHub links to DESCRIPTION'
✔ Pushing 'main' branch to GitHub and setting 'origin/main' as upstream branch
✔ Opening URL 'https://github.com/annakrystalli/mypackage'
This creates a new GitHub repository and pushes the contents of your package to it.
Before doing so, it also adds details of our remote to the DESCRIPTION file and commits it.
Everything so far (the package skeleton, DESCRIPTION, NAMESPACE) is on main. From here on, we’ll do our function development on a branch.
🚦 Work on a branch
Why work on a branch?
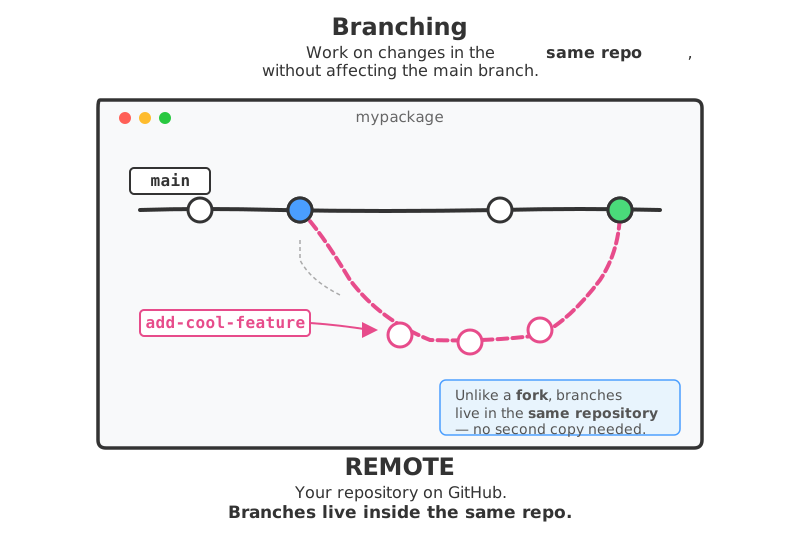
So far we’ve been committing directly to main. That’s fine for getting a project started, but when we start adding new functionality it’s good practice to do that work on a separate branch and only merge it back to main once we’re happy with it.
Unlike a fork (a copy of someone else’s repo in your own account, like we used in the evolottery exercise), a branch lives inside your own repo. You can have many branches in parallel, each tracking a different line of work, and switch between them as you go.
Create a branch
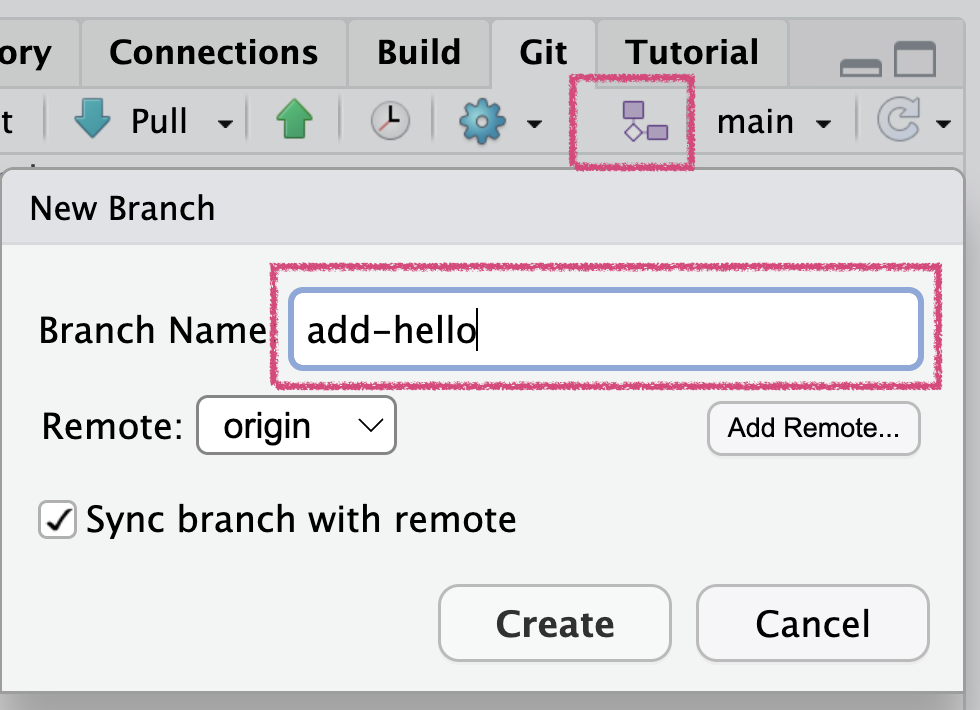
Let’s create a new branch called add-hello for the work we’re about to do on our hello() function.
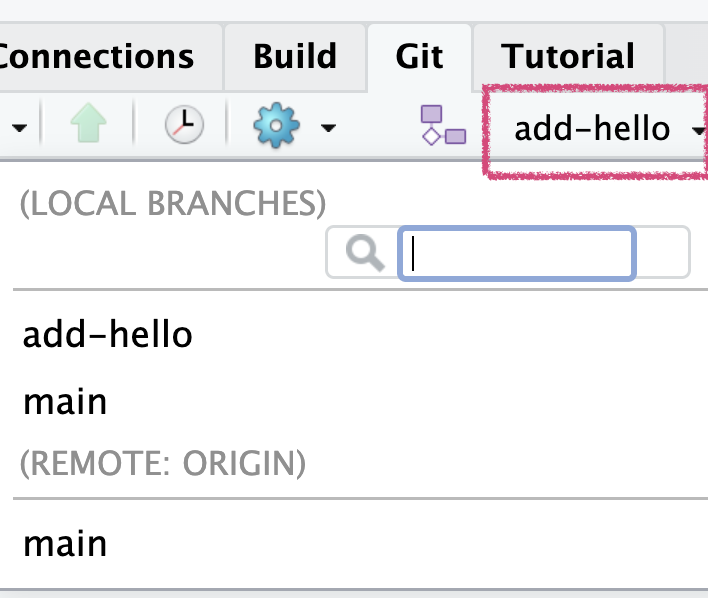
In RStudio, click the New Branch button in the Git pane, enter the branch name and click Create. RStudio will switch you onto the new branch automatically.
You can confirm the new branch is active and switch between branches using the branch dropdown in the Git pane.
All the commits we make from here on will go on the add-hello branch, leaving main untouched until we’re ready to merge.
🚦 Functions in the R/ dir
Create function script and first function
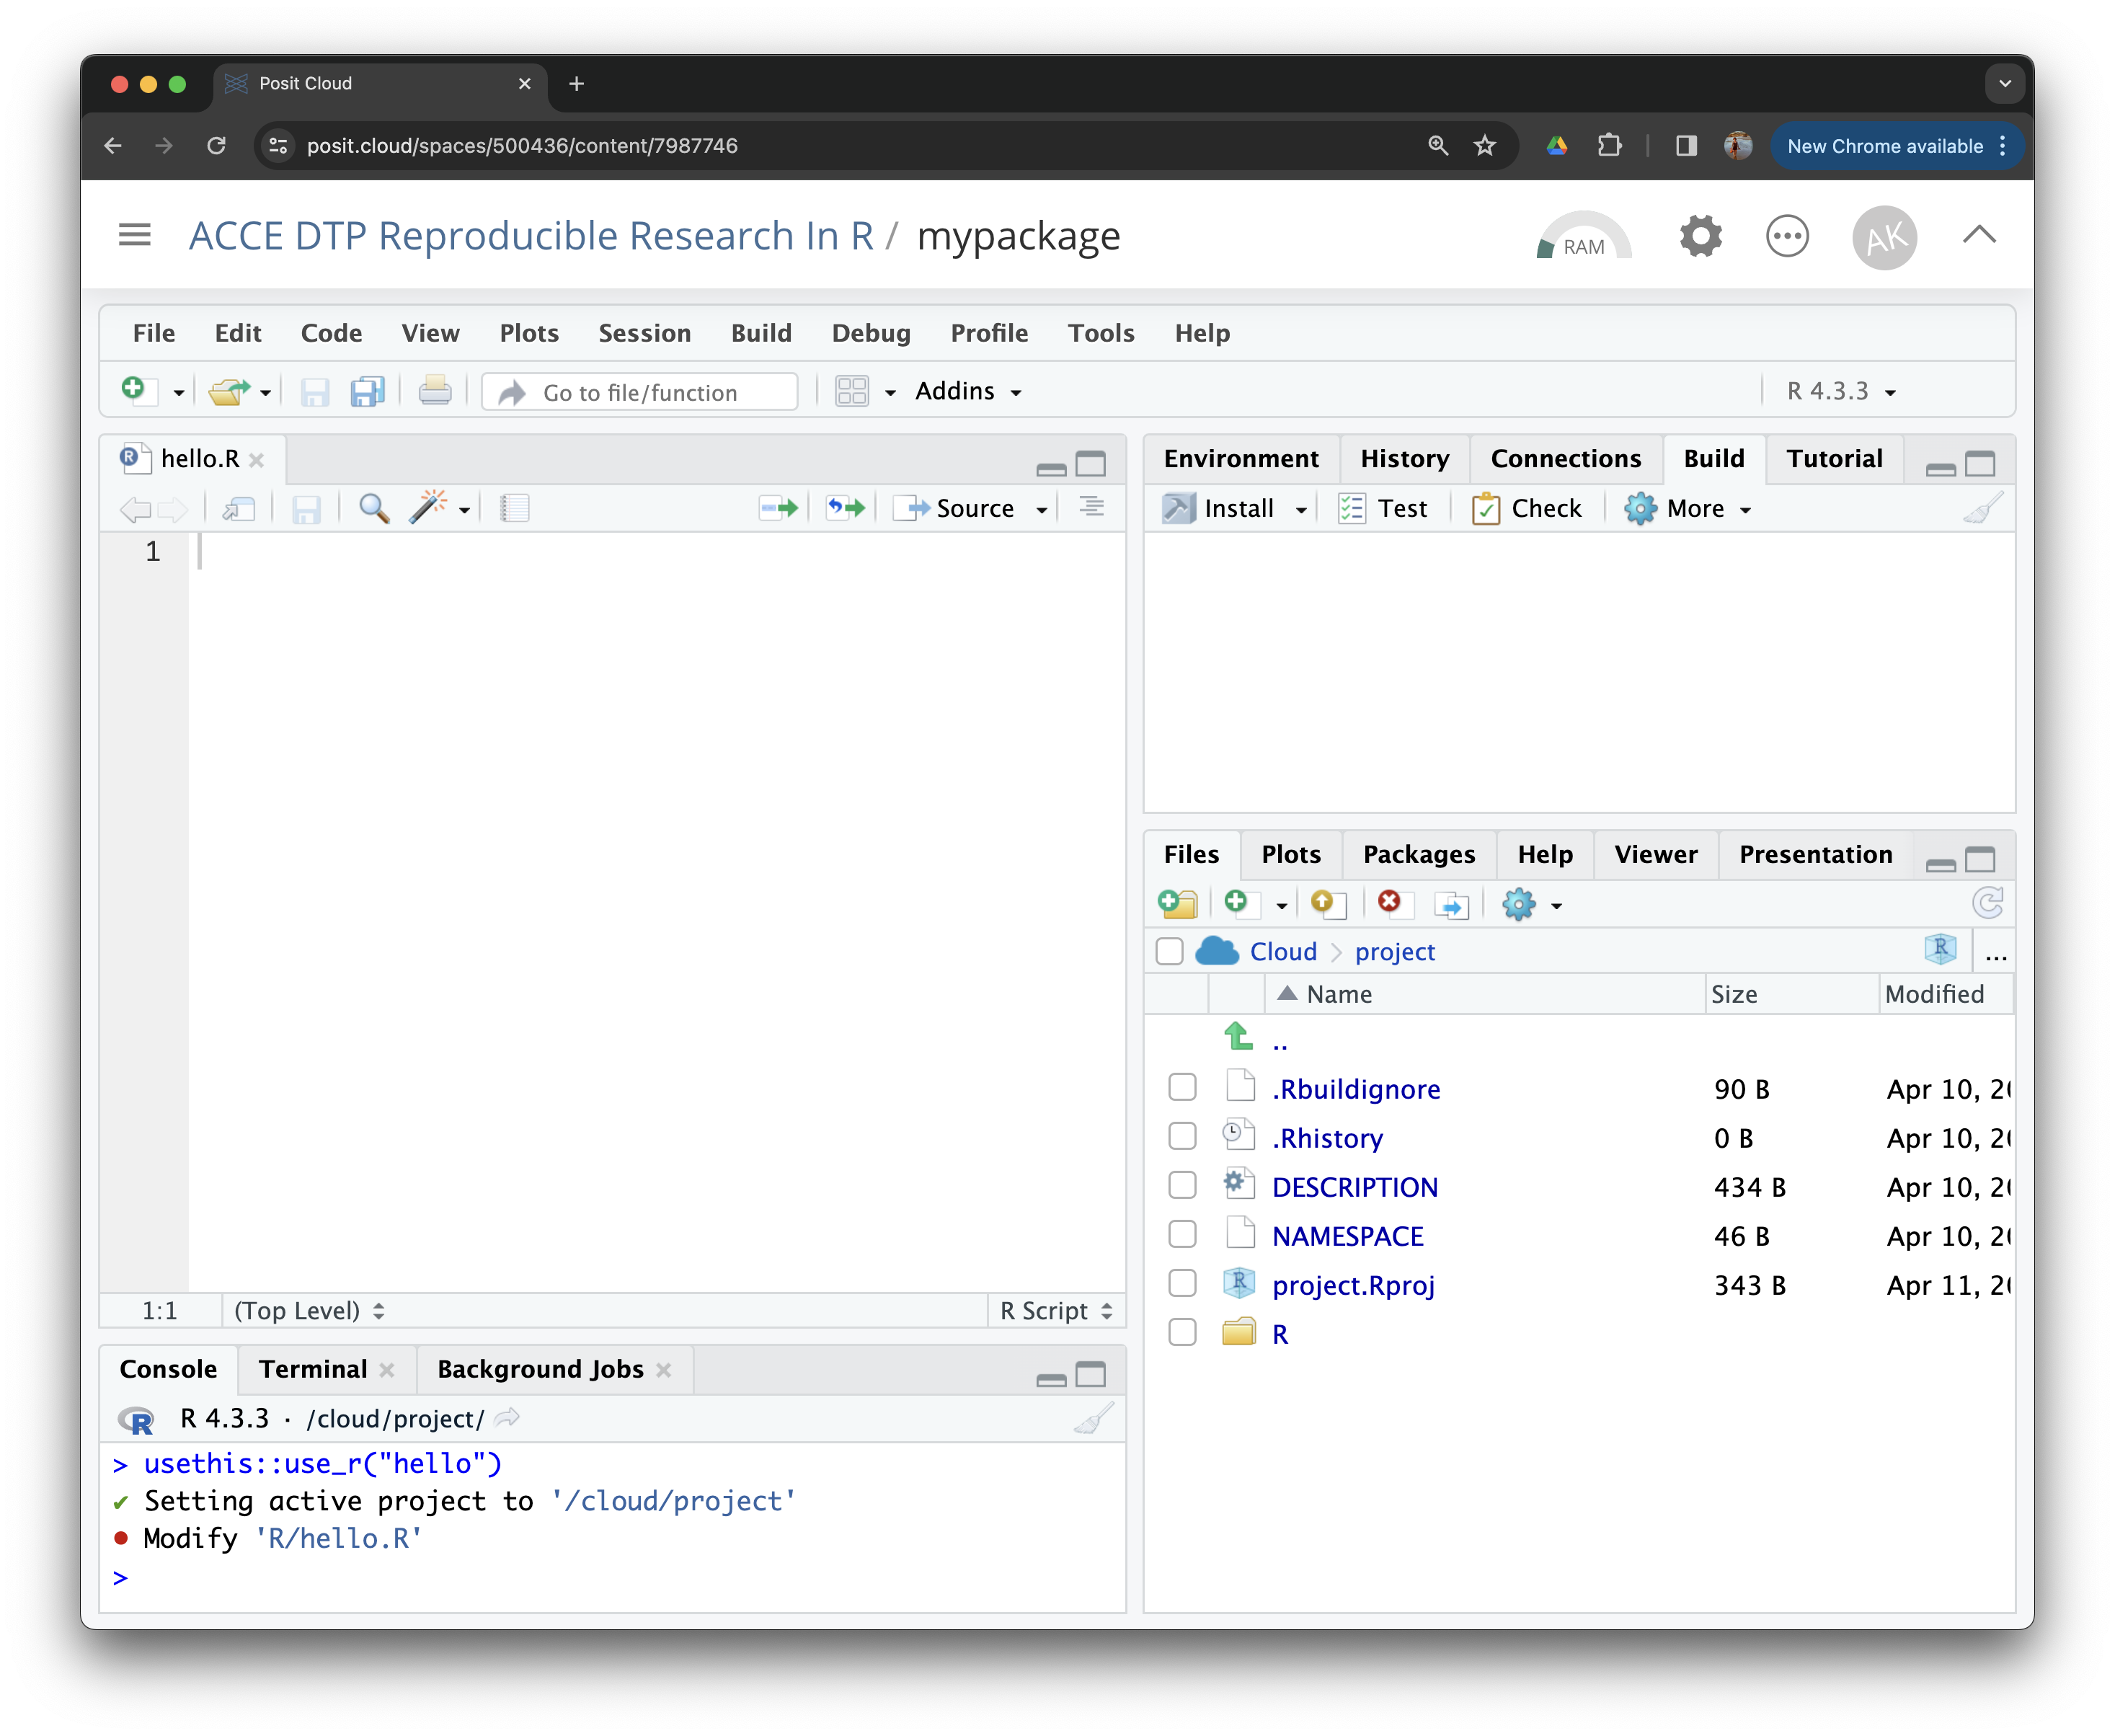
Let’s create a script and write our first function:
It’s a function that takes no arguments and prints Hello, world! to the console when called.
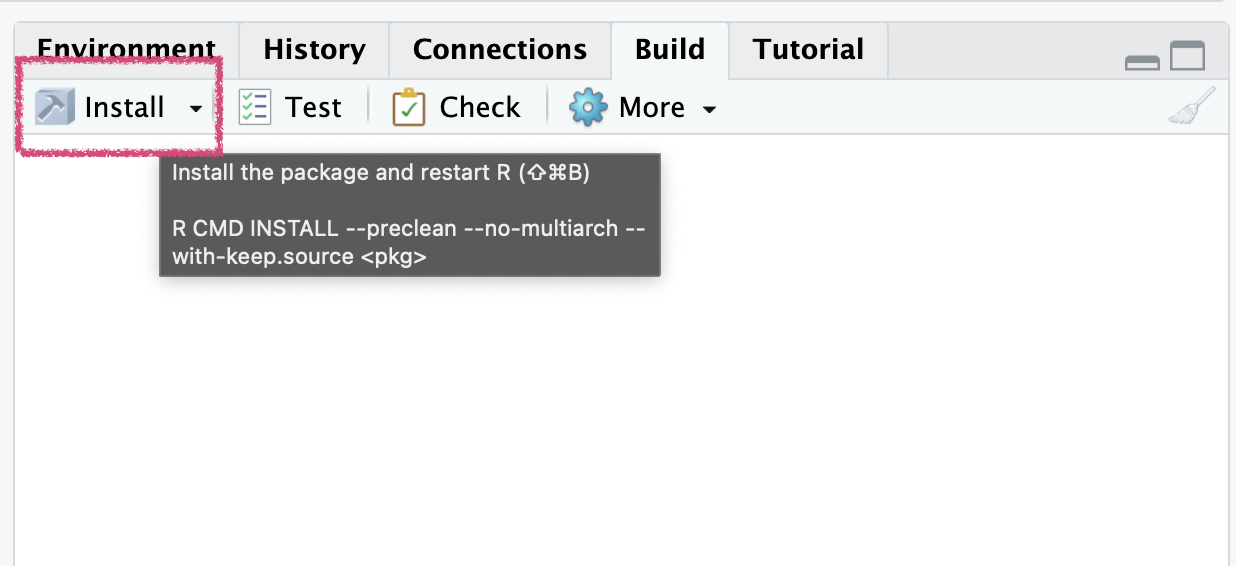
Install package.
You can install a package locally from it’s source code with function devtools::install()
devtools::install()
── R CMD build ────────────────────────────────────────────
✔  checking for file ‘/cloud/project/mypackage/DESCRIPTION’ ...
─  preparing ‘mypackage’:
✔  checking DESCRIPTION meta-information
─  checking for LF line-endings in source and make files and shell scripts
─  checking for empty or unneeded directories
─  building ‘mypackage_0.0.0.9000.tar.gz’
   Warning: invalid uid value replaced by that for user 'nobody'

Running /opt/R/4.5.3/lib/R/bin/R CMD INSTALL \
  /tmp/RtmpVJXWXx/mypackage_0.0.0.9000.tar.gz \
  --install-tests
* installing to library ‘/cloud/lib/x86_64-pc-linux-gnu-library/4.5’
* installing *source* package ‘mypackage’ ...
** using staged installation
** R
** byte-compile and prepare package for lazy loading
** help
*** installing help indices
** building package indices
** testing if installed package can be loaded from temporary location
** testing if installed package can be loaded from final location
** testing if installed package keeps a record of temporary installation path
* DONE (mypackage)
Although the package contains our function, we have not exported it to make it available to a user.
Currently it is contained as an internal function. Hence we can access it with the notation for internal functions (:::) but not directly when we load the package!
To export the function, we will need to add a tag to tell R to do so using a special documentation notation called Roxygen!
🚦 Add Roxygen documentation
Roxygen2 allows you to write specially-structured comments preceding each function definition to document:
a description of what it does
the inputs and outputs
an example of how to use it
whether to export the function or treat it as internal
These are processed automatically to produce .Rd help files for your functions and control which functions are exported to the package NAMESPACE.
Let’s document our example function.
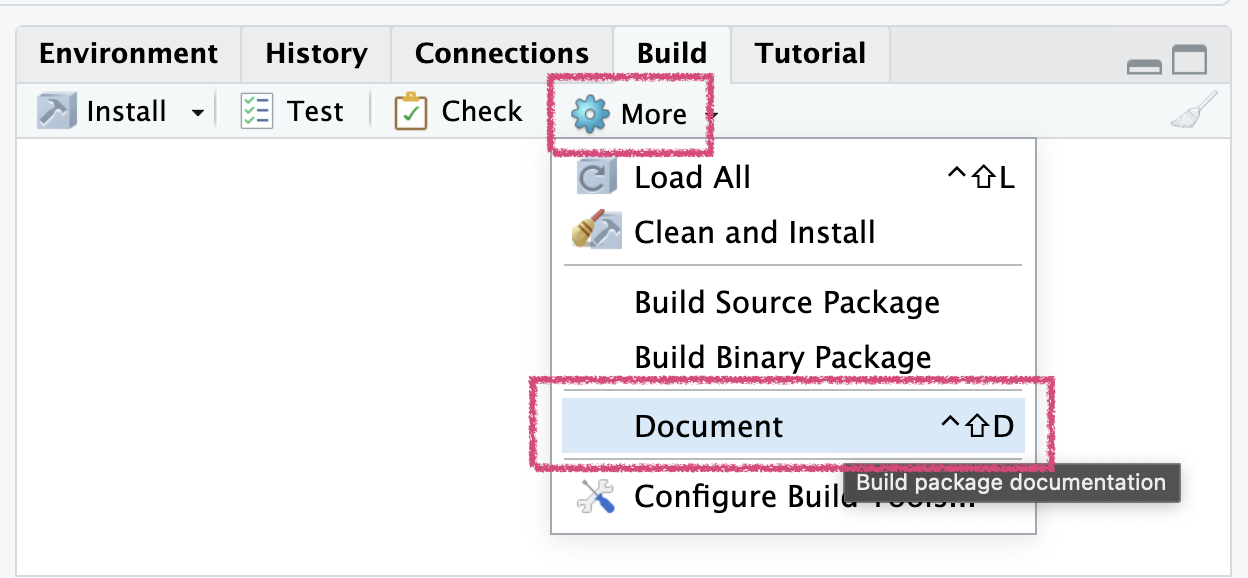
Insert Roxygen skeleton
You can insert a Roxygen skeleton by placing the cursor within a function and clicking:
This re-creates a hello.Rd help file in the man/ folder and populates the NAMESPACE with our functions
Configure Build Tools
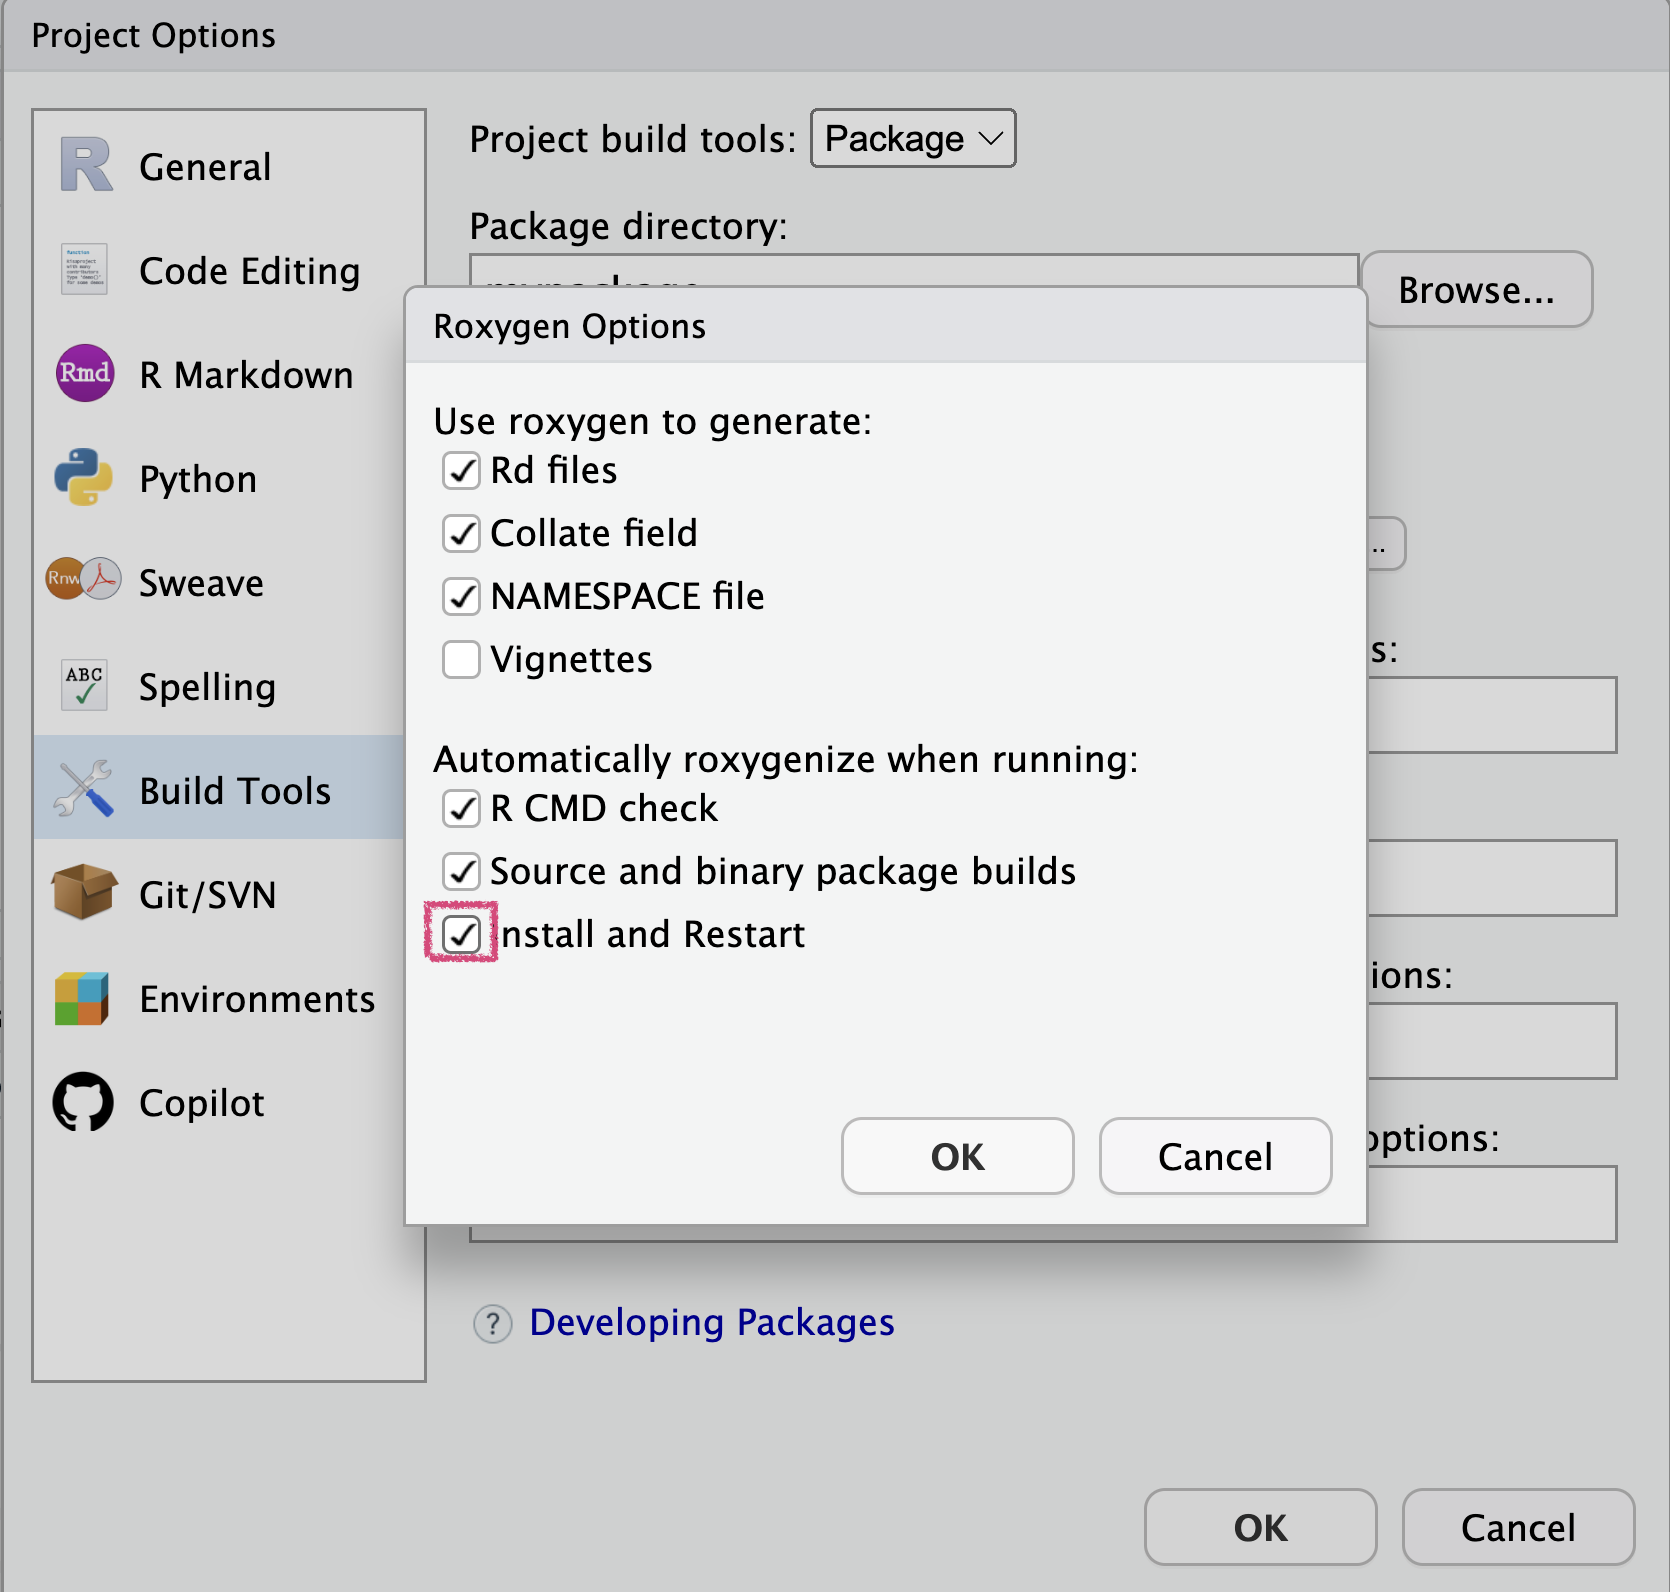
We can also configure our Build Tools to run devtools::document() every time we re-install the package.
To do so, we click on the Build > Configure Build Tools > Generate documentation with Roxygen > Configure… and then tick the Install and Restart box.
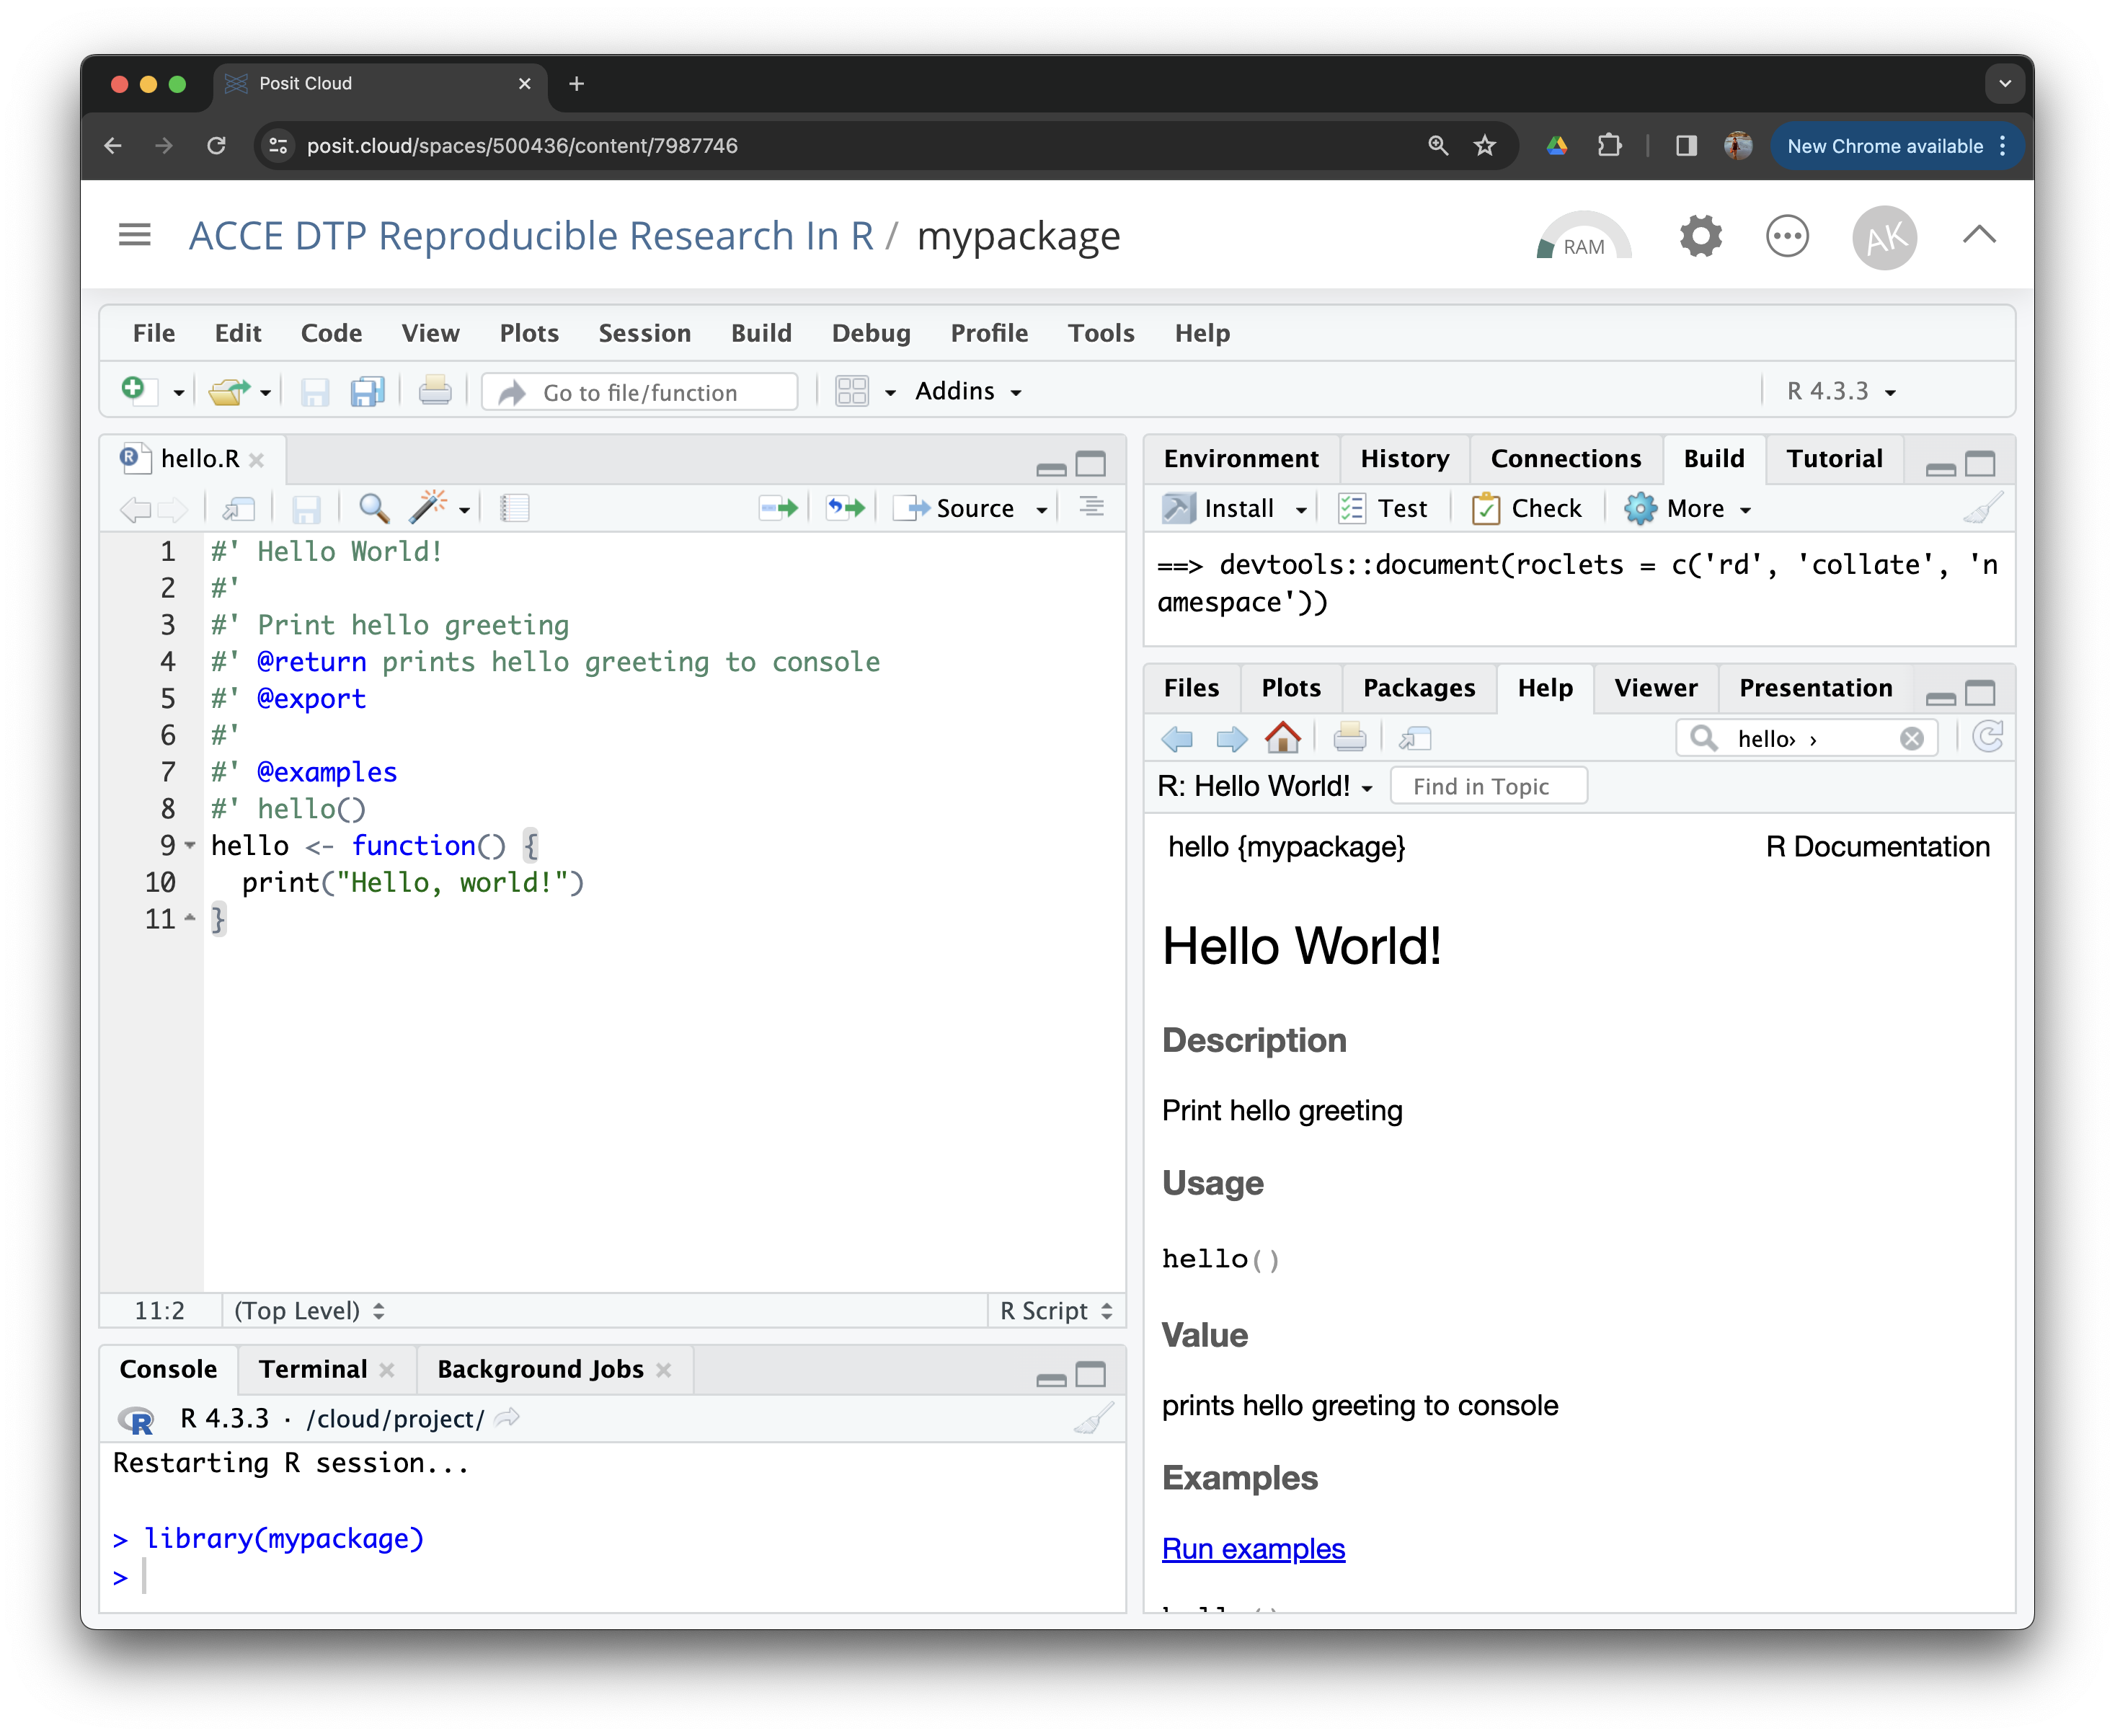
Now clicking Install in the Build panel will also build your docs in the man/ folder for you.
Now that the documentation has been built, the help file for our hello() function is now available!
🚦 Personalise function
Let’s go a step further and customise our function so that the greeting is from ourselves!
#' Hello World!#'#' Print hello greeting#' @return prints hello greeting to console from me#' @export#'#' @examples#' hello()hello<-function(){print("Hello, world from Anna")}
Add some fun!
Programming is most useful for having fun. So let’s make our function extra fun!
So let’s create a function that randomly chooses one of the animals available in cowsayto deliver the greeting, and also allow the user to customise who the recipient of the greeting is.
#' Hello World!#'#' Print personalised hello greeting from me.#'#' @param name character string. Your name!#'#' @return prints hello greeting to console#' @export#'#' @examples#' hello()#' hello("Lucy Elen")hello<-function(name=NULL){# create greetingif(is.null(name)){name<-"world"}greeting<-paste("Hello", name, "from Anna!")# randomly sample an animalanimal<-sample(cowsay::animals, 1)cowsay::say(greeting, by =animal)}
An important part of the package development process is R CMD check. R CMD check automatically checks your code and can automatically detects many common problems that we’d otherwise discover the hard way.
To check our package, we can:
use devtools::check()
press Ctrl/Cmd + Shift + E
click on the :check:Check tab in the Build panel.
This:
Ensures that the documentation is up-to-date by running devtools::document().
Both these run R CMD check which return three types of messages:
ERRORs: Severe problems that you should fix regardless of whether or not you’re submitting to CRAN.
WARNINGs: Likely problems that you must fix if you’re planning to submit to CRAN (and a good idea to look into even if you’re not).
NOTEs: Mild problems. If you are submitting to CRAN, you should strive to eliminate all NOTEs, even if they are false positives.
Let’s Check our package:
Click on the Check button (📋✅)
── R CMD check results ────────────────────────────── mypackage 0.0.0.9000  ────
Duration: 8.4s

❯ checking DESCRIPTION meta-information ... WARNING
  Non-standard license specification:
    What license is it under?
  Standardizable: FALSE

❯ checking dependencies in R code ... WARNING
  '::' or ':::' import not declared from: ‘cowsay’

0 errors ✔ | 2 warnings ✖ | 0 notes ✔
Error: R CMD check found WARNINGs
Execution halted

Exited with status 1.
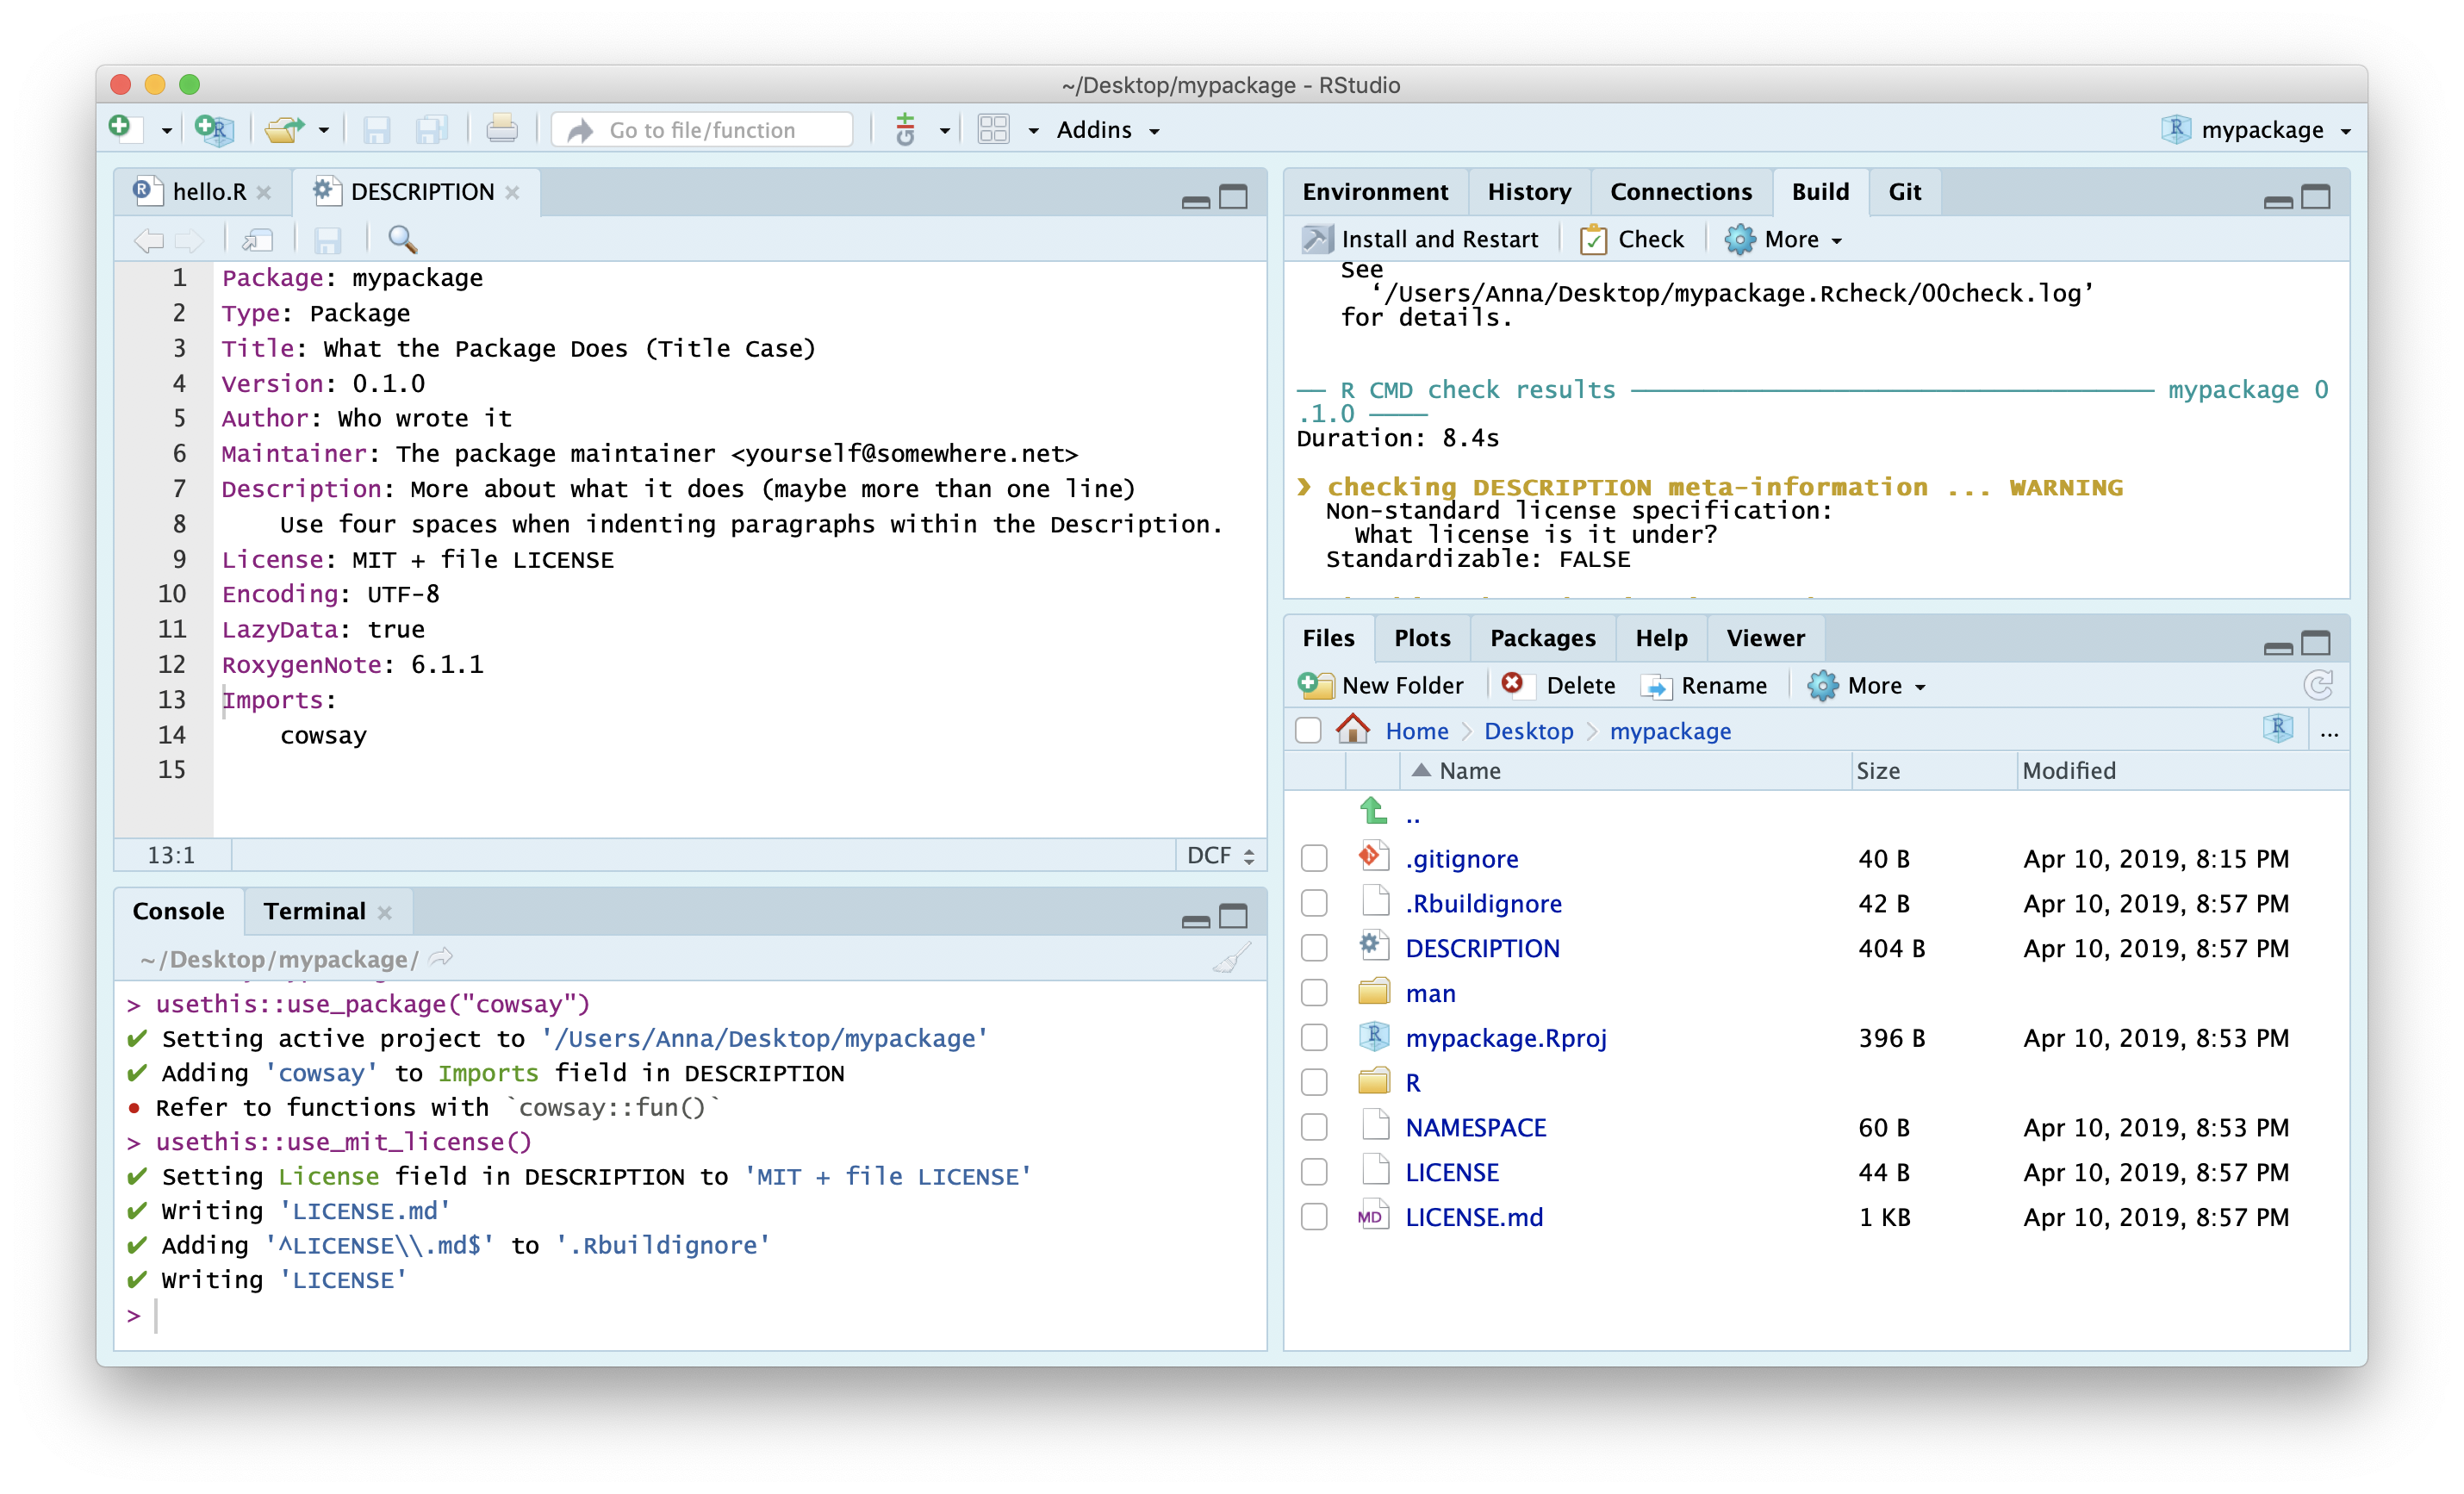
Aha, so our checks have thrown up some warnings! First, it’s telling us we haven’t added a LICENSE. It’s also telling us that we have a dependency (import) from package cowsay which we haven’t documented in the DESCRIPTION file. usethis to the rescue!
Testing is a vital part of package development. It ensures that our code does what you want it to do.
Once you’re set up with a testing framework, the workflow is simple:
Modify your code or tests.
Test your package with Ctrl/Cmd + Shift + T or devtools::test().
Repeat until all tests pass.
Create test file
To create a new test file (and the testing framework if required), use function usethis::use_test(). It’s good practice to name the test files after the .R files containing the functions being tested.
✔ Adding 'testthat' to Suggests field in DESCRIPTION✔ Adding '3' to Config/testthat/edition✔ Creating 'tests/testthat/'✔ Writing 'tests/testthat.R'✔ Writing 'tests/testthat/test-hello.R'• Modify 'tests/testthat/test-hello.R'
It also added testthat to the suggested packages in the DESCRIPTION file.
Suggests:
    testthat
That’s because you don’t need test that to run the functions in mypackage, but you do if you want to run the tests.
When the tests are run (either through running devtools::test(), clicking on More > Test Package in the Build panel or Cmd/Ctrl + Shift + T), the code in each test script in directory testthat is run.
test-hello.R
Let’s load the library so we can explore the testthat testing framework
Error:
! Test failed with 1 failure and 0 successes.
Write test
Let’s write a simple test to check that we are getting an expected output type.
One way to test the consistency of the output of a function, especially one that may output messages, warnings etc, like ours does, is to use expect_snapshot().
This function takes a snapshot of the output of a function and compares it to the snapshot the next time the test is run.
Now, because our functions has a random element to it (selecting a random animal), we need to set the seed to ensure that the output is consistent across runs.
Other common expect_* functions
expect_snapshot() is handy for functions whose full printed output we want to pin down. Most tests use more targeted expectations:
expect_equal(actual, expected) — checks two values are (approximately) equal; the workhorse for numeric and data-frame comparisons.
expect_identical(actual, expected) — stricter than expect_equal(); requires the same type as well as the same value.
expect_type(x, "character") — checks the base type of an object ("double", "character", "list", …).
expect_error(code, "regex") — checks that code throws an error matching the pattern; paired companion expect_warning() for warnings.
The first time we run our tests, testthat will create a snapshot of the output of our function and warns us of that. The next time we run the tests, it will compare the output of the function to the snapshot and let us know if it has changed.
If you run your tests twice you should have success!
==> devtools::test()

ℹ Testing mypackage
✔ | F W  S  OK | Context
✔ |          2 | hello

══ Results ═══════════════════════════════════════
[ FAIL 0 | WARN 0 | SKIP 0 | PASS 2 ]
Commit with message: Add hello() function, tests and license
🚦 Create README
The final document you will need for your package is a README.
✔ Setting active project to '/cloud/project'
✔ Writing 'README.Rmd'
✔ Adding '^README\\.Rmd$' to '.Rbuildignore'
• Modify 'README.Rmd'
• Update 'README.Rmd' to include installation instructions.
✔ Writing '.git/hooks/pre-commit'
.Rmd documents are the predecessors to Quarto documents and allow us to run R code in our GitHub README.
Because it’s an .Rmd but GitHub can only display an md document as it’s landing page, this is a special .Rmd that renders to a markdown document rather than html.
The function adds a check to .git to ensure you commit an up to date version on the md when you commit changes to the .Rmd.
Important elements of a README to include:
Installation instructions: In our case we will be distributing our package via GitHub, so we will include instructions on how to install the package from GitHub using remotes::install_github("<yourgithubusername>/mypackage").
Description: A brief description of what the package does.
Examples: A few simple examples of how to use the package.
Complete the README. Here’s what mine looks like:
---output: github_document---<!-- README.md is generated from README.Rmd. Please edit that file --># mypackage<!-- badges: start --><!-- badges: end -->The goal of mypackage is to print a personalised greeting from me!## InstallationYou can install the development version of mypackage from GitHub with:``` r# install.packages("remotes")remotes::install_github("annakrystalli/mypackage")```## ExampleThis is a basic example which shows you how to print a generic greeting:```{r example}library(mypackage)## basic example codehello()```This is a basic example which shows you how to print a personalised greeting:```{r}hello(name = "Lucy Elen")```
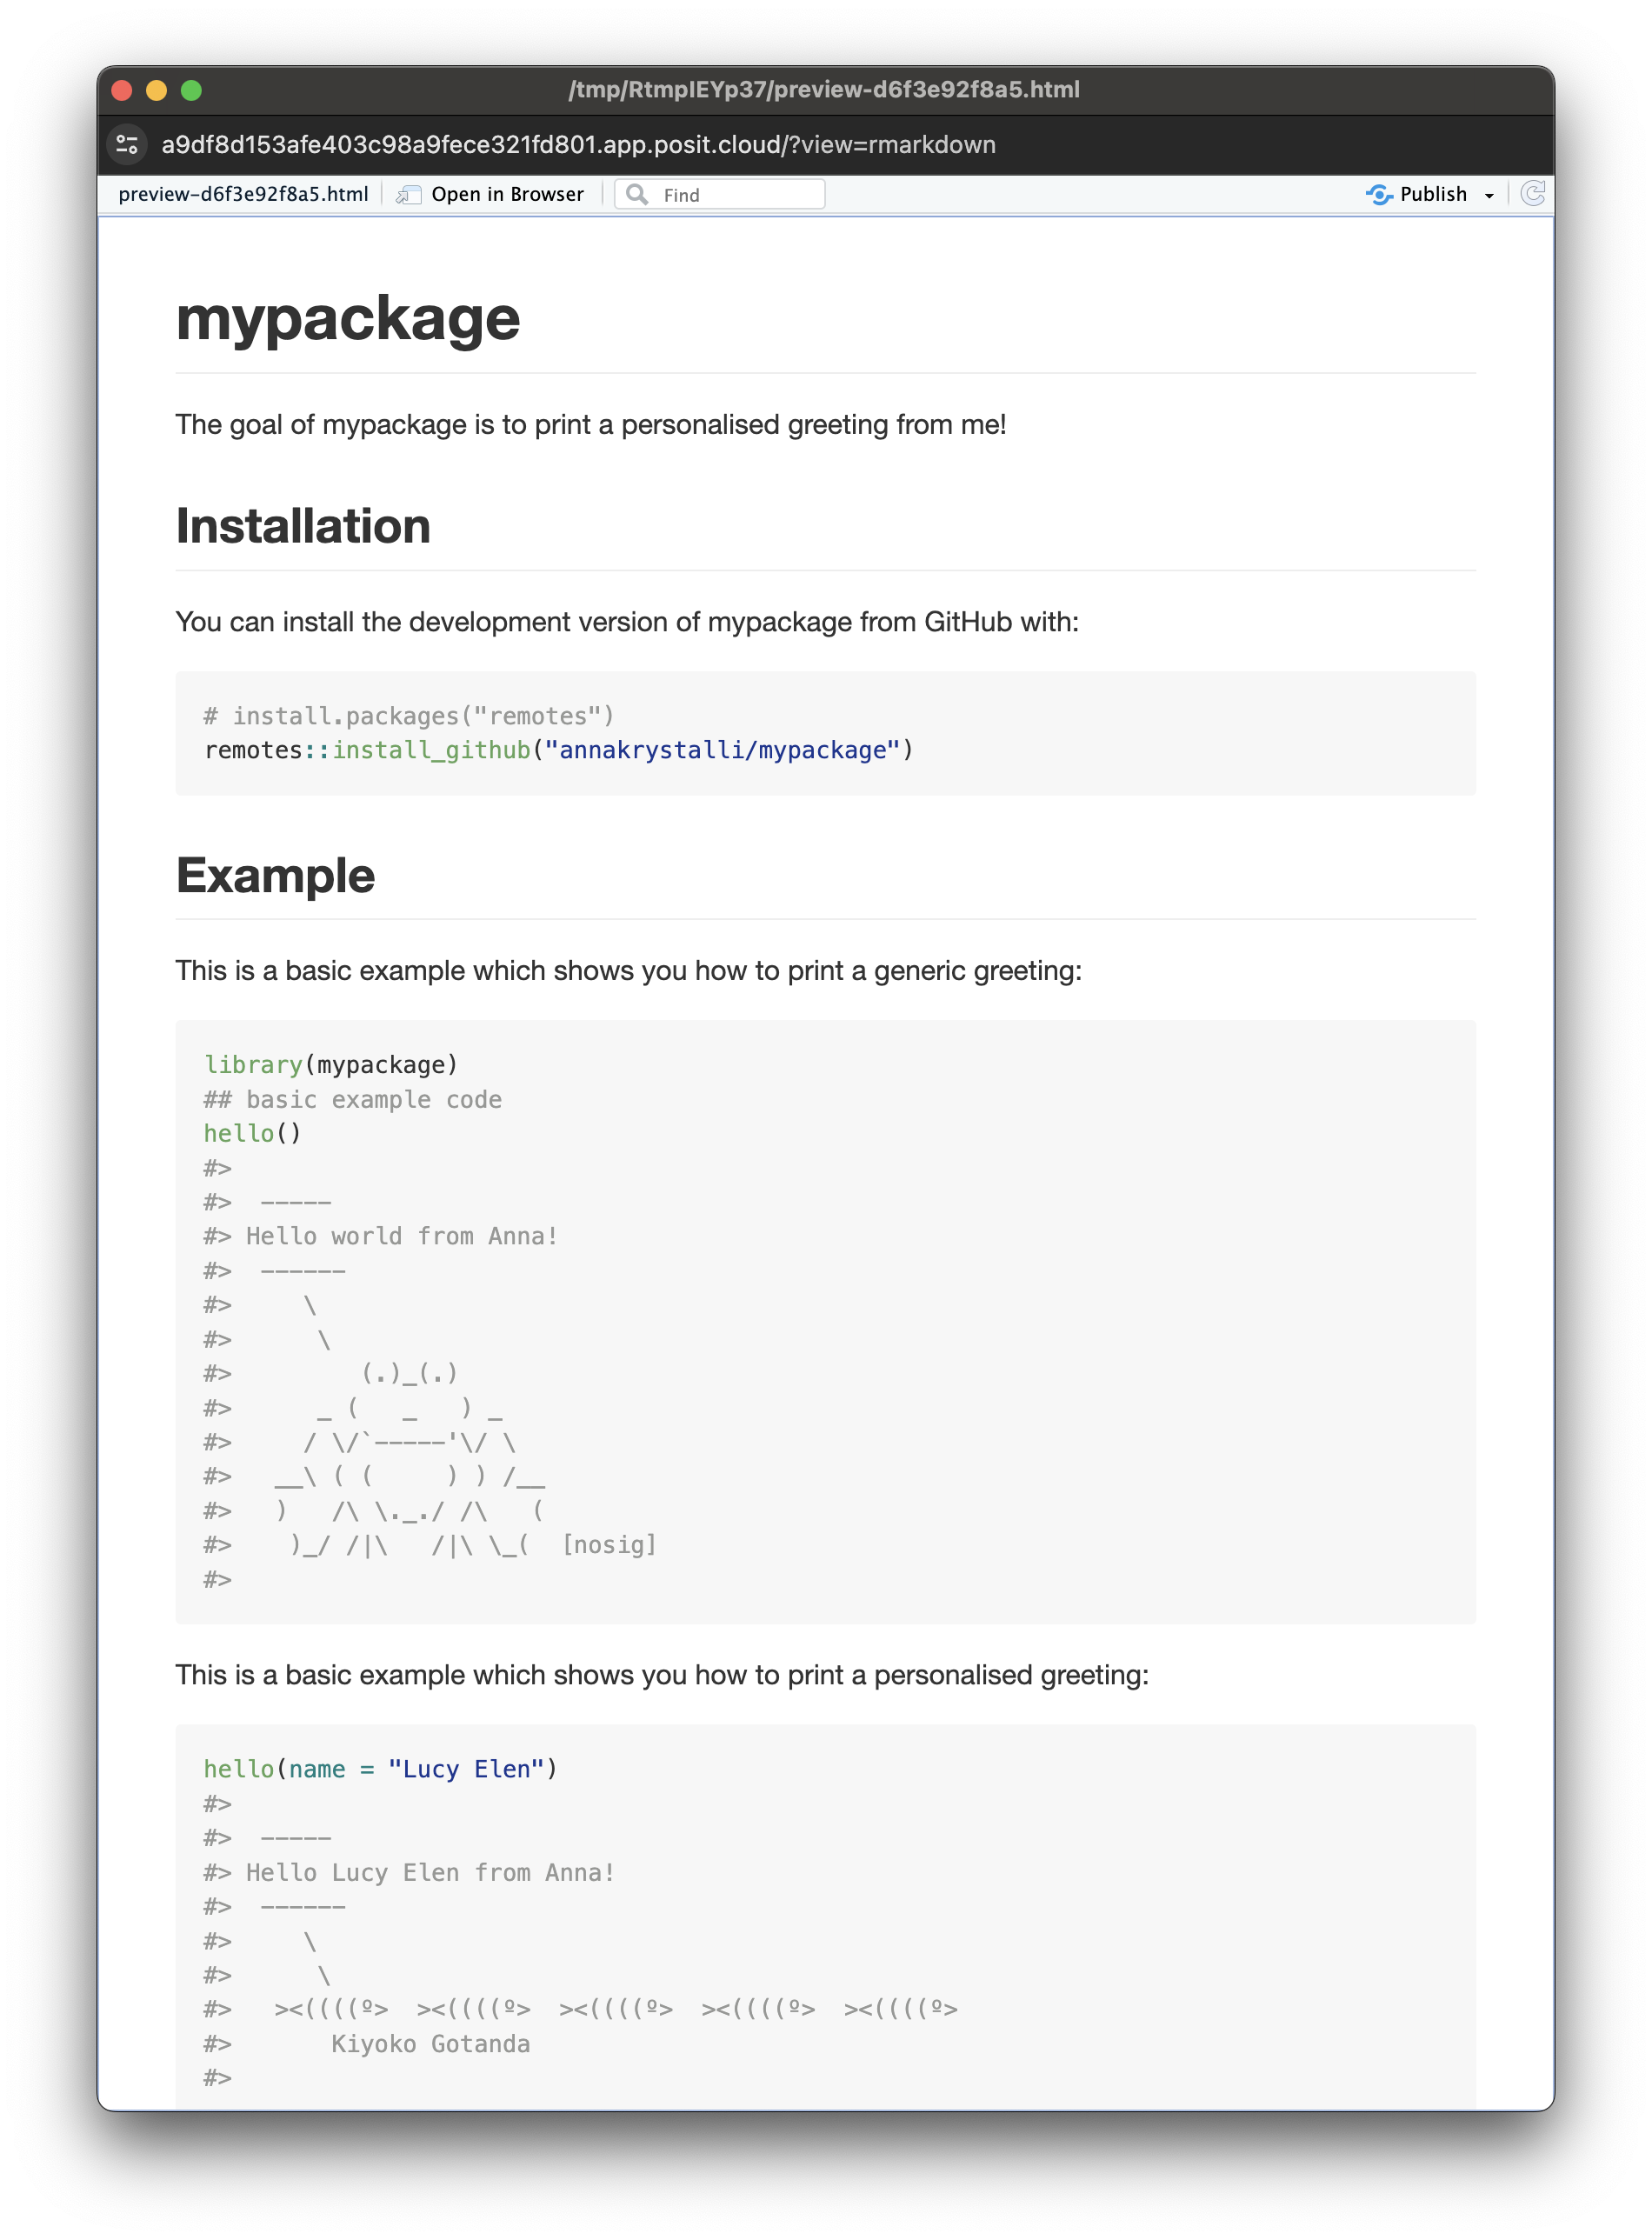
and renders to the following when Knit
🚦 Complete package metadata
Let’s head to the DESCRIPTION file and complete the details.
Authors
First let’s complete the authors.
Remove the current author and maintainer lines and replace it with the following line:
Authors@R: person("First", "Last", email = "first.last@example.com", role = c("aut", "cre"))
completed with your own details
Add a title and description
Complete the title and description fields with appropriate details.
If you want to form a paragraph of text, make sure do indent the hanging lines by 4 spaces (one tab). And make sure that your Description field ends in a full-stop.
Add a date
Use today’s date in ISO format, ie 2026-05-01. This will populate a citation entry for us.
Completed DESCRIPTION
The complete DESCRIPTION file should look something like this:
Package: mypackage
Title: Customised greetings from me!
Version: 0.0.0.9000
Authors@R: person("Anna", "Krystalli",
  email = "annakrystalli@googlemail.com",
  role = c("aut", "cre"))
Description: Prints a customised greeting from myself,
  delivered by a friend.
License: MIT + file LICENSE
Encoding: UTF-8
Roxygen: list(markdown = TRUE)
RoxygenNote: 7.3.3
Imports:
    cowsay
Suggests:
    testthat (>= 3.0.0)
Config/testthat/edition: 3
Date: 2026-05-01
Check your package. If all is good, document, install and restart!
To cite package ‘mypackage’ in publications use:

  Krystalli A (2024). _mypackage: Customised
  greetings from me!_. R package version 0.0.0.9000.

A BibTeX entry for LaTeX users is

  @Manual{,
    title = {mypackage: Customised greetings from me!},
    author = {Anna Krystalli},
    year = {2024},
    note = {R package version 0.0.0.9000},
  }
Commit with message: Add README and complete package metadata
Setup Continuous Integration with GitHub Actions
Continuous Integration Background
Continuous integration (CI) is the practice of automating the integration of code changes from multiple contributors into a single software project. Automated tools are used to assert the new code’s correctness before integration. In our case this is what are tests are for. And GitHub Actions allows us to do this all within GitHub!
Once the appropriate CI workflow is set up, it will automatically run our tests for us every time we push new code to GitHub or when a new pull request is made. This way we can (try to) ensure we don’t merge new code into our code base that introduces bugs (causing our tests to fail).
Obviously, our ability to screen for breaking changes is only as good as our tests! But at least we can get GitHub to run our tests for us!
So far we’ve been running R CMD check and our tests manually. Let’s automate this so they run every time we push, and crucially, before we merge our branch into main.
Setup R CMD CHECK GitHub Action
To run CI workflows through GitHub Actions, we specify the actions or jobs we want the CI system in a .yaml file that lives in .github/workflows/ folder in the root of our package/project.
This can be quite complicated for complex projects as you have to effectively specify instructions for GitHub to recreate a computational environment to run the tests in. The .yaml format can also be fiddly, with indents having special meaning.
However for a standard R project like ours, there is a usethis functions that can create and appropriate .yaml for us that works right out of the box!
Make sure you’re still on the add-hello branch, and run:
✔ Creating '.github/'.
✔ Adding "^\\.github$" to '.Rbuildignore'.
✔ Adding "*.html" to '.github/.gitignore'.
✔ Creating '.github/workflows/'.
✔ Saving "r-lib/actions/examples/check-release.yaml@v2" to
'.github/workflows/R-CMD-check.yaml'.
☐ Learn more at <https://github.com/r-lib/actions/blob/v2/examples/README.md>.
☐ Copy and paste the following lines into README.md:
<!-- badges: start -->
[](https://github.com/annakrystalli/mypackage/actions/workflows/R-CMD-check.yaml)
<!-- badges: end -->
[Copied to clipboard]
It installs latest release R version on linux and runs R CMD check via the rcmdcheck package.
Tip
If this is the first time you have used CI for a project this is probably what you want to use. Once you get a hang of CI workflows or if you want to follow more formal procedures for checking your package against multiple versions of R and different operating systems, you can look at more complex workflows like "check-standard".
Paste the badge copied to the clipboard into the README.Rmd file in the root of your project. This will display the status of the workflow in your README.
Re-knit README.Rmd to include GitHub Actions badge.
Commit the whole .github folder as well as README.Rmd & README.md
Commit with message: Add R-CMD-check GitHub Action
🚦 Push the branch and open a Pull Request
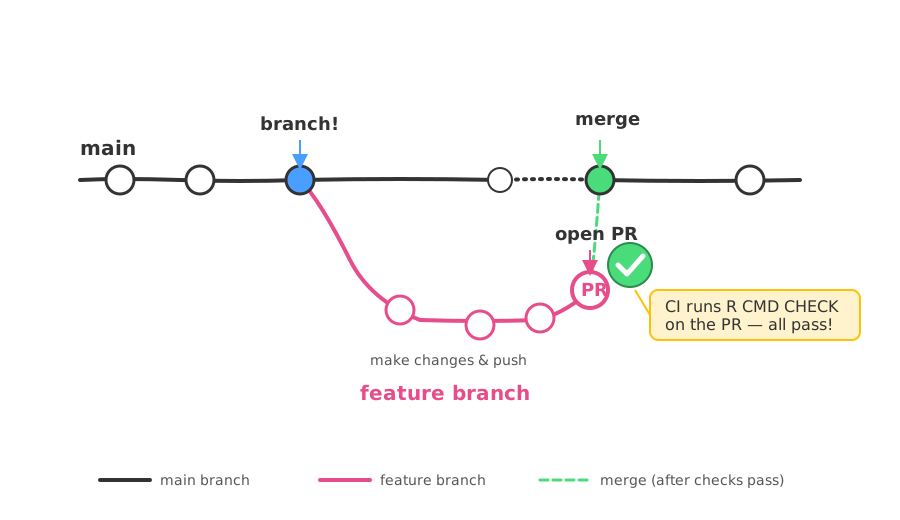
Now that we have all our function work committed on add-hello, it’s time to push the branch to GitHub and open a Pull Request to merge it into main.
A Pull Request (PR) is a request to merge the changes on one branch into another: in our case, add-hello into main. It’s also where CI runs against the proposed changes before we merge, so we can catch problems before they land on main.
Push the branch to GitHub
In the RStudio Git pane, click Push to push the add-hello branch to GitHub. (You’ll need your GitHub PAT again.)
Open a Pull Request
Head to your repo on GitHub. You should see a prompt to open a Pull Request from the branch you just pushed. Click Compare & pull request, then Create pull request.
Watch CI run on the PR
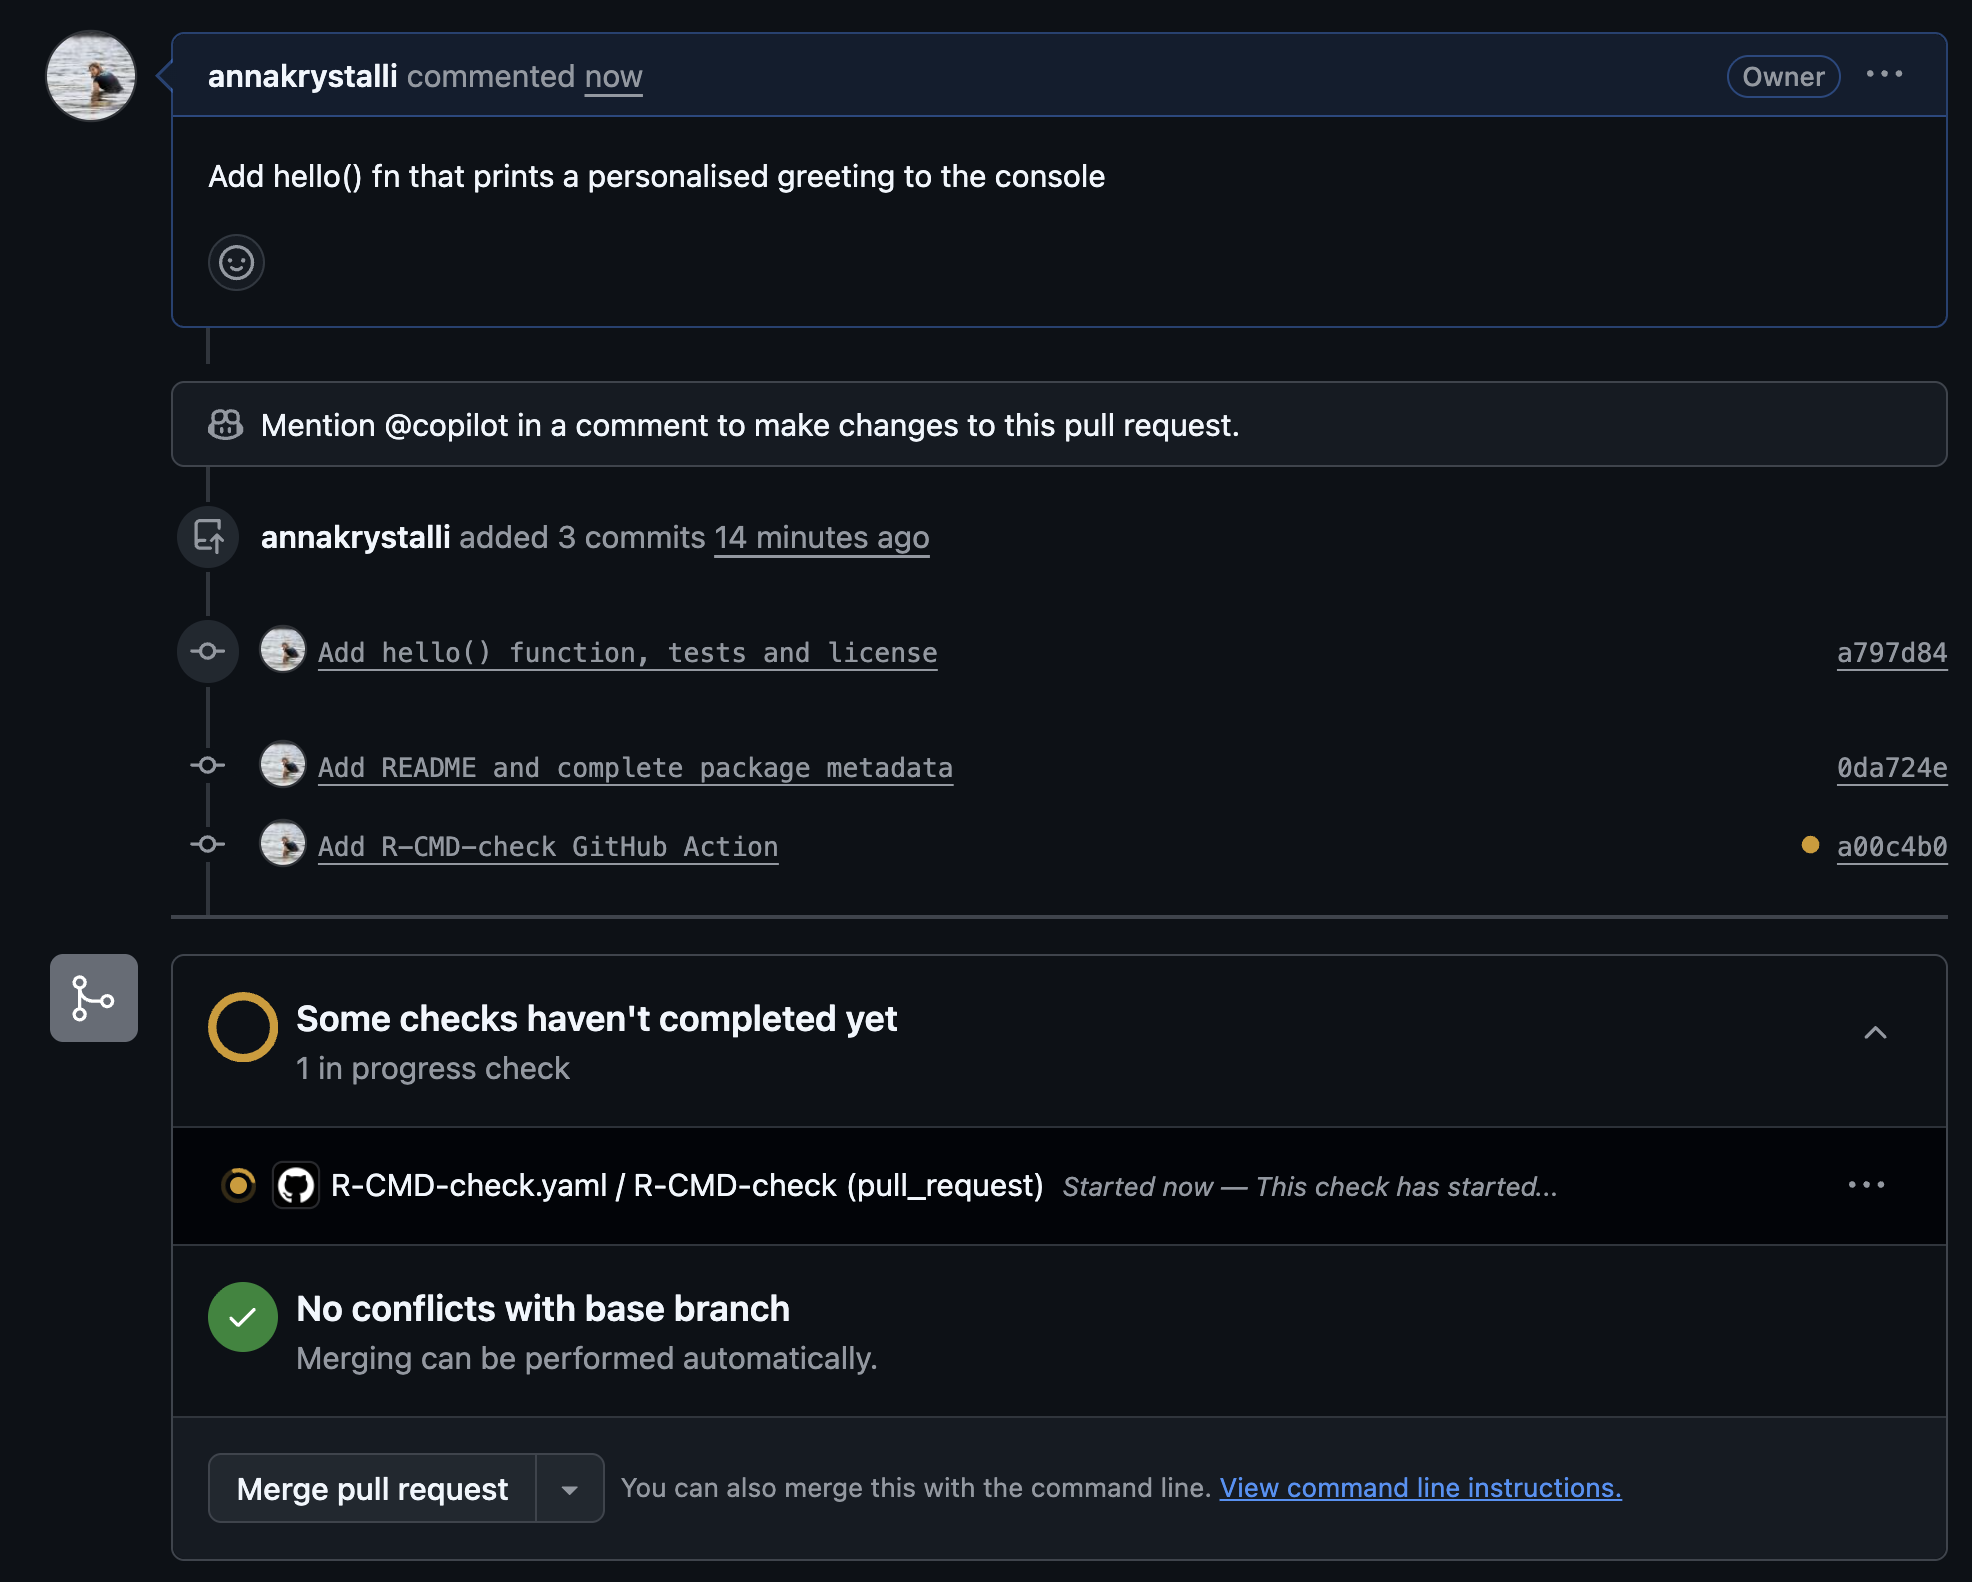
As soon as the PR is open, the R-CMD-check GitHub Action kicks in and runs our checks against the proposed changes. You can watch it directly from the PR conversation page: it starts as a yellow pending circle…
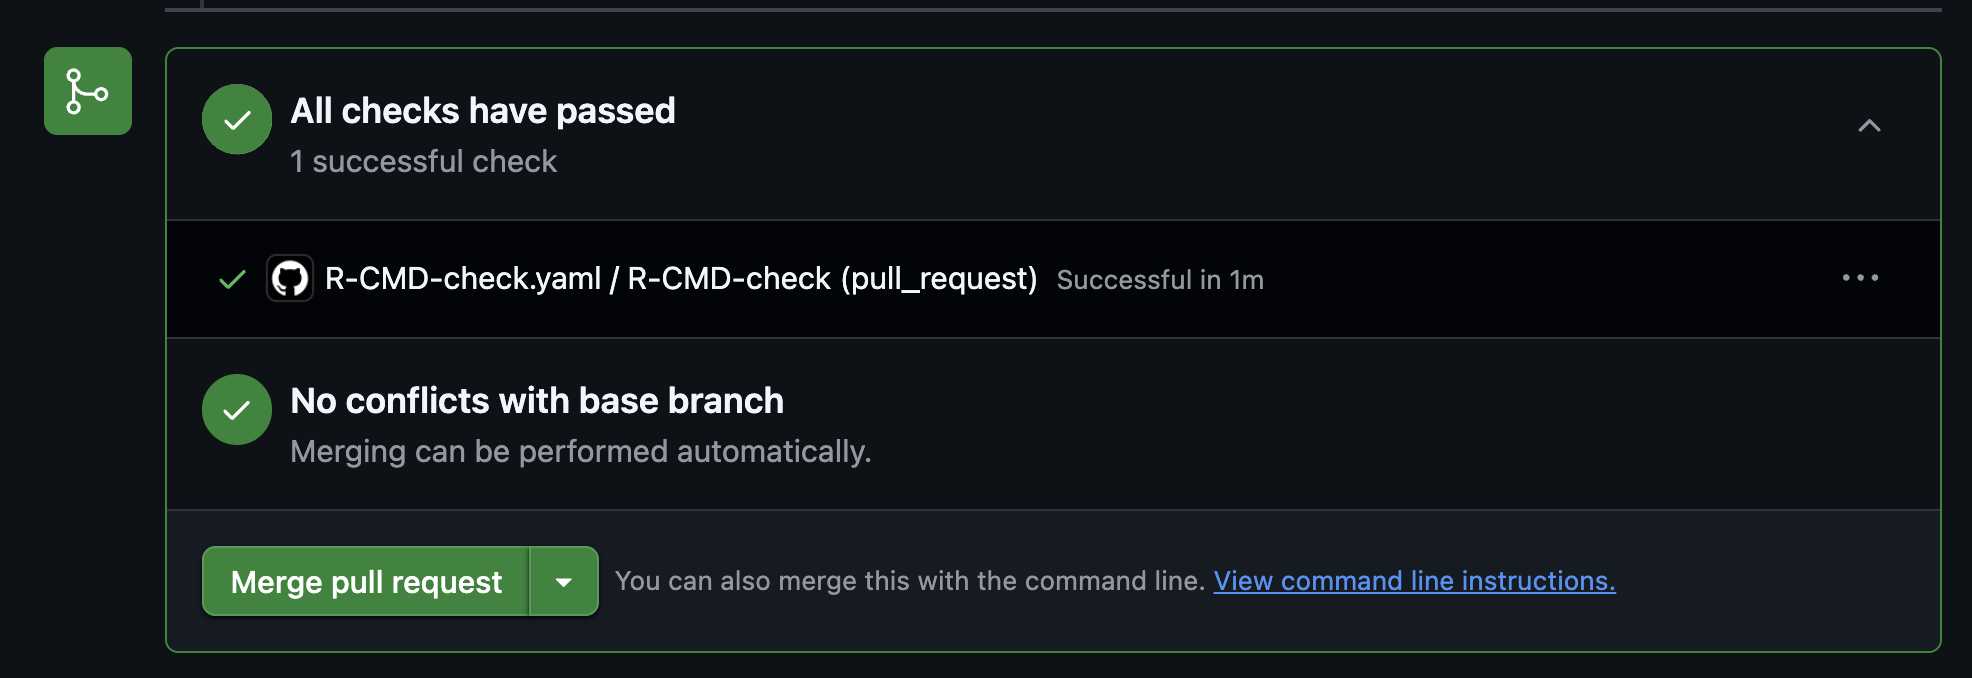
…and turns into a green check when it passes. The badge in our README will also update to reflect the latest run.
Inspect the run in the Actions tab
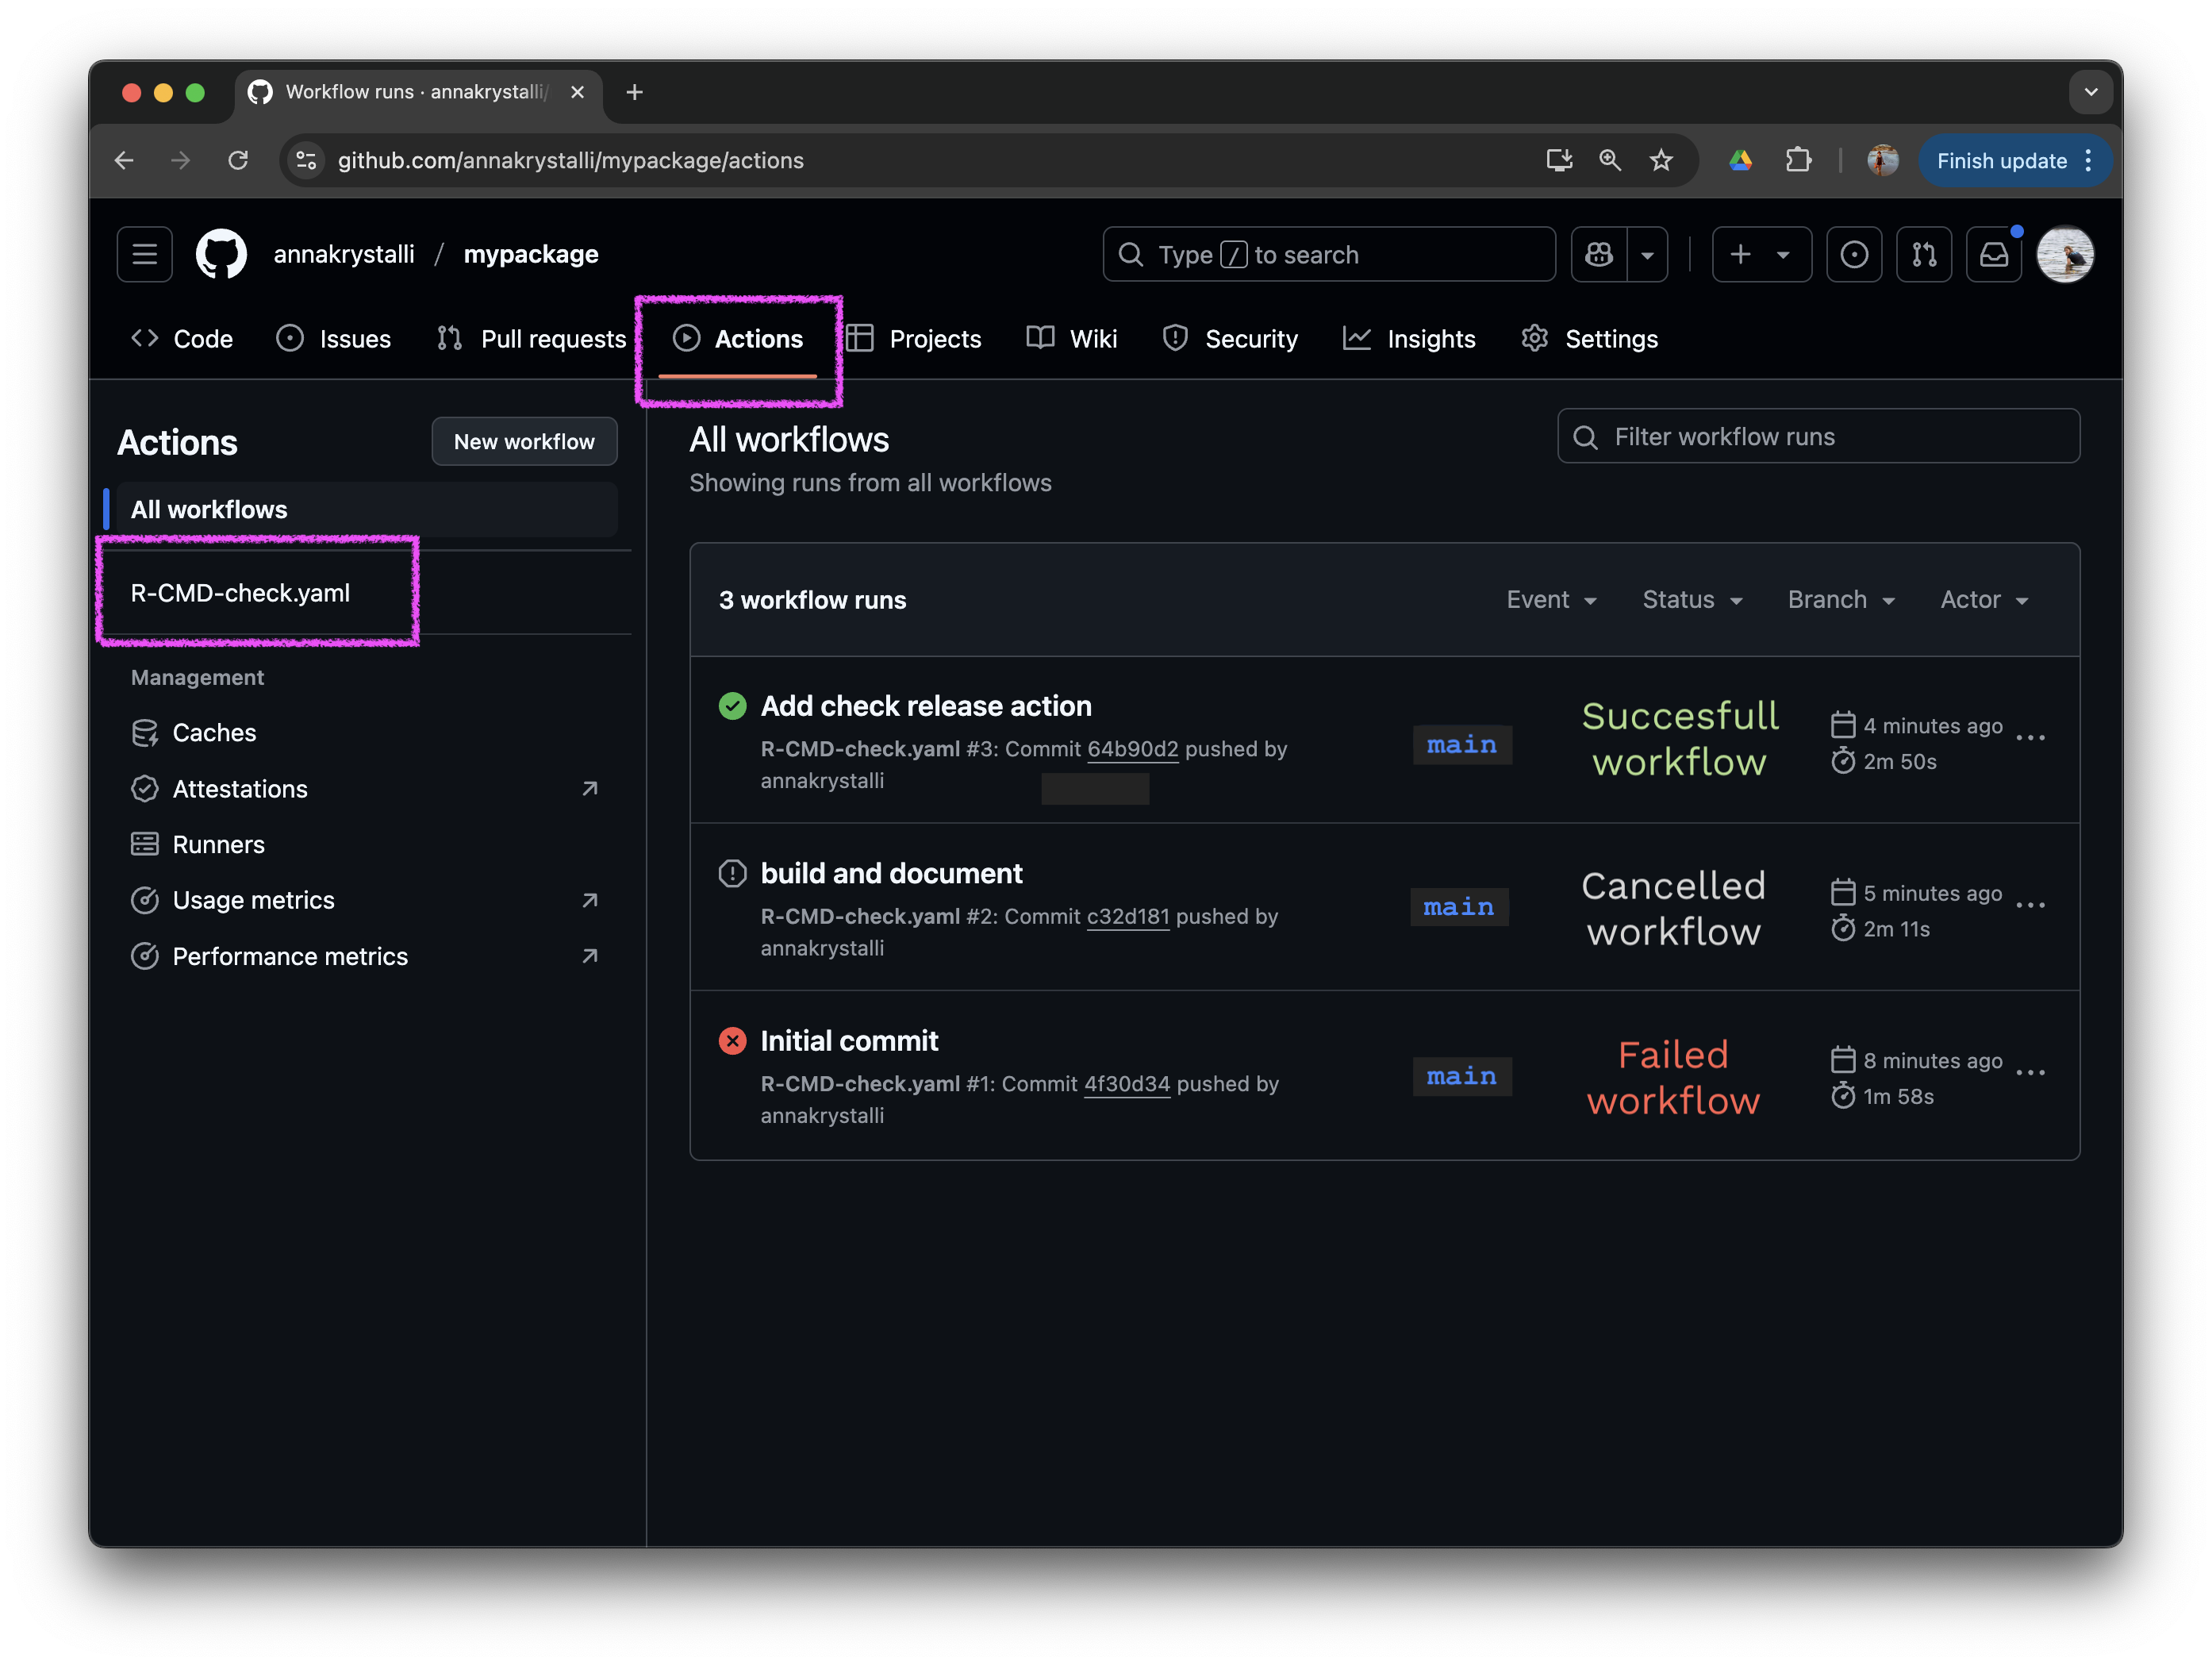
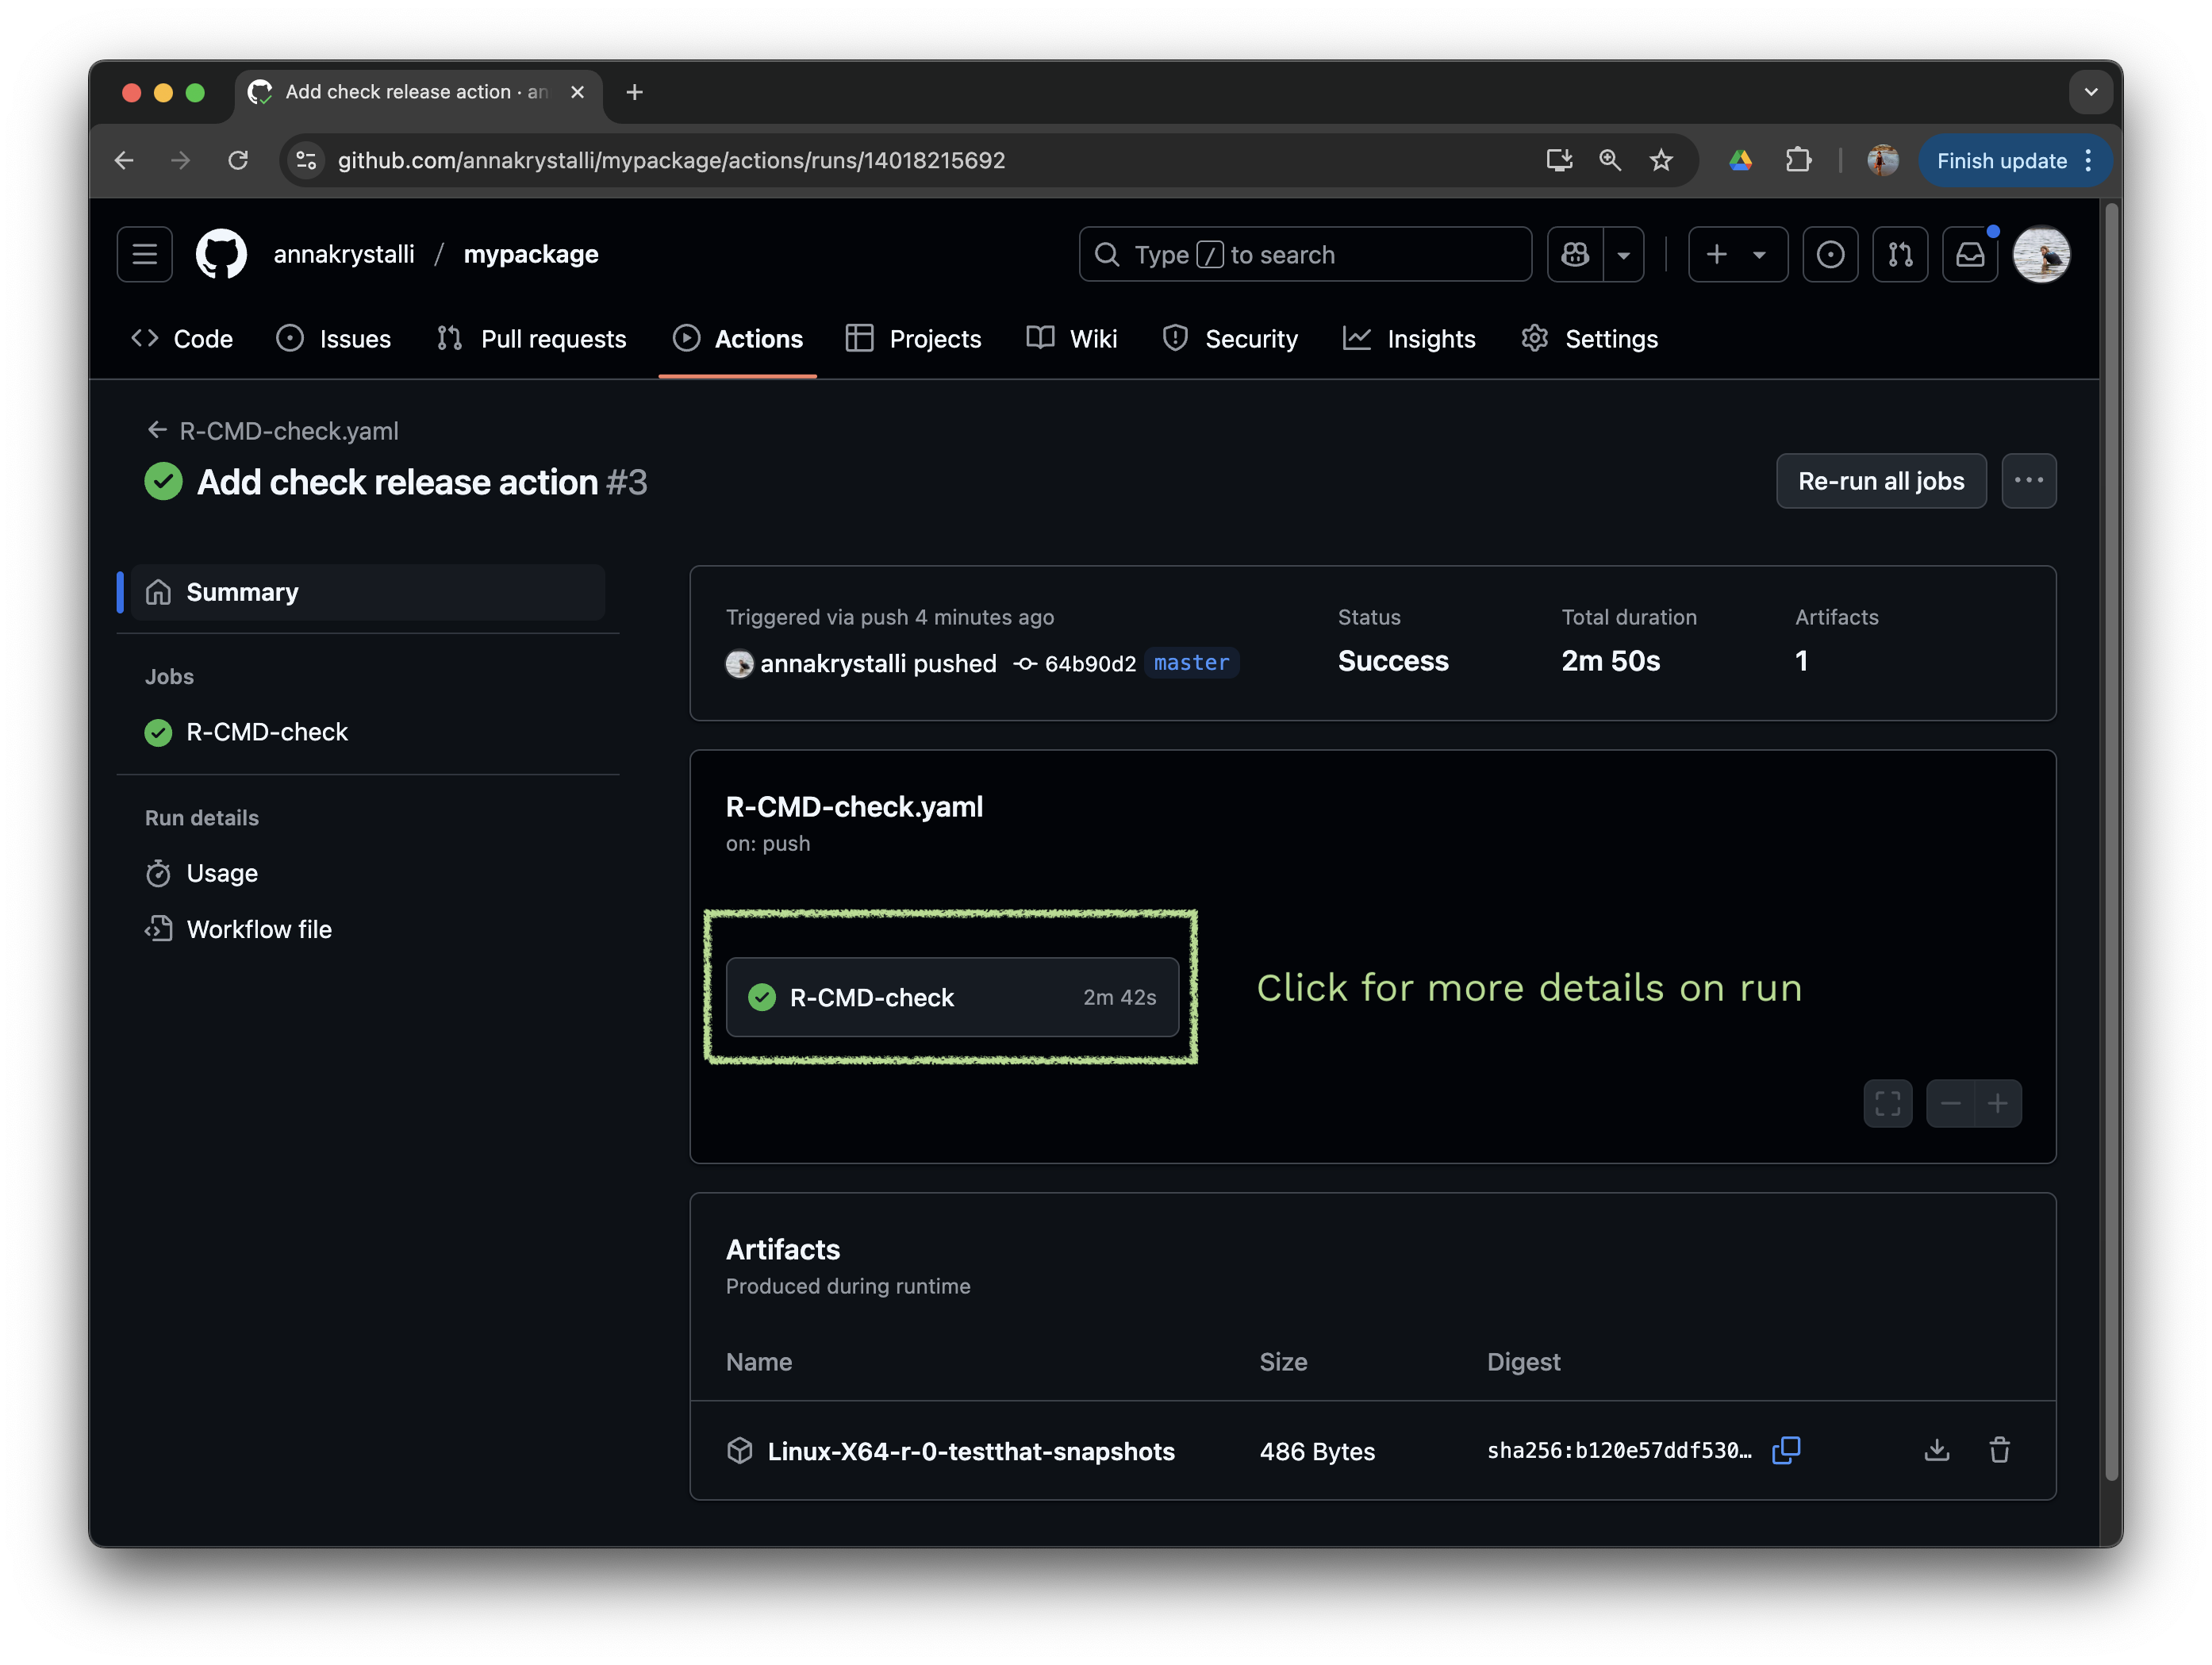
For the full details of what ran, head to the Actions tab on your repo. You’ll see all your workflow runs listed there, with status (success, cancelled, failed) for each.
Click into a specific run for the per-job summary.
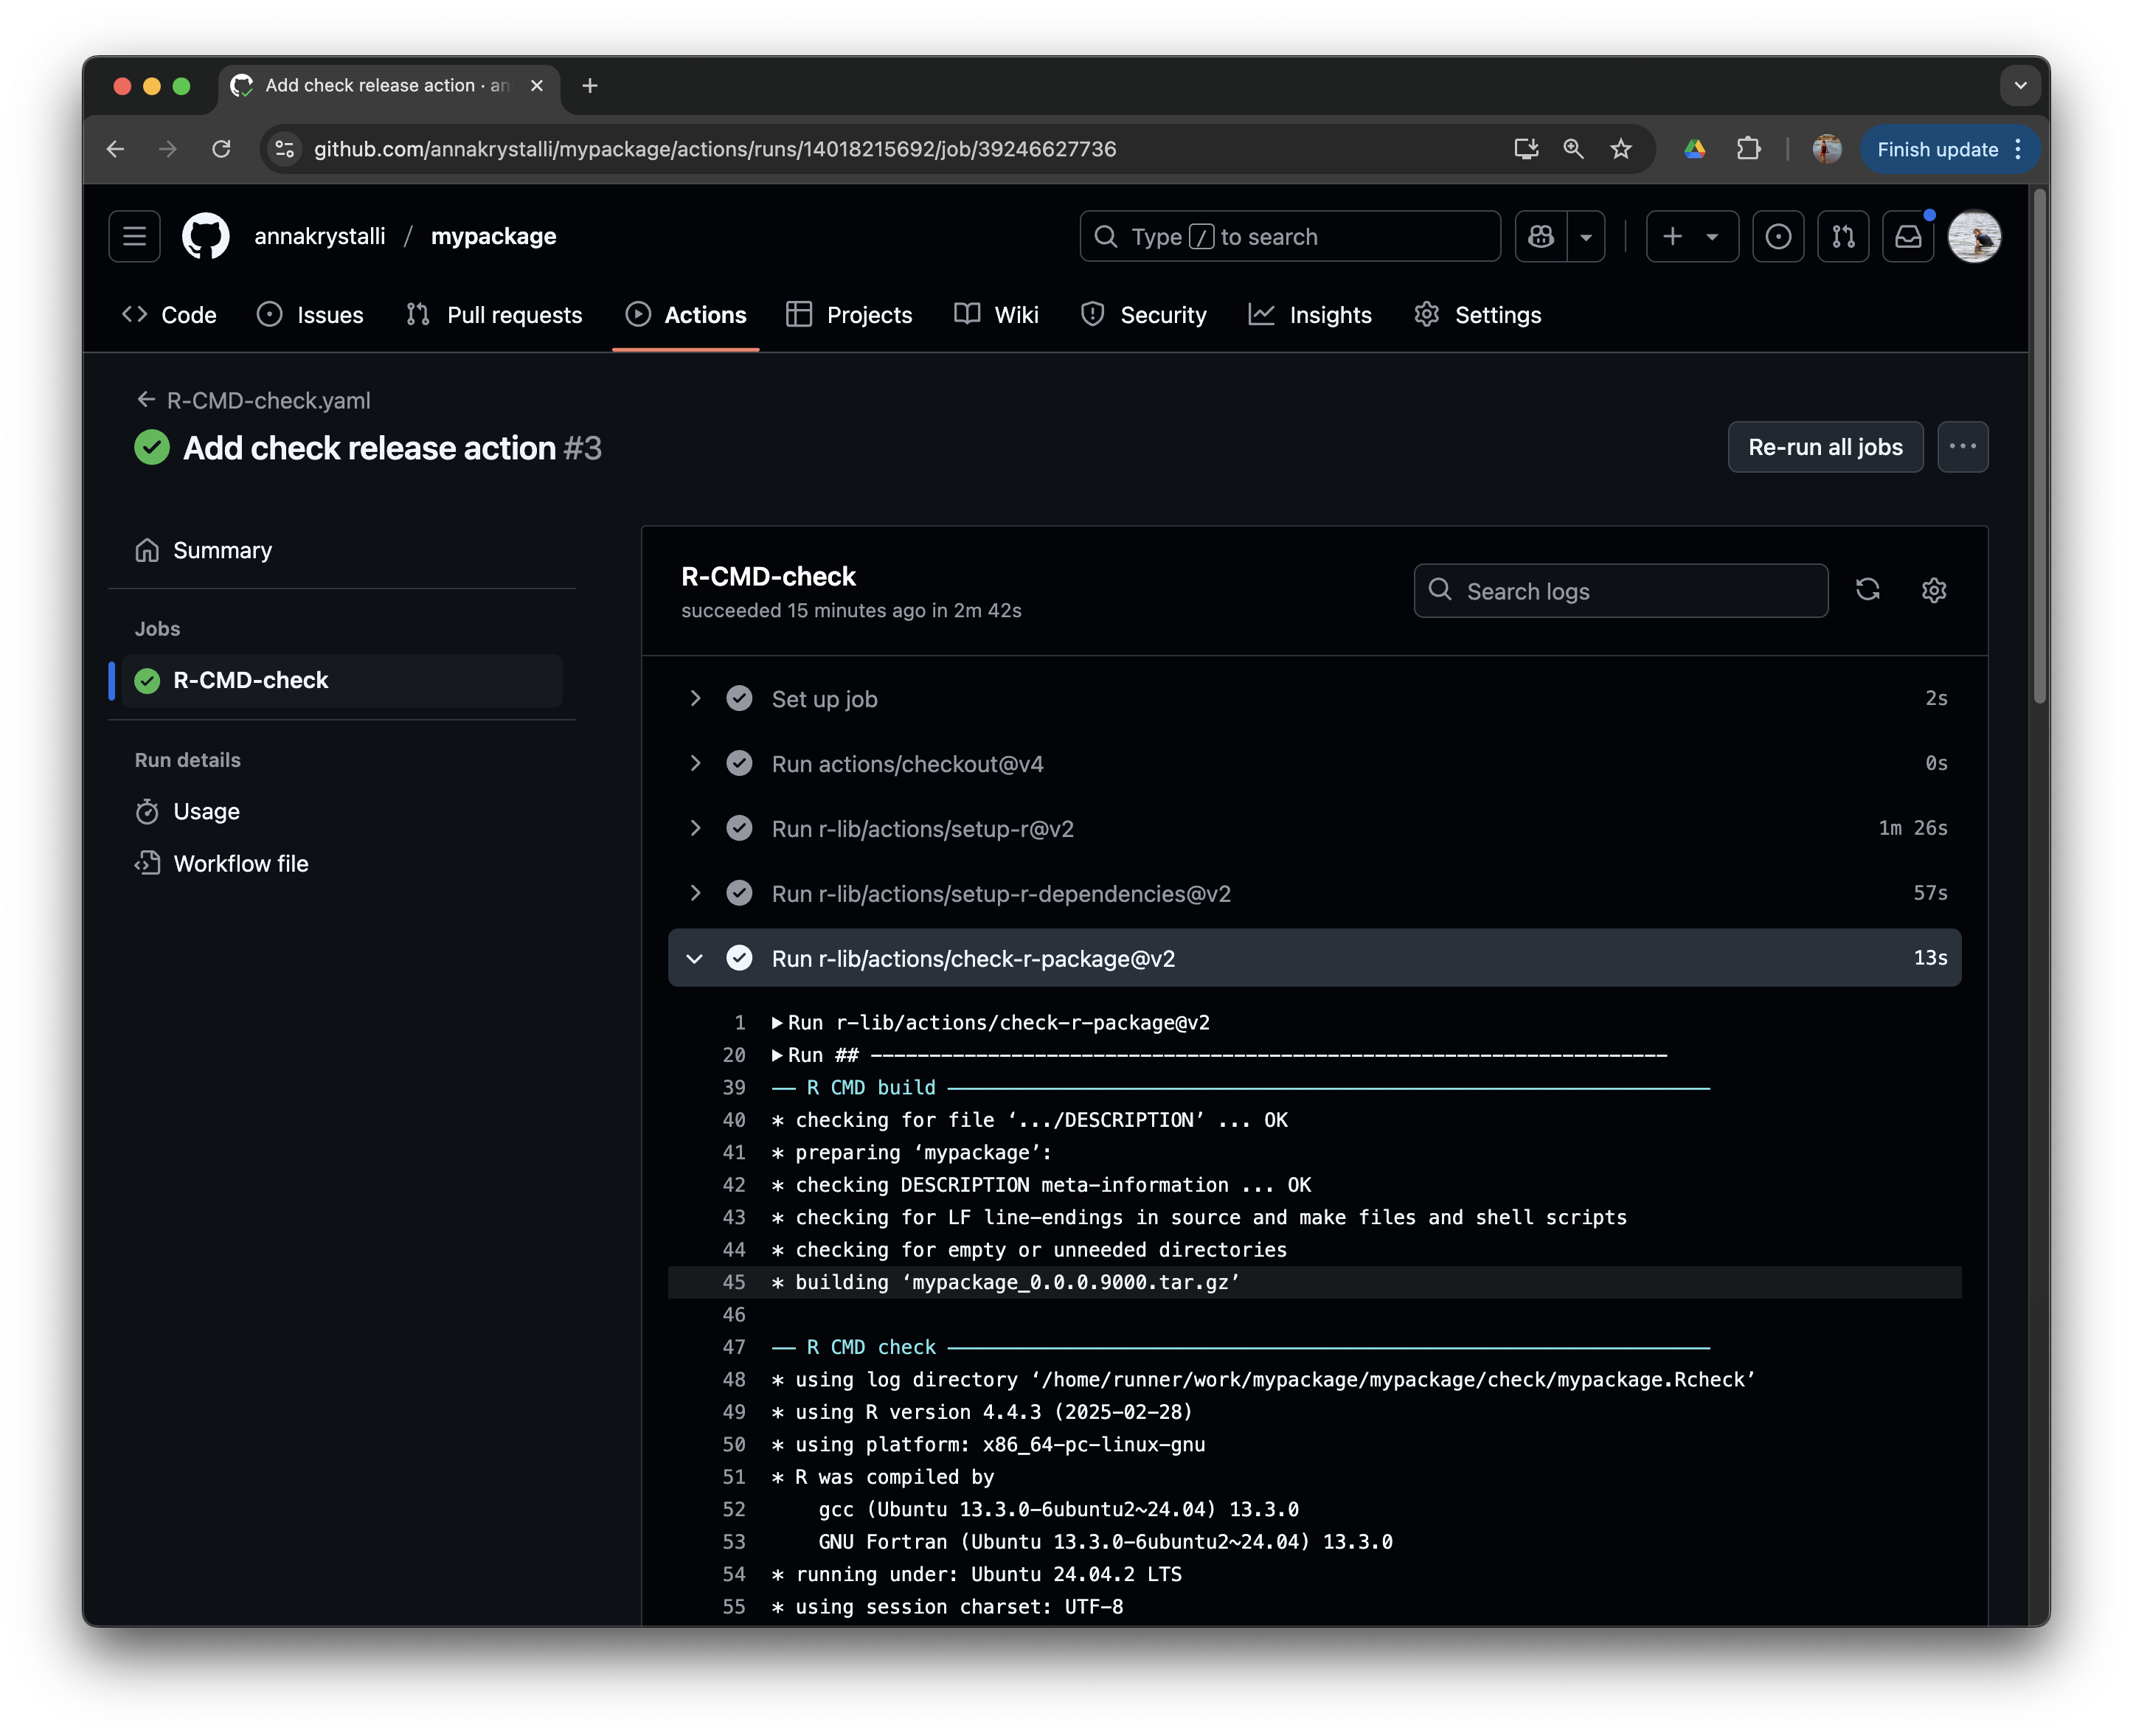
Drill further into a job to inspect the logs. This is where you go when something fails to see exactly which step broke and why.
The key idea: CI ran on the PR, before we merged to main. If something had been broken, we’d catch it here rather than on main.
Merge the Pull Request
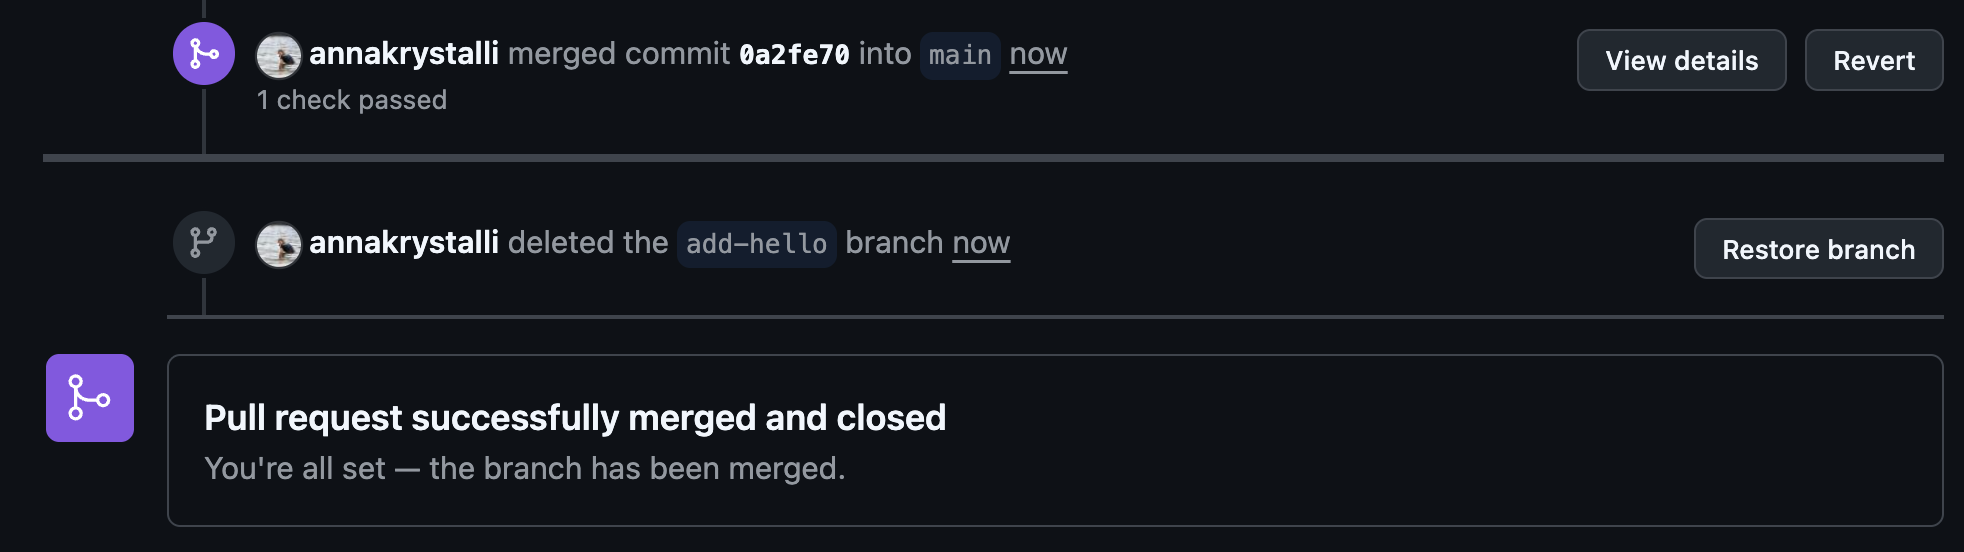
Once the checks are green, click the Merge pull request button on GitHub to merge add-hello into main. GitHub will confirm the merge and offer to delete the now-merged branch.
Pull main locally
Now switch back to main locally and pull the merged changes down.
In the RStudio Git pane, open the branch dropdown (top-right of the pane) and select main to switch back from add-hello. Once you’re on main, click Pull in the Git pane to fetch and merge the latest changes from origin/main.
If you prefer the Terminal, the equivalent is:
Terminal
git checkout maingit pull
You’re now back on main with all your function work integrated, and your CI workflow in place for any future changes.
Share your package
Now anyone can install your package from GitHub using, eg:
Visit someone else’s package repo, follow the instructions to install, load it and receive a personalised greeting from the author!
🚦 Create documentation site
While the README is a great first step for documenting your package, there is an easy way to create a full website which makes the documentation of each exported function avaliable online and where you could include additional, more detailed vignettes.
You can use package pkgdown to create an online site for your documentation. It effectively recycles the documentation you have already created for your functions, information in your README and DESCRIPTION file and presents it in a standardised website form.
✔ Setting active project to "/cloud/project".
✔ Adding "^_pkgdown\\.yml$", "^docs$", and "^pkgdown$" to '.Rbuildignore'.
✔ Adding "docs" to '.gitignore'.
✔ Writing '_pkgdown.yml'.
☐ Edit '_pkgdown.yml'.
And now let’s build it the site.
pkgdown::build_site()
── Installing package mypackage into temporary library ─────────────────────────
── Initialising site ───────────────────────────────────────────────────────────
Copying <pkgdown>/BS5/assets/katex-auto.js to katex-auto.js
Copying <pkgdown>/BS5/assets/lightswitch.js to lightswitch.js
Copying <pkgdown>/BS5/assets/link.svg to link.svg
Copying <pkgdown>/BS5/assets/pkgdown.js to pkgdown.js
Updating deps/bootstrap-5.3.1/bootstrap.bundle.min.js
Updating deps/bootstrap-5.3.1/bootstrap.min.css
Updating deps/font-awesome-6.5.2/css/all.min.css
── Building pkgdown site for package mypackage ─────────────────────────────────
Reading from: /cloud/project
Writing to: /cloud/project/docs
── Sitrep ──────────────────────────────────────────────────────────────────────
✖ URLs not ok.
  In _pkgdown.yml, url is missing.
  See details in `vignette(pkgdown::metadata)`.
✔ Favicons ok.
✔ Open graph metadata ok.
✔ Articles metadata ok.
✔ Reference metadata ok.
── Initialising site ───────────────────────────────────────────────────────────
── Building home ───────────────────────────────────────────────────────────────
Writing `authors.html`
Reading LICENSE.md
Writing `LICENSE.html`
Writing `LICENSE-text.html`
Reading README.md
Writing `index.html`
Writing `404.html`
── Building function reference ─────────────────────────────────────────────────
Writing `reference/index.html`
Reading man/hello.Rd
Writing `reference/hello.html`
── Building sitemap ────────────────────────────────────────────────────────────
Writing `sitemap.xml`
── Building docs for llms ──────────────────────────────────────────────────────
── Building search index ───────────────────────────────────────────────────────
── Checking for problems ───────────────────────────────────────────────────────
── Finished building pkgdown site for package mypackage ────────────────────────
This creates html documentation for our package in the docs/ folder and presents you with a preview to the site.
Caution
Note the Preview might be blocked in Posit Cloud and when you click to allow a pop might still look a bit wonky!
Now, you could push this docs/ folder to GitHub and serve through GitHub Pages, but you would need to rebuild, commit and push these docs any time there was a change in the package documentation.
Instead what we could do is get our CI system (GitHub Actions) to build our docs for us automatically every time there is a push or pull request to our repository!! So let’s try this approach!
Indeed that’s what the usethis::use_pkgdown() workflow expects so has already told git to ignore local copies of the docs in our docs/ folder by adding docs/* to our .gitignore file. This way, we can still build and preview our site locally if we want but we won’t commit it to ourmaster or main branch.
Then, we can deploy another GitHub Actions template, provided by usethis that again will work right out the box!
✔ Saving 'r-lib/actions/examples/pkgdown.yaml@v2' to '.github/workflows/pkgdown.yaml'
• Learn more at <https://github.com/r-lib/actions/blob/v2/examples/README.md>.
This creates another file in .github/workflows/ called pkgdown.yaml. The workflow installs the package, building all documentation, installs pkgdown and uses it to build the site. It then commits the build site to a separate gh-pages site.
Commit the file and push it up to GitHub to activate. Once the workflow completes successfully, you will find the html for your documentation for you site in a new gh-pages branch!
Commit with message: Add pkgdown site config and deploy workflow, then click Push in the Git pane to send it up to origin/main. This first push to main triggers the pkgdown.yaml workflow on GitHub.
Enable gh-pages
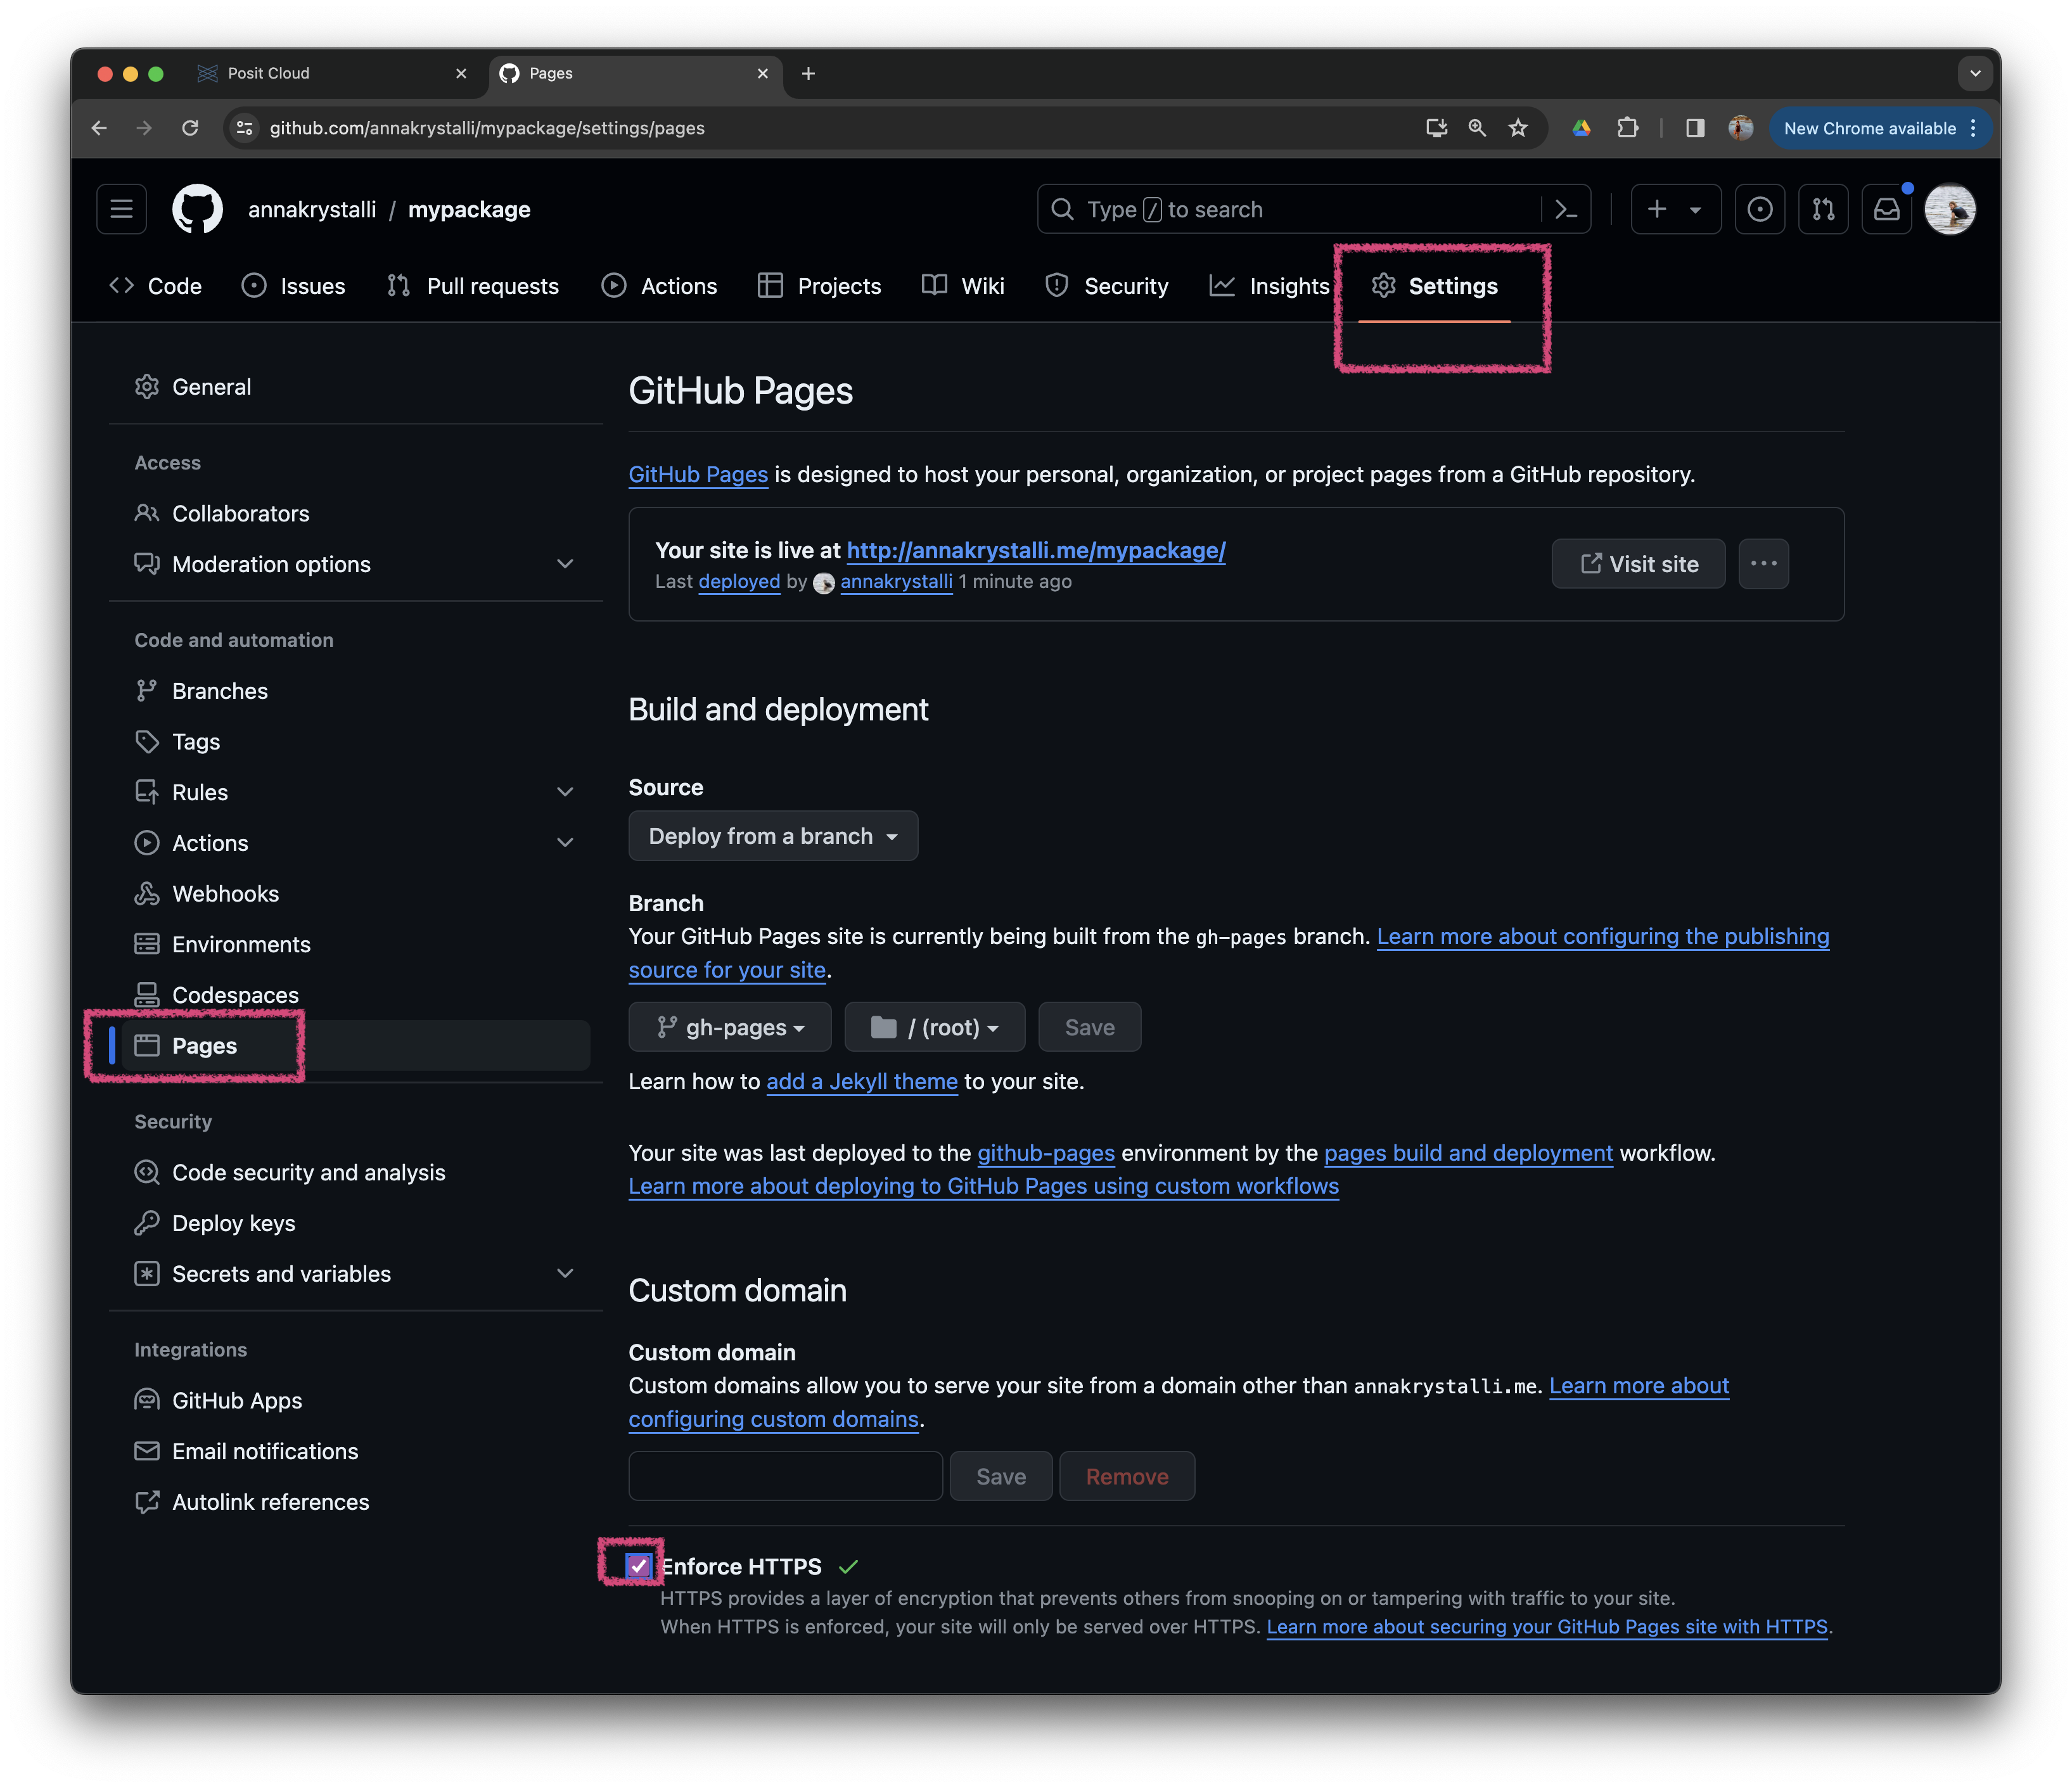
To serve our new site, we need to enable GitHub Pages and set the source directory to the root of the gh-pages branch.
To check our Github Pages settings we go to Settings and click on Pages on the navigation bar on the left.
Also Double Check that Enforce HTTPS is checked at the bottom.
Watch the automated build
With Pages now enabled and serving from gh-pages, our pkgdown.yaml workflow — just like the R-CMD-check one we set up earlier — runs on GitHub’s servers every time we push to main. It installs our package, rebuilds the site with pkgdown, and pushes the output back to the gh-pages branch, so our docs always reflect the latest state of the package without any manual build steps.
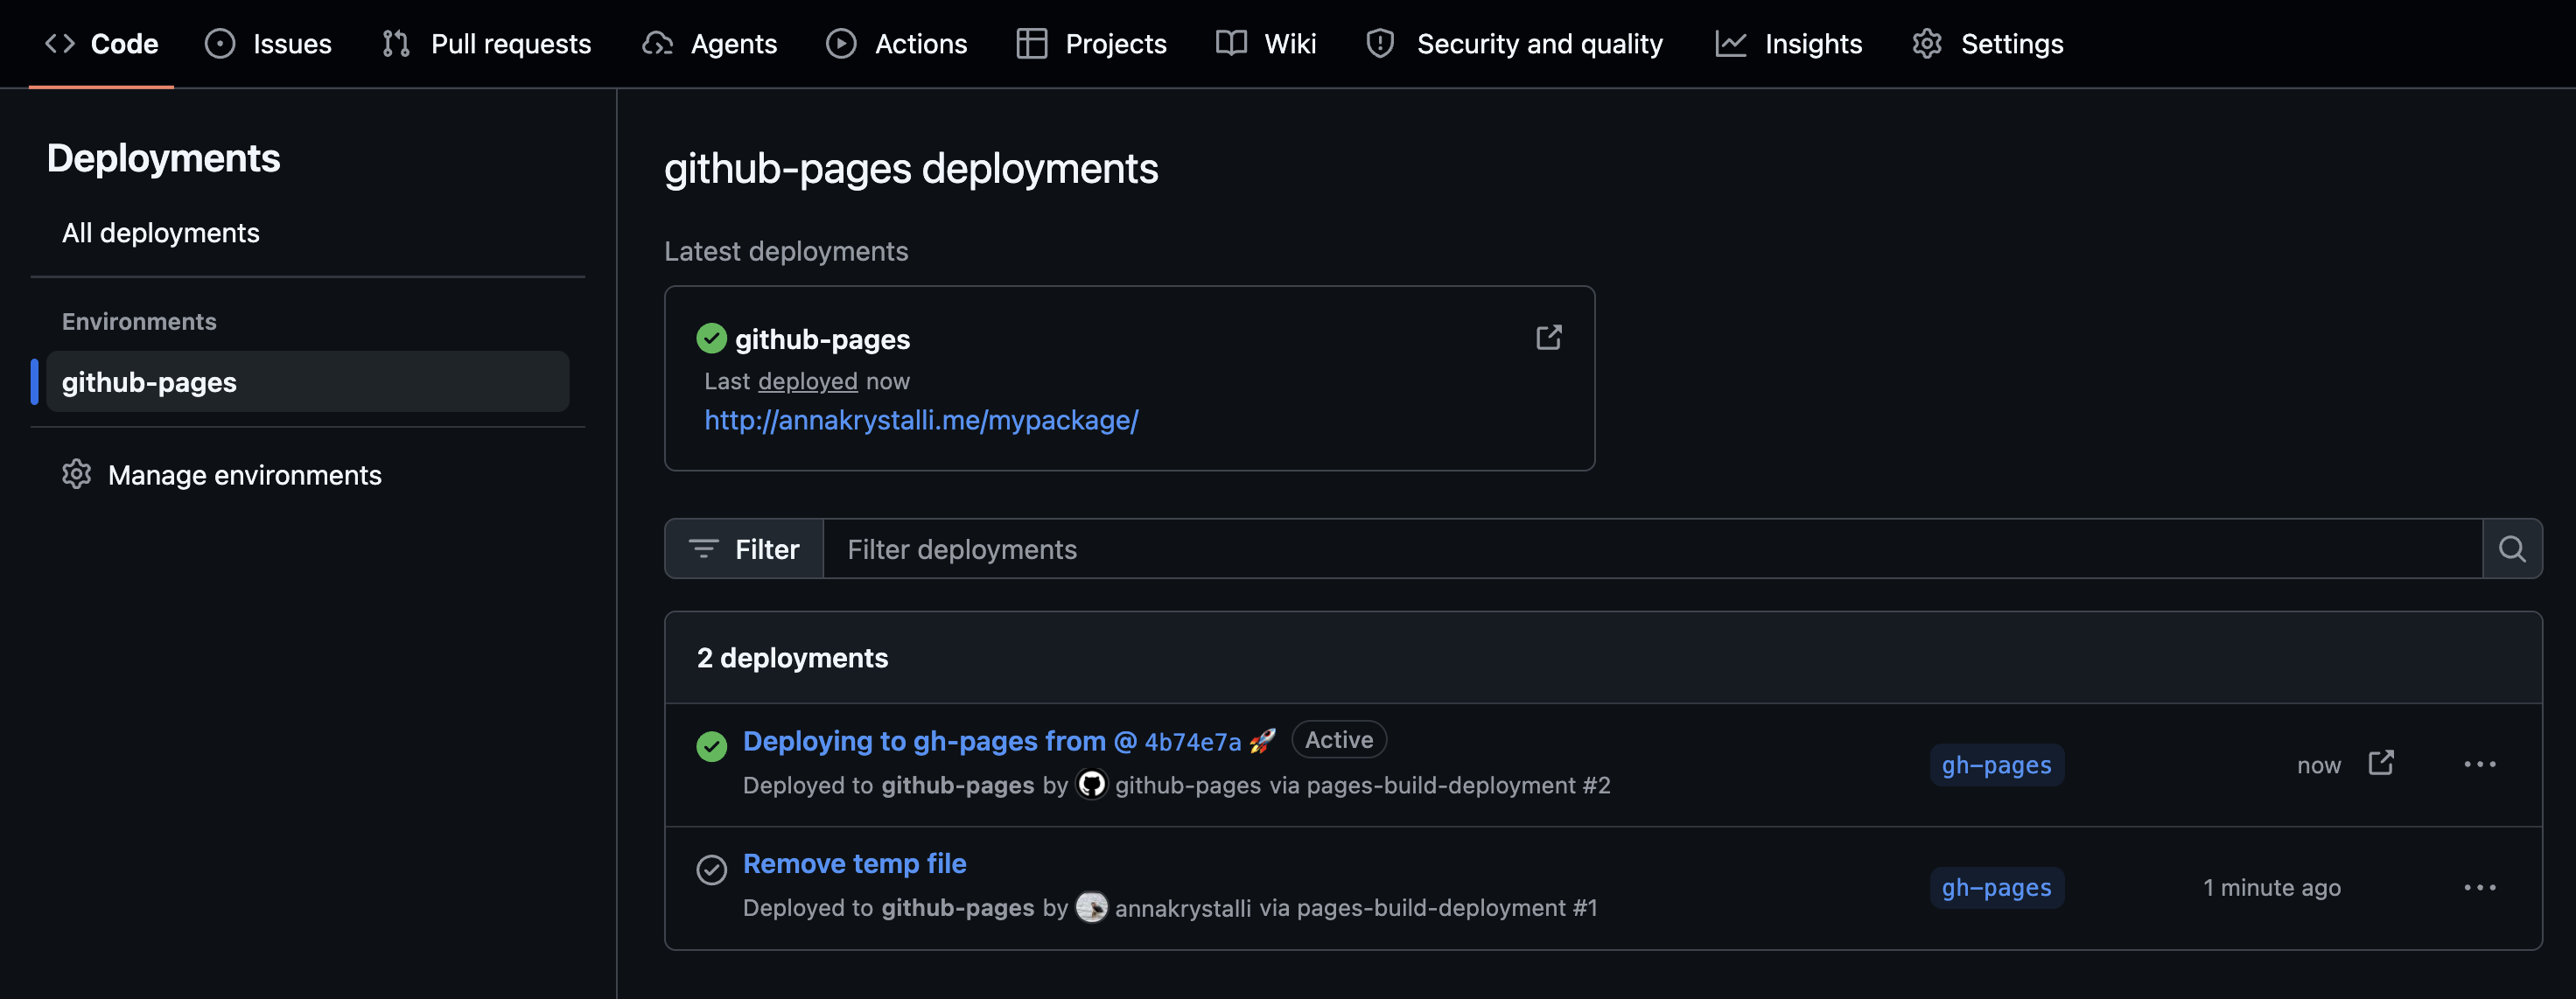
You can watch each deployment from your repo’s Deployments section (linked from the right sidebar of the Code tab, under the github-pages environment).
Each entry here corresponds to one successful run of the pkgdown.yaml workflow. As in the R-CMD-check flow, if a build fails, the full log is available in the Actions tab to diagnose what broke.
Check site
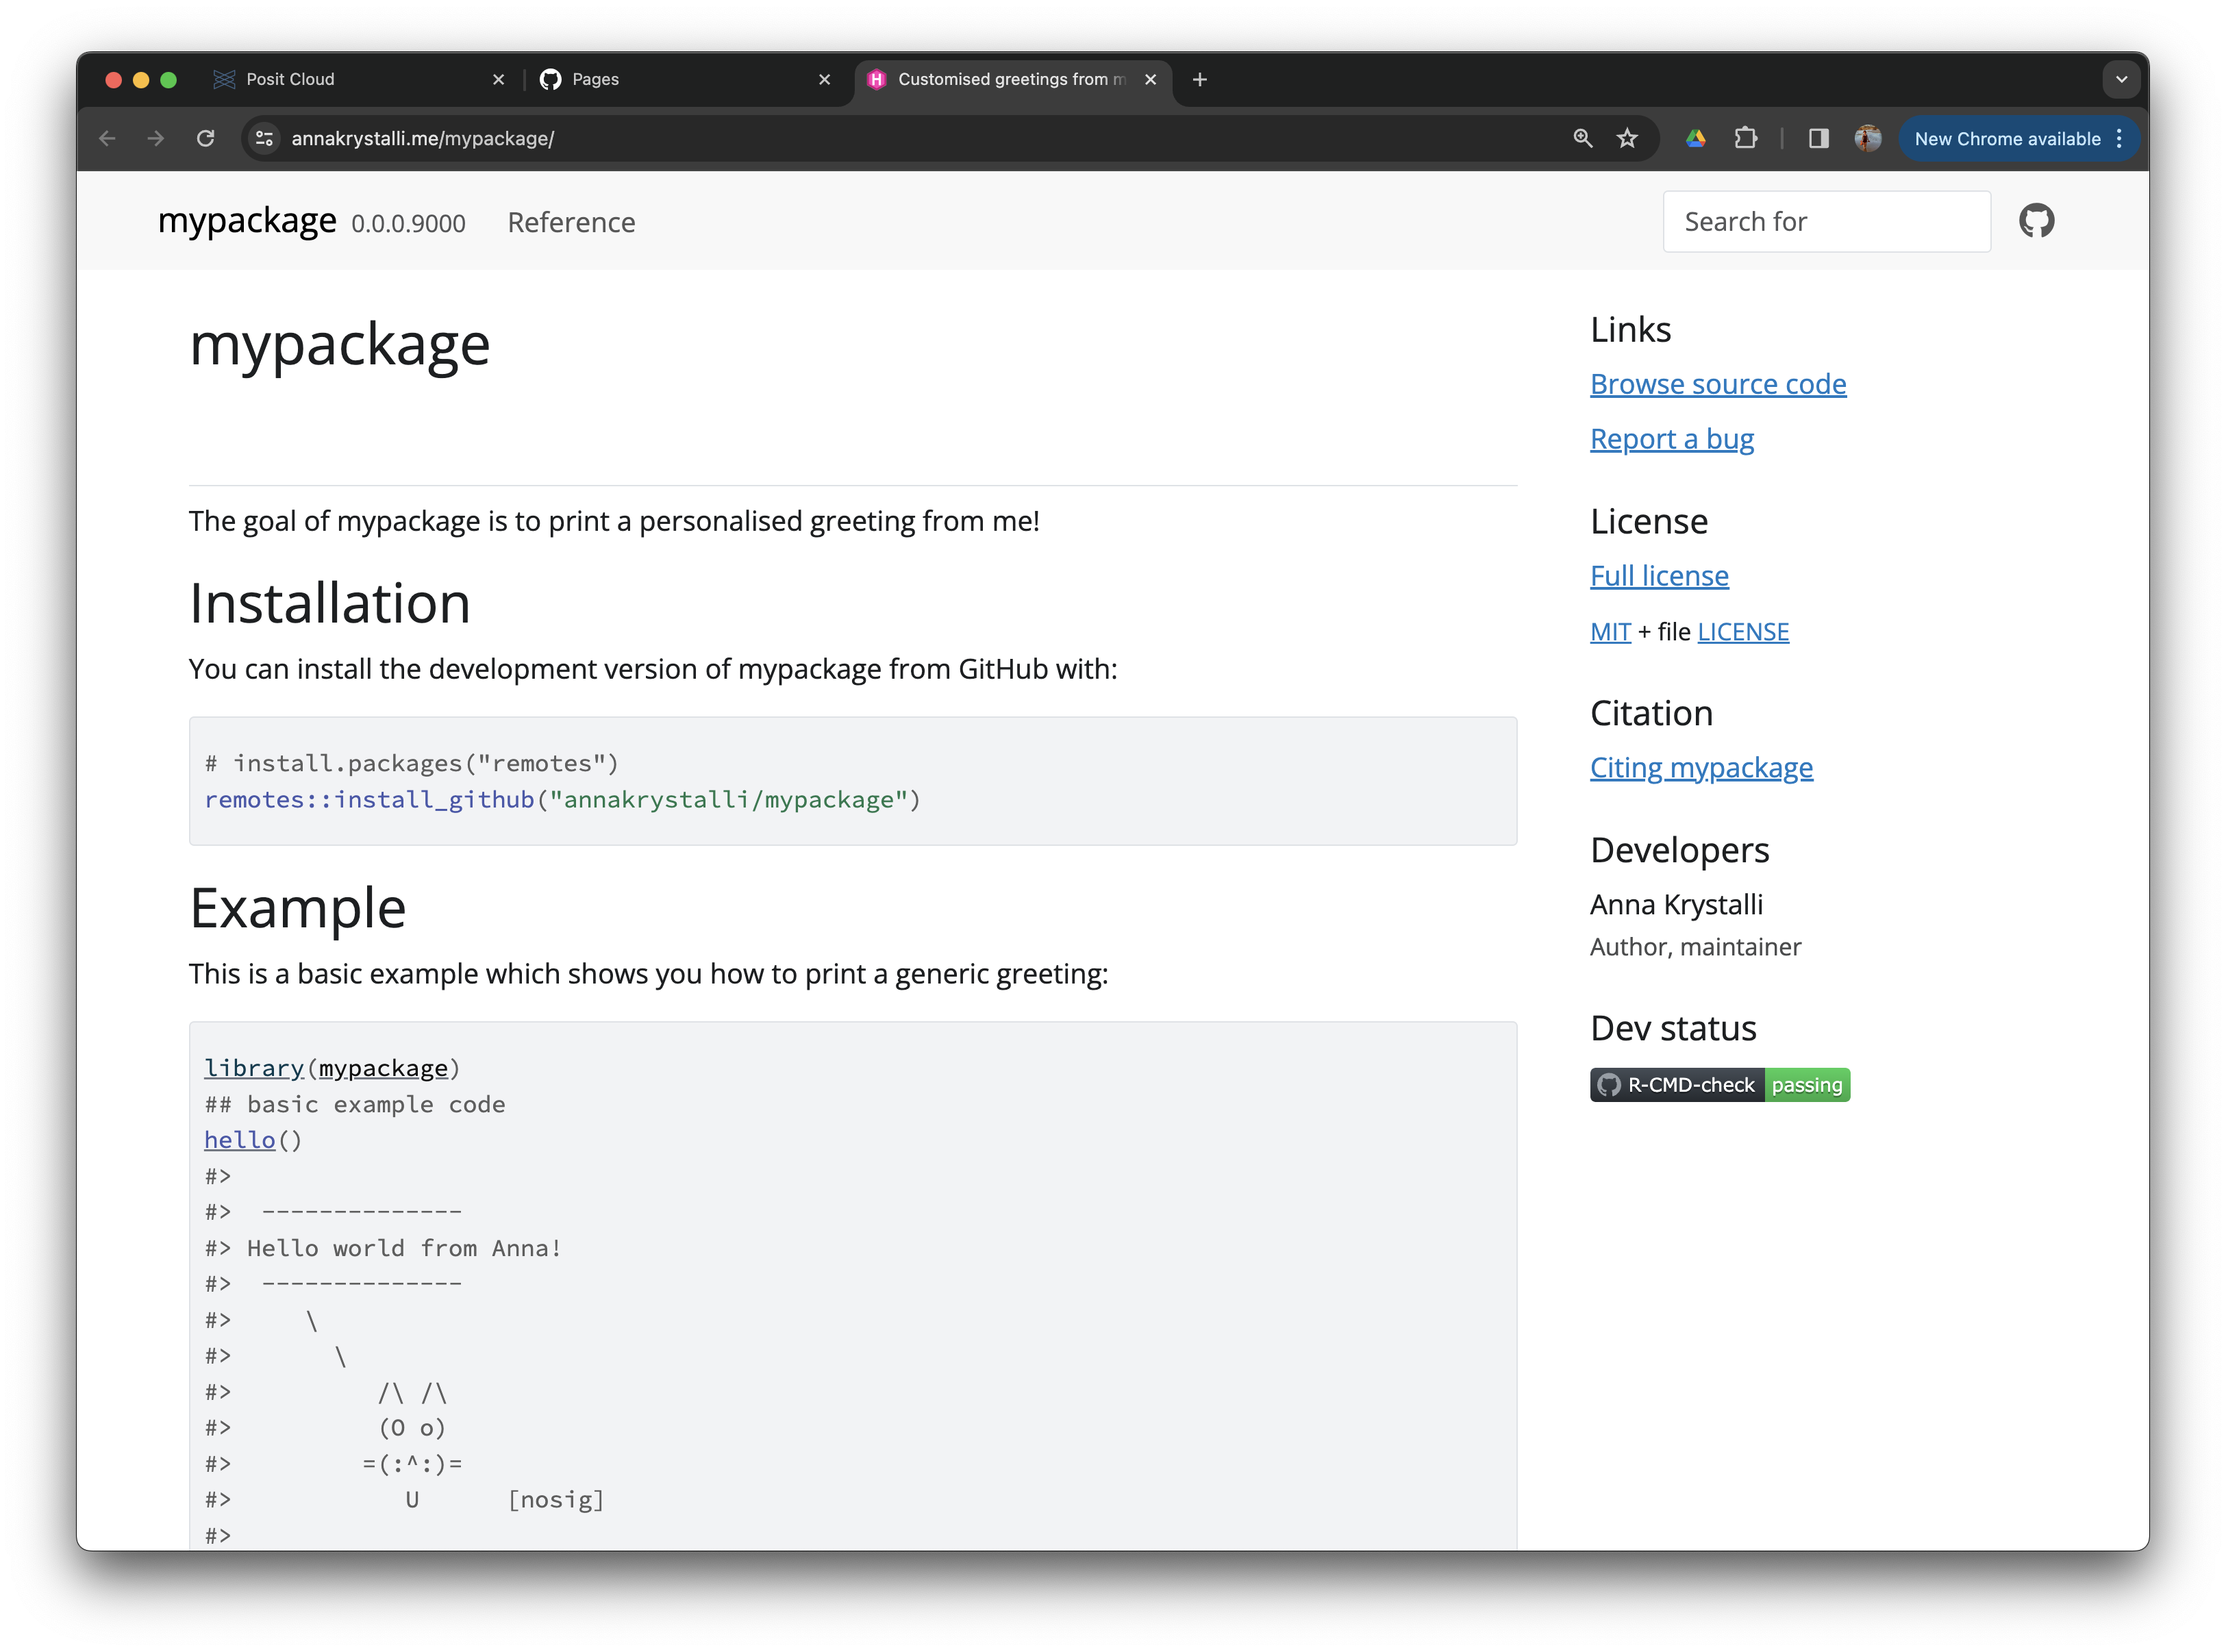
You’ll find your site at the URL provided in the GitHub Pages settings.
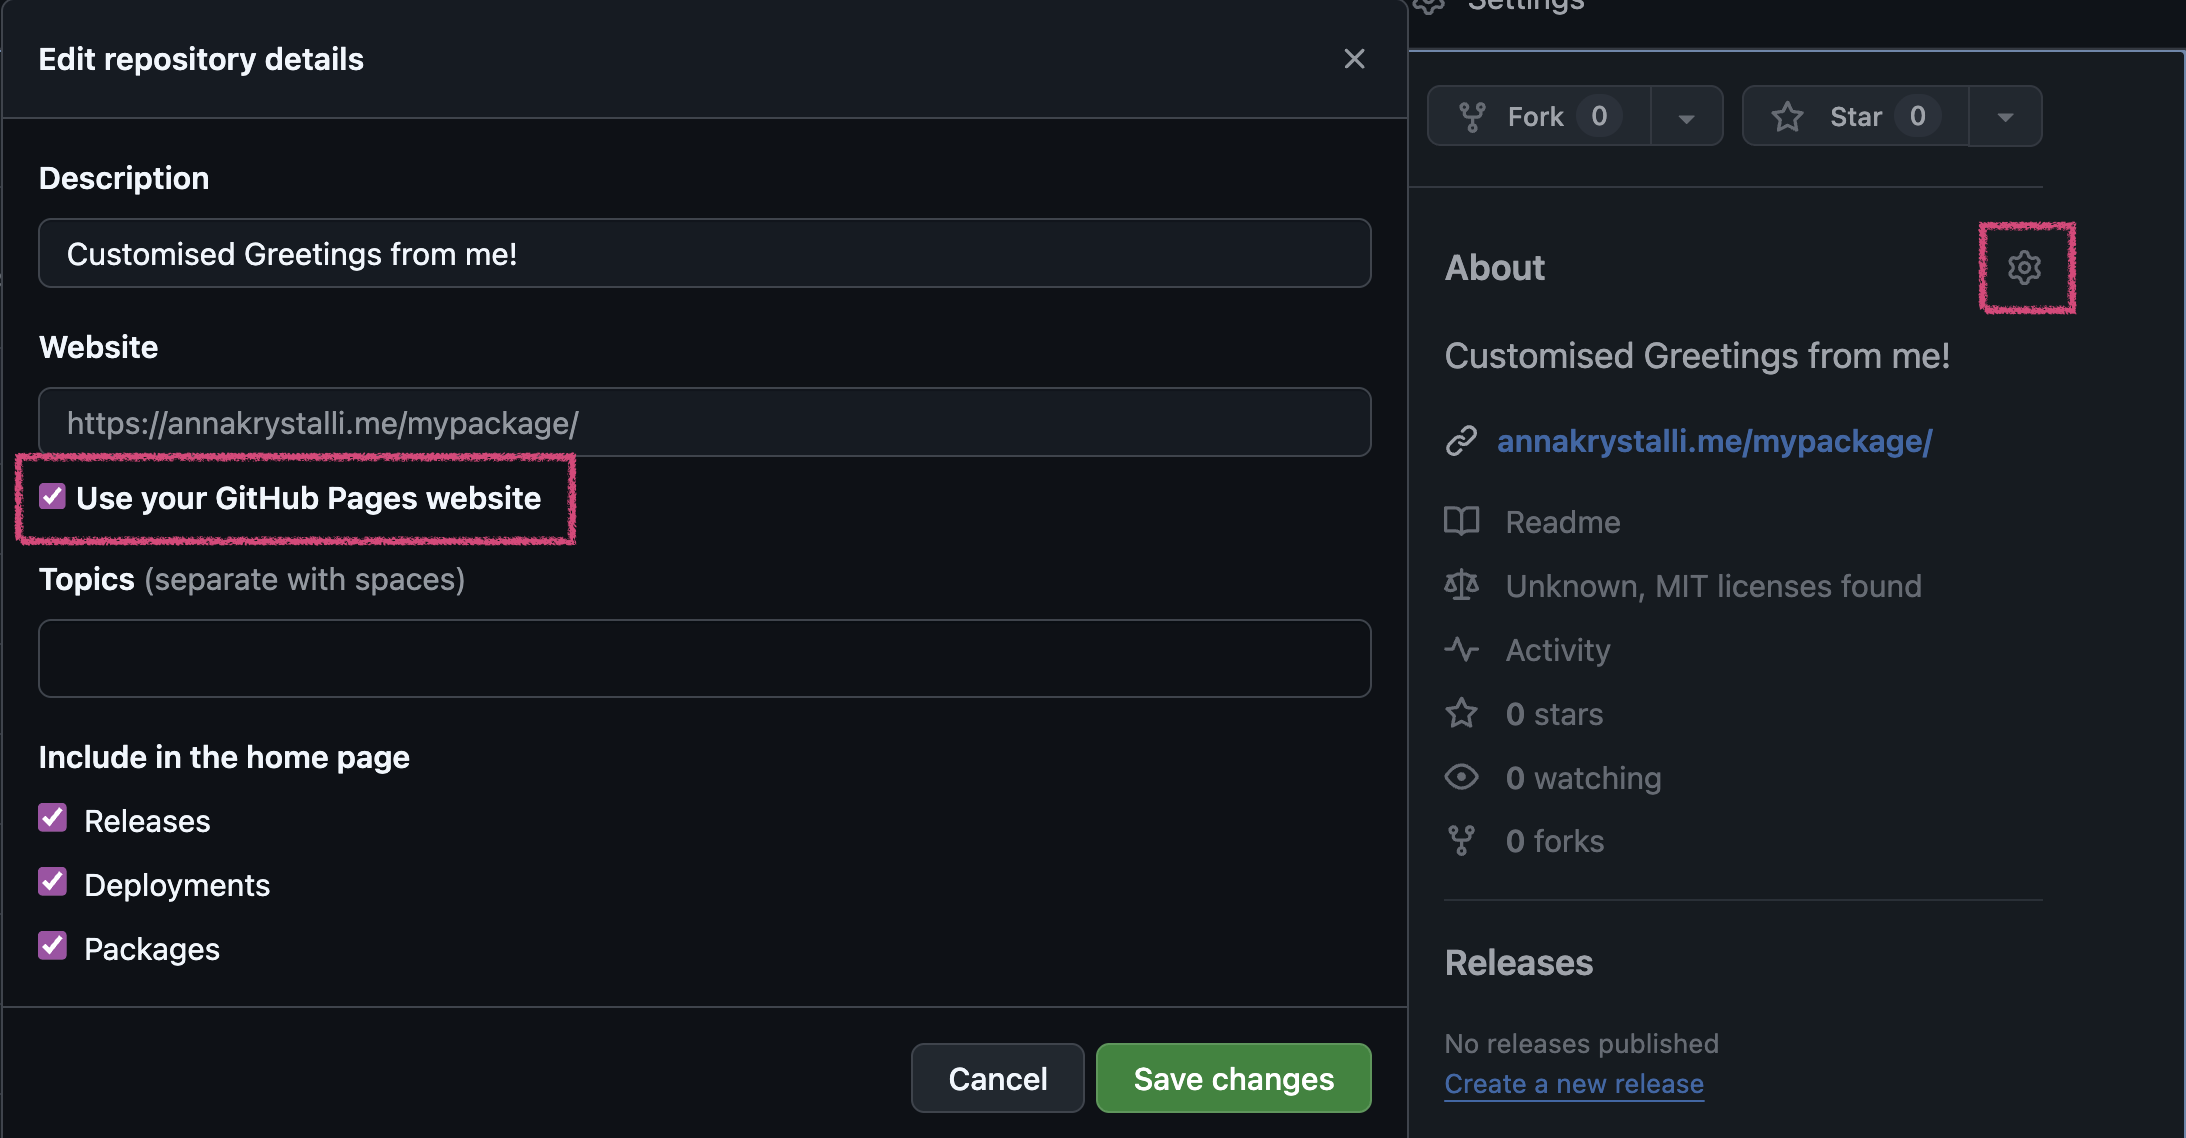
You can add it to your repo details by clicking on the in the About side panel and ticking Use your Github Pages website.