

Version Control with Git & GitHub
Version Control
Hands up - who has heard of version control software?
What do you think it does?
What is Version control? 🤔
The management of changes to documents, computer programs, large web sites, and other collections of information.
Examples:
- Numbering of book editions
- Wikipedia’s Page history
Where did it come from?
The need for a logical way to organize and control revisions has existed for almost as long as writing has existed, but revision control became much more important and much more complicated when the era of computing began
Elements of a Version Control system
Changes are usually identified by a number or letter code, termed the “revision number”
Each revision is associated with a timestamp and the person making the change.
Only changes to a file are recorded rather than saving a whole new copy.
Revisions can be compared, restored, and with some types of files, merged.
What is git? 🤔
Open source (free to use) Version control software. Usually accessed via the command line, or a client program.
Where did it come from?
Git development began in 2005 after many developers of the Linux kernel gave up access to BitKeeper (at the time the best but proprietary).
Why use it in research?
Exhibit A
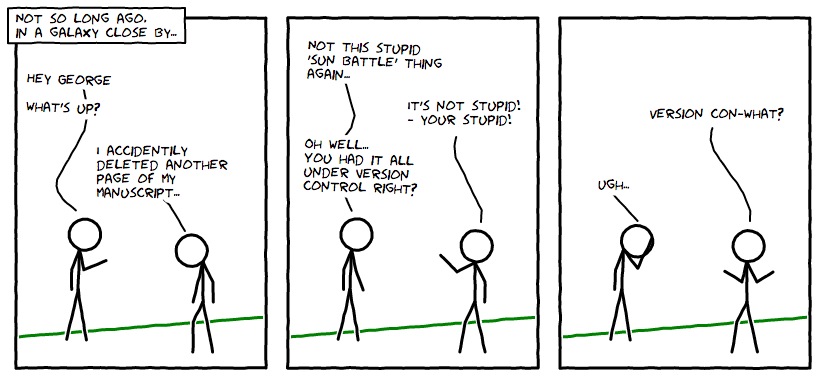
Image: xkcd (CC BY-NC 2.5)
Exhibit B

What is GitHub 🤔

A website that allows you to store your Git repositories online and makes it easy to collaborate with others. They also provide other services like issue (bug) tracking and wikis. Similar services are GitLab and BitBucket.
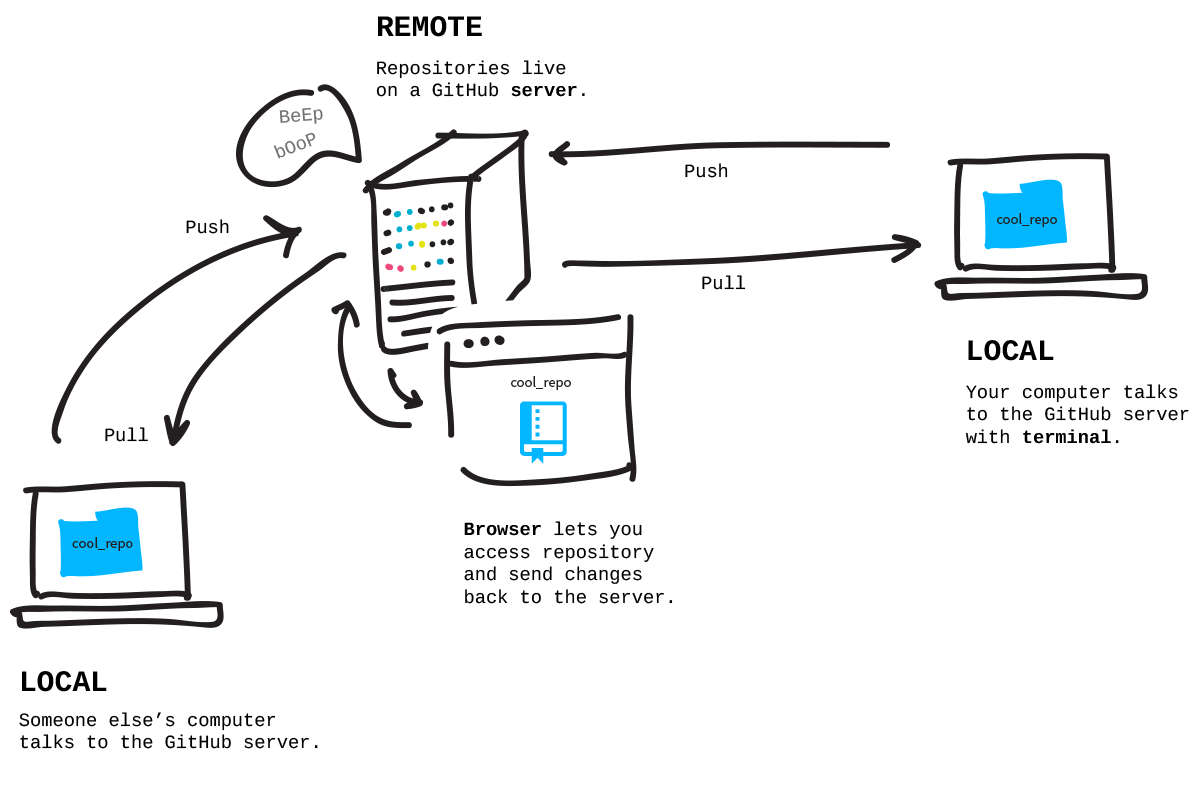
Why use it in research?
To enable collaboration and track contributions
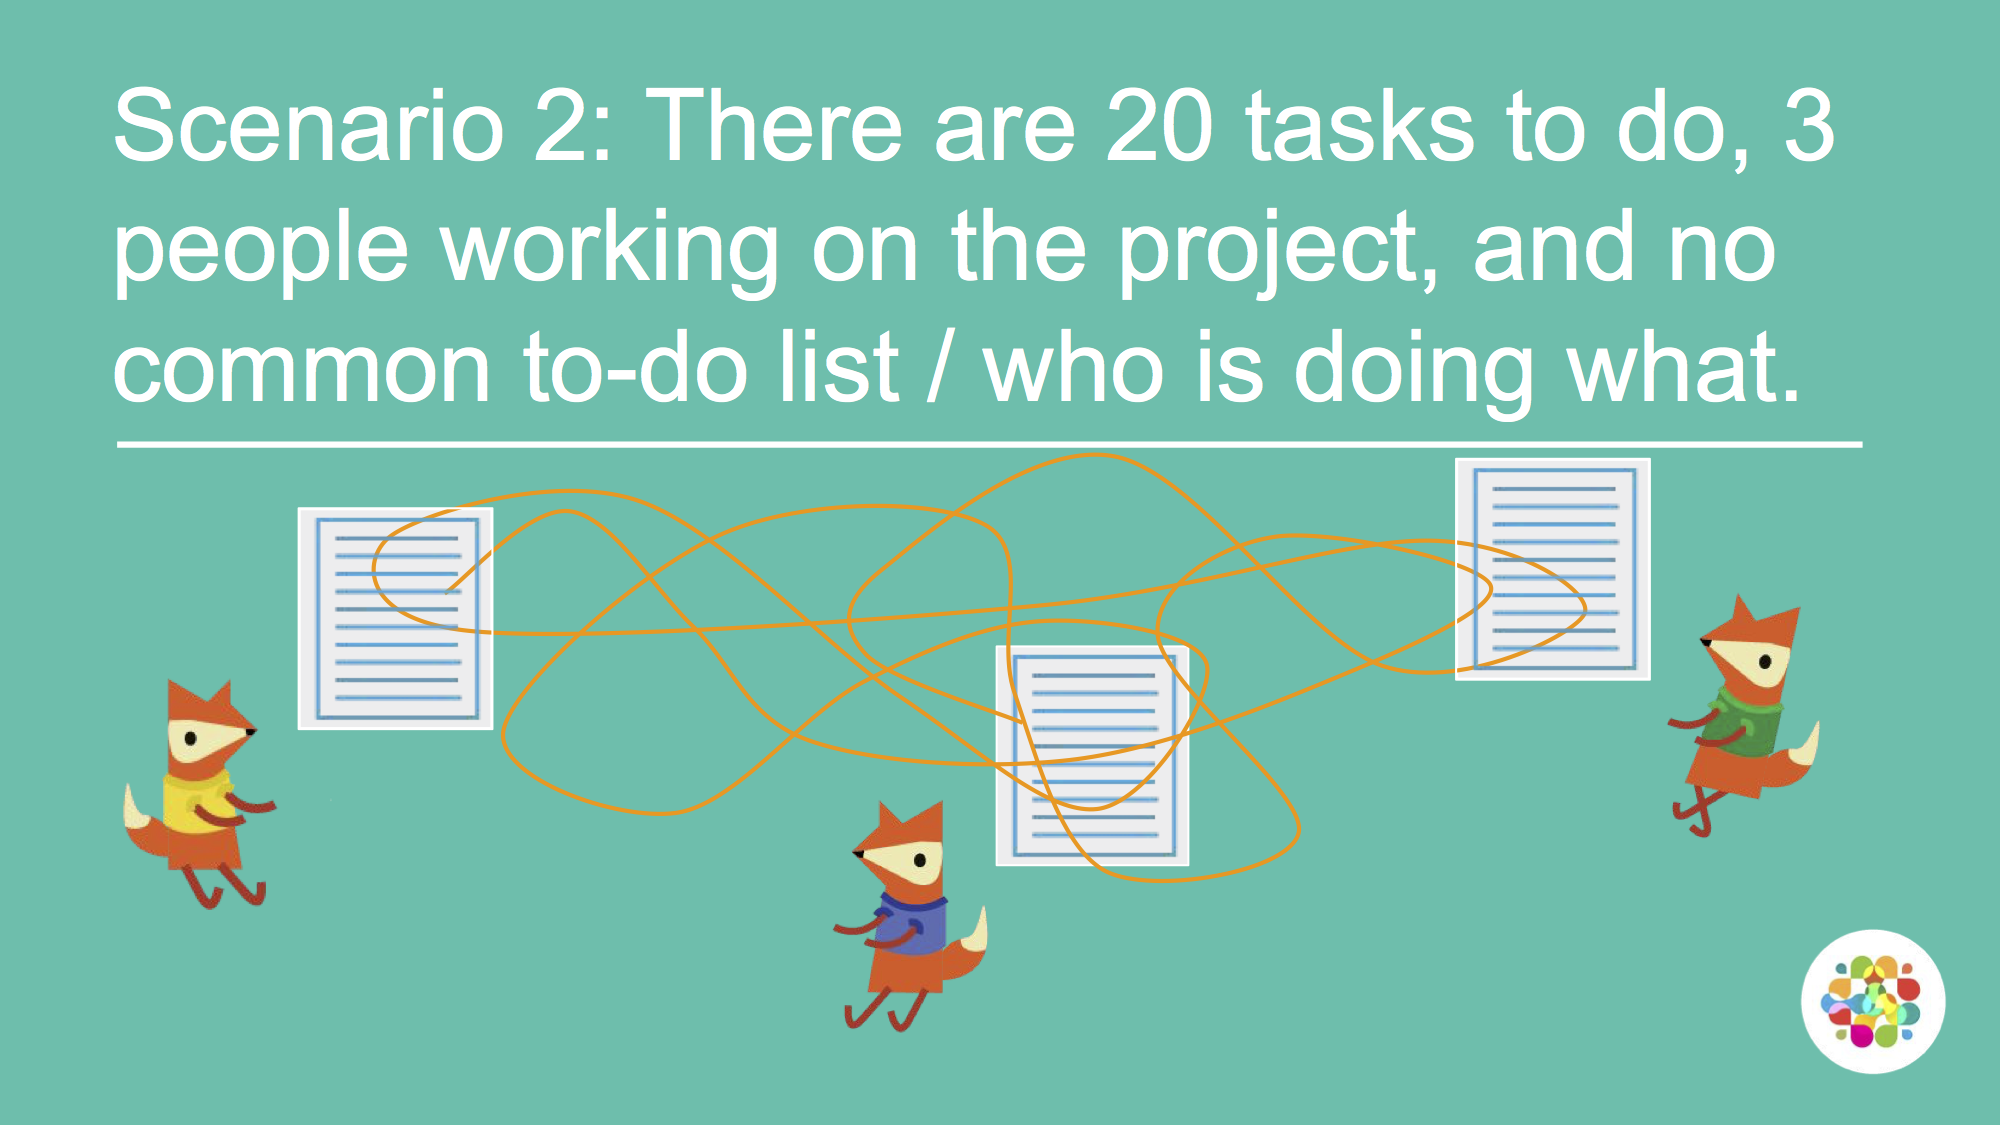
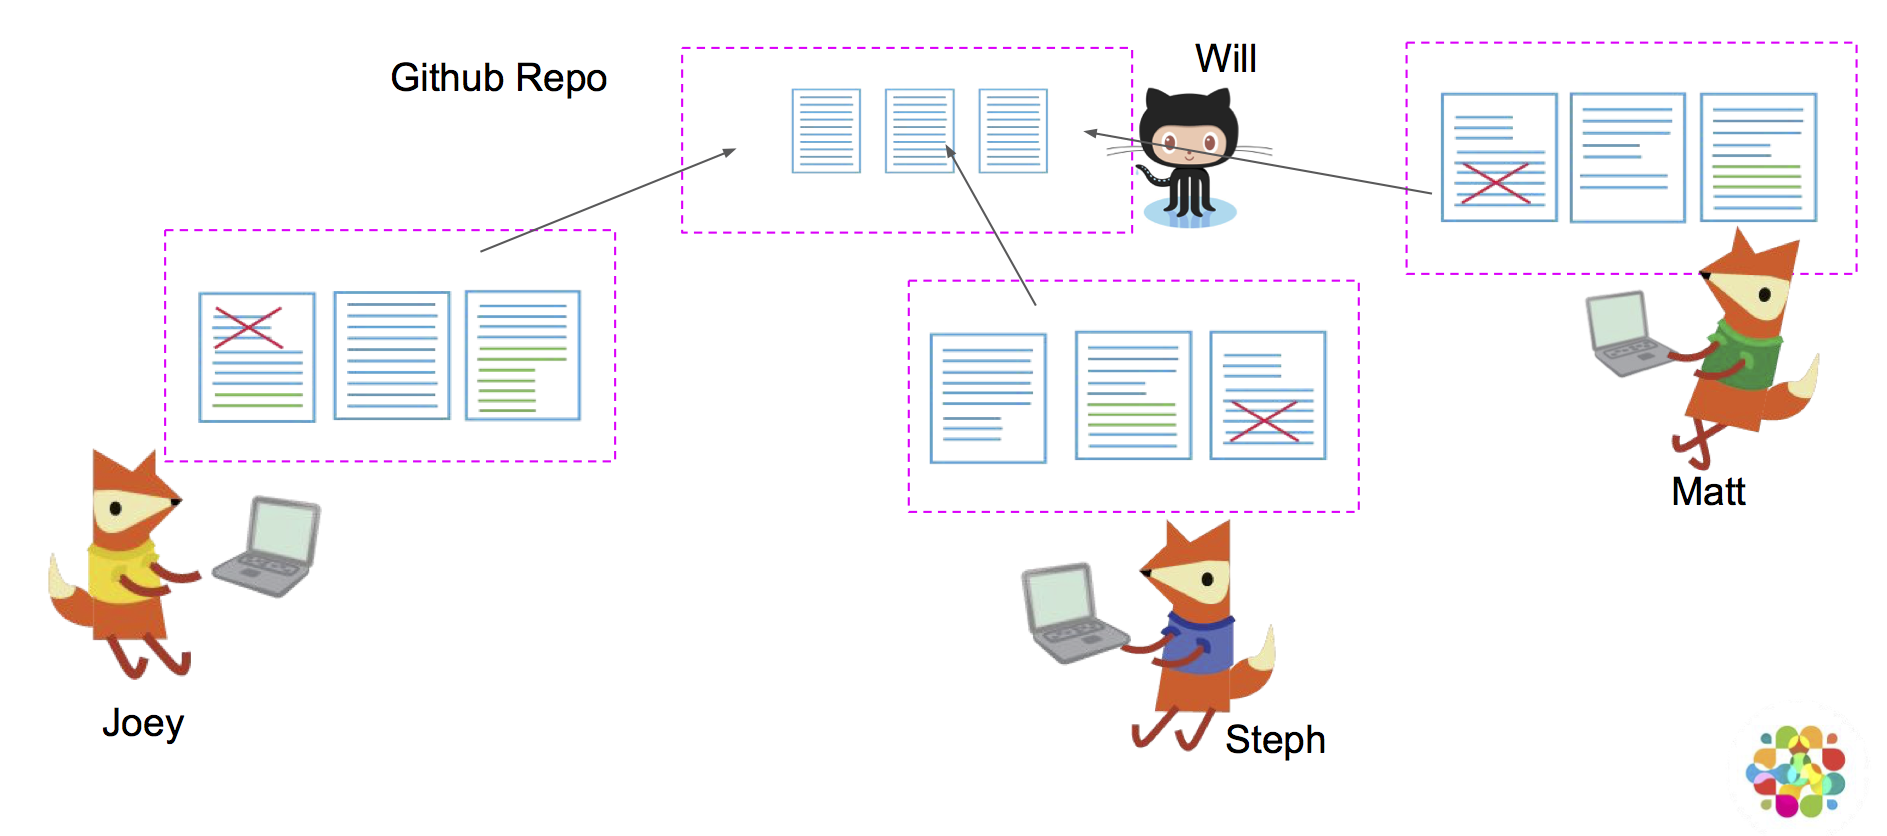
Images: Mozilla Science Lab, CC-BY 4.0
- Acts as a remote back-up
- Facilitates transparency
- Facilitates project management
- Facilitates sharing and collaboration
- Super-charges innovation by Open Sourcing Science
Anatomy of GitHub Repo
A well-structured GitHub repository typically contains a small set of standard files that explain the project, set the rules for using and contributing to it, and provide a place to track tasks and discussions. We won’t create every one of these in this course, but it’s worth knowing what each is for so you recognise them in the wild.
Readme files. Create a
README.mdfile to explain what your project is, and how to install and use it.README.mdis the file that is automatically displayed when you open a GitHub repo.-
License. Without some sort of licence, the contents of the repository are technically closed. Some allow users of the code to do anything they like with their code - these are known as permissive licences. Examples are the MIT Licence or Apache. Here are some resources to help you choose:
- https://choosealicense.com/ - does what it says on the tin and helps you choose a licence.
- https://tldrlegal.com/ - plain english explanations of licences in bullet form.
Contributing guide - a file called
CONTRIBUTING.mdcontaining guidelines for contributors, so they know what to do if they want to help you out.Code of Conduct - good projects have codes of conduct to make sure that people are treated well. GitHub has a Code of Conduct wizard to make it easy to add one.
Issues - use GitHub issues to record and discuss tasks.
Git, GitHub & RStudio
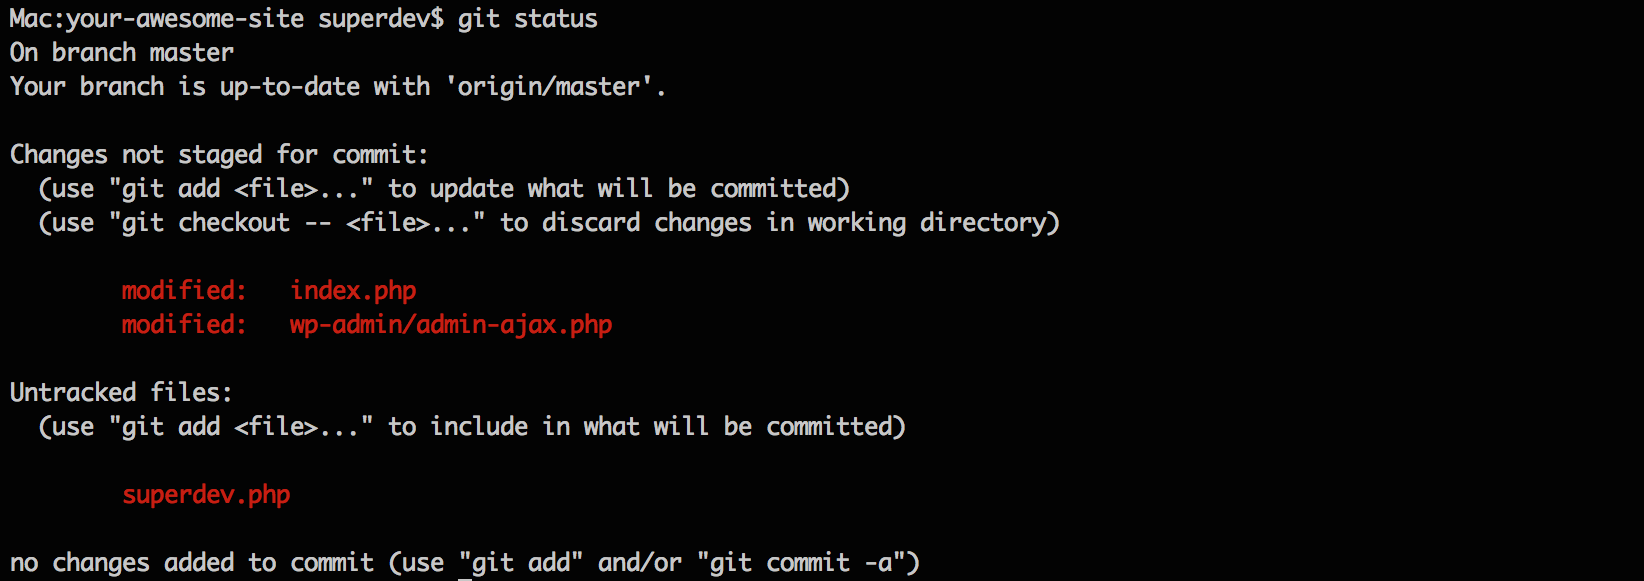
Before: git only through the terminal
For most of git’s history, all interaction with it happened through the command line. Using git meant typing commands and reading their text output, with no graphical interface to help you visualise what was happening.
RStudio & usethis to the rescue!
Modern R / RStudio users have it much easier. RStudio’s git integration gives you a visual panel to do everything you’d otherwise do at the command line, without typing a single git command. Combined with the usethis package, even one-off setup tasks are reduced to single R function calls.
In particular:
-
Initialise a project with git by ticking a box at New Project (or call
usethis::use_git()after the fact). - Browse file version history interactively from the git pane.
Version control in RStudio: what to expect
How does Git work?
When a local directory becomes initialised with git, a hidden .git folder is added to it.
it’s now called a repository
Git keeps your changes in three logical areas:
- Working directory: the files on disk you actually edit.
- Staging area (also called the index): changes you’ve explicitly marked for inclusion in the next commit. Think of it as a draft of “what goes in next”.
-
.githistory: the permanent record of committed snapshots.
Recording a change in git history is therefore a two-step process: add (stage) the file to mark it for inclusion in the next commit, then commit to write the staged snapshot to history along with a commit message. In RStudio, staging is the tick-the-box action in the git pane, and committing is clicking the Commit button after writing your message.
Writing good commit messages
A commit message is a short, human-readable description of what changed and why. Together with the snapshot itself, it becomes a permanent entry in the project’s history, so future-you (or a collaborator) can scan the log and understand the story of the project without having to read every diff. Treat them like meaningful labels, not afterthoughts: aim for a concise summary line (e.g. “Add complete-cases filter to analysis_df”) rather than “updated stuff”.
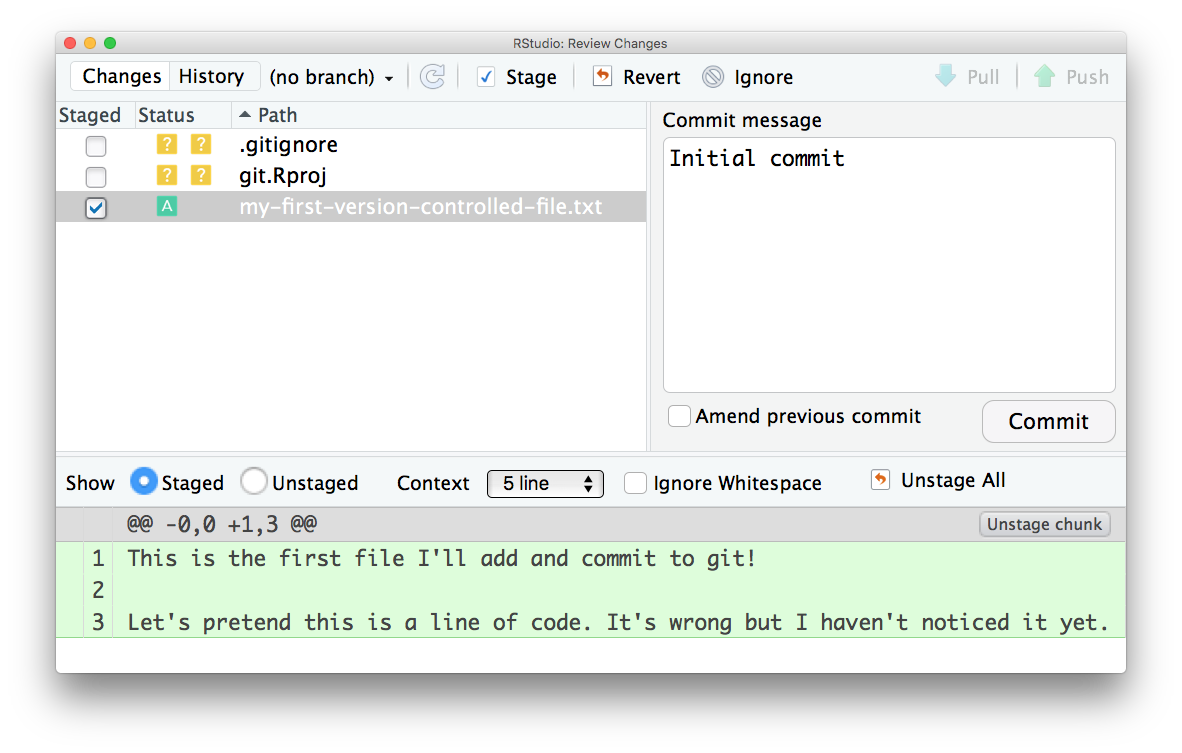
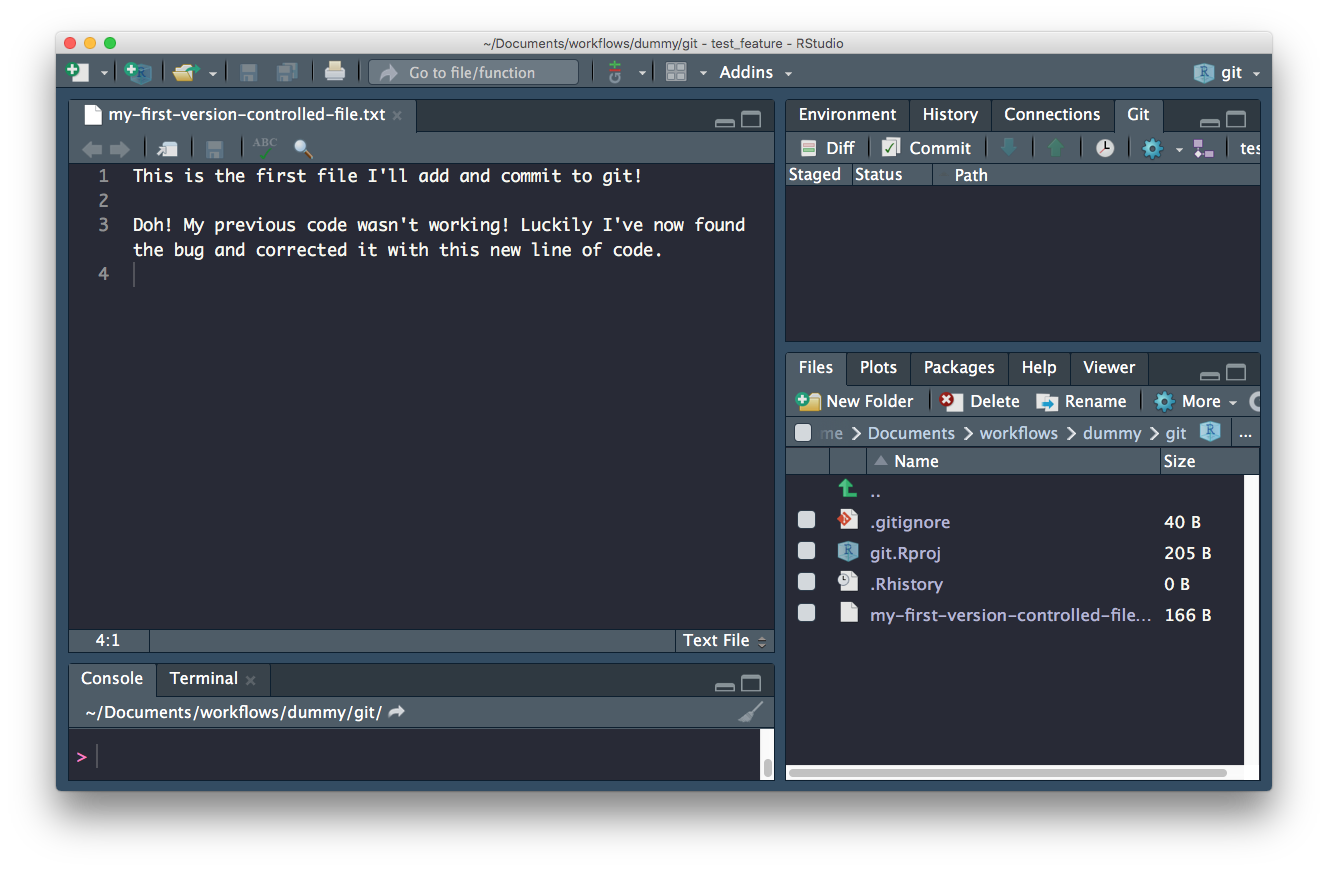
first commit - whole file added
Any file unknown to git will have a yellow ? box next to it.
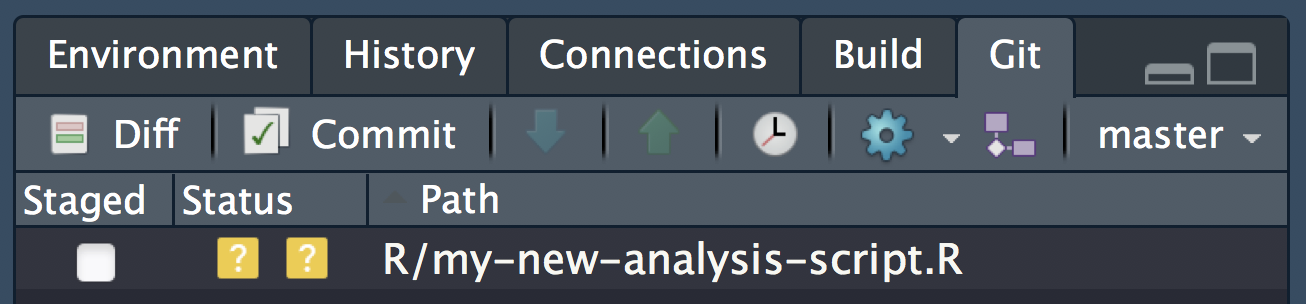
The first time you commit a file you are adding it to .git, effectively telling it to start tracking the file
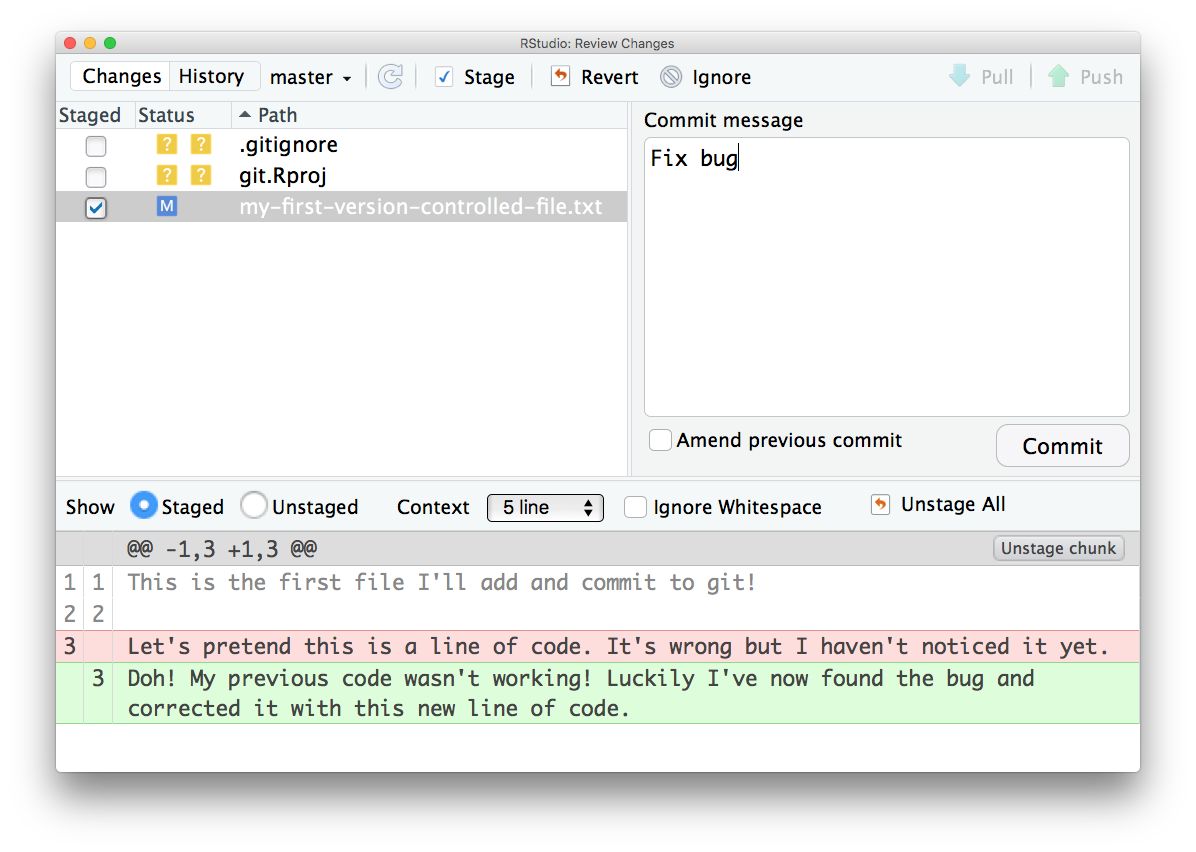
second commit - only difference highlighted
After the first commit, only the changes (the diff against the last commit) are shown, and any file with uncommitted modifications is marked with a blue M
 When all changes have been committed, the git panel is clear.
That’s the theory. Let’s now switch over to Posit Cloud and put it into practice in our own project.
Configure git & GitHub
Configure git
First, git needs to know who you are so your commits can be attributed to you. usethis to the rescue again!
Check your configuration
usethis::git_sitrep()── Git global (user)
• Name: <unset>
• Email: <unset>
✖ Git user's name and email are not set. Configure using `use_git_config(user.name = "<your name>", user.email = "<your email>")`.
• Global (user-level) gitignore file: <unset>
• Vaccinated: FALSE
ℹ See `?git_vaccinate` to learn more
ℹ Defaulting to 'https' Git protocol
• Default Git protocol: 'https'
• Default initial branch name: <unset>
── GitHub user
• Default GitHub host: 'https://github.com'
• Personal access token for 'https://github.com': <unset>
• To create a personal access token, call `create_github_token()`
• To store a token for current and future use, call `credentials::set_github_pat()`
ℹ Read more in the 'Managing Git(Hub) Credentials' article:
https://usethis.r-lib.org/articles/articles/git-credentials.html
── Active usethis project: '/cloud/project' ──
ℹ Active project is not a Git repoSet your configuration
Use your GitHub username and the email you used to sign up to GitHub.
usethis::use_git_config(
  user.name = "Jane",
  user.email = "jane@example.org"
)
Posit Cloud hack: keep the call in
attic/development.R
On Posit Cloud, the git config is wiped every time the project is relaunched, so you’ll need to re-run usethis::use_git_config(...) at the start of each session.
To save yourself re-typing it, copy your call (with your own user.name and user.email, not Jane’s) into attic/development.R so you can just source it whenever the project boots back up.
If you’re working locally on your own machine, you only need to set this once ever: git stores the config in your home directory (~/.gitconfig) and remembers it across all projects and sessions.
Create a GITHUB PAT
A Personal Access Token (PAT) is GitHub’s way of letting your local computer prove who it is when it pushes or pulls.
Think of a PAT as a special-purpose key for git, separate from the password you use to log in to GitHub in your browser. When you create one, you choose:
- what it can do (read-only? full access? just one repo?)
- how long it’s valid for (a week? a year? until you revoke it?)
That means if a PAT ever leaks, the damage is limited to whatever scopes you gave it, and you can revoke or replace it without touching anything else about your account.
So instead of typing your GitHub login password every time git needs to authenticate, you generate a PAT once and let git use that.
How to get a PAT?
Open the PAT creation form
GitHub provides a web form for creating a personal access token, and the usethis package gives us a helper function to open it directly, with the added benefit of pre-selecting the recommended scopes for typical R / git workflows:
usethis::create_github_token()● Call `credentials::set_github_pat()` to register this token in the local Git credential store
It is also a great idea to store this token in any password-management software that you use
✔ Opening URL 'https://github.com/settings/tokens/new?scopes=repo,user,gist,workflow&description=DESCRIBE THE TOKEN\'S USE CASE'This opens the GitHub web form for creating a new PAT, with the recommended scopes already ticked.
Configure and generate the token
Give your PAT a descriptive name so you can identify it later. I’m calling mine POSIT_CLOUD since that’s the only place I’m going to use it.
For security reasons, set an expiration date of 7 days: just long enough to complete the course.
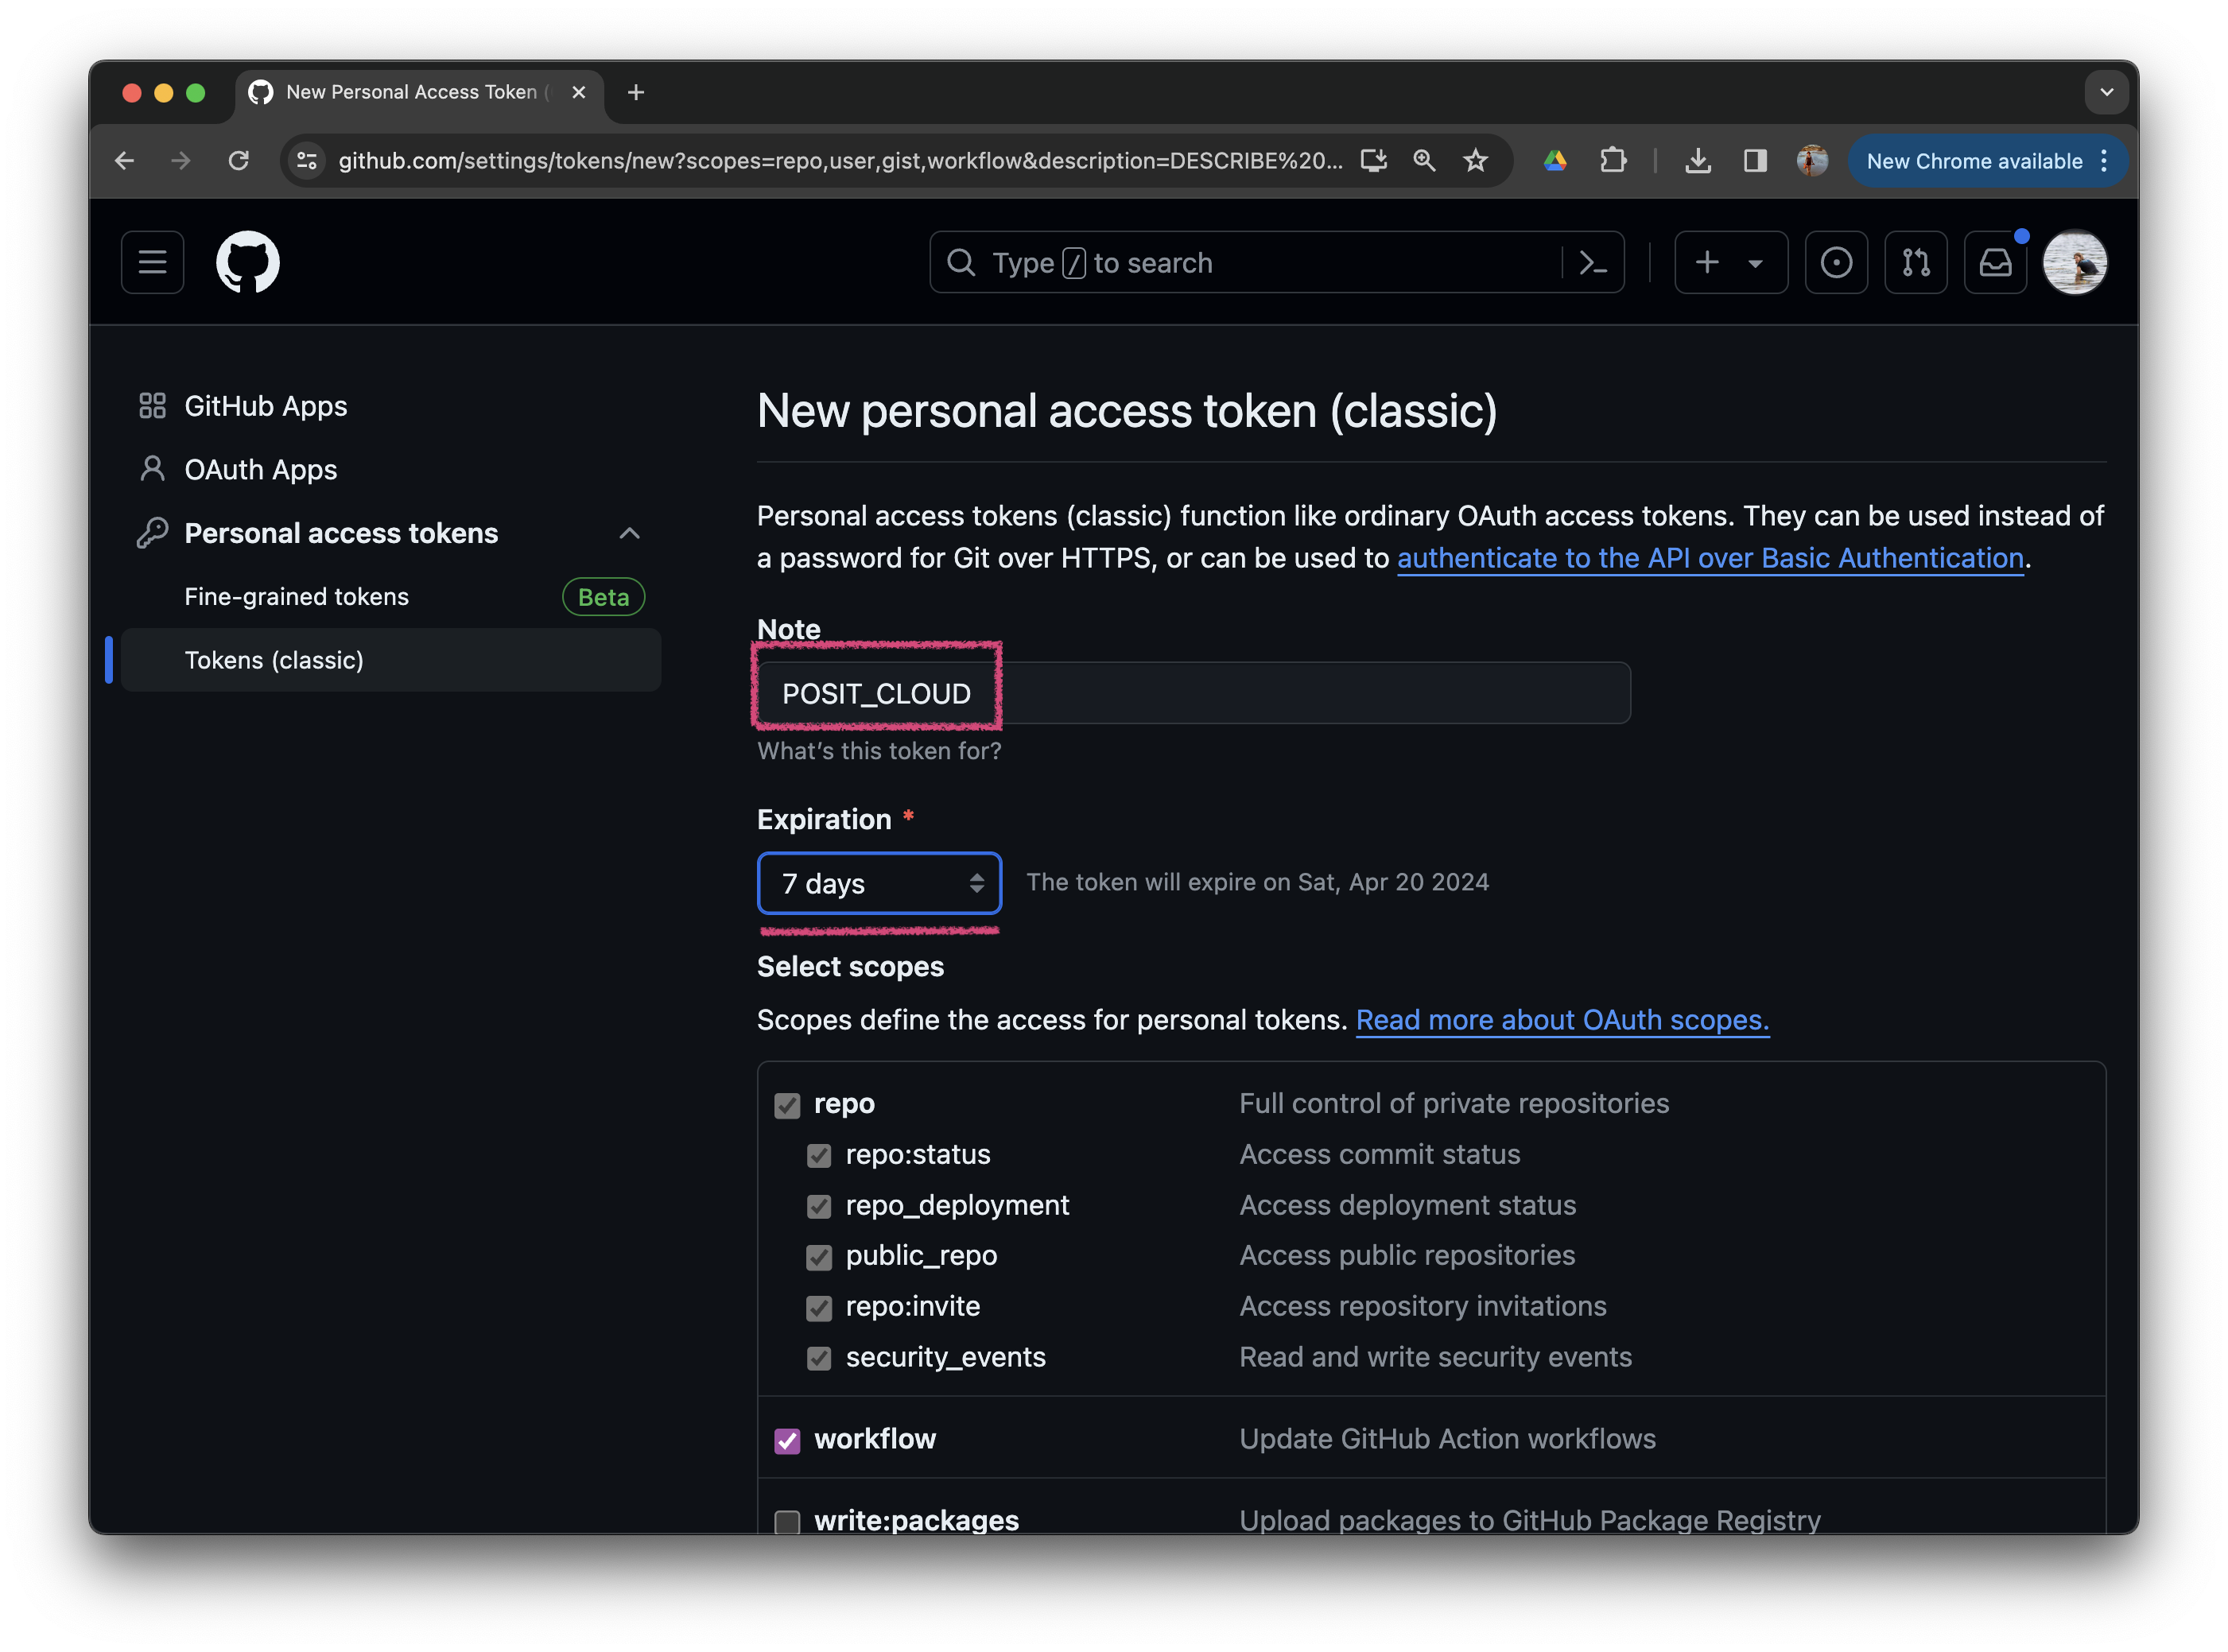
The scopes below are already pre-selected by usethis::create_github_token(), so once you’re happy with the name and expiration, scroll to the bottom and click “Generate token”.
Day-to-day PATs
The 7-day expiration here is just for the duration of this course. For your everyday local work, you’ll typically want a longer-lived PAT (a few months, or up to a year).
Even so, it’s good practice to rotate your PATs every few months: revoke the old one and generate a fresh one. If a token ever leaks (say, accidentally pushed to a public repo), you don’t want it valid forever.
You can also keep several PATs at once, each with a different name and different scopes (i.e. authorised to do different things). For example, one for read-only access and one for full access. Narrower scopes mean less damage if a token is ever exposed.
Copy and save the token
You’ll be taken to a page showing your newly generated token. Make sure you copy it to your clipboard!
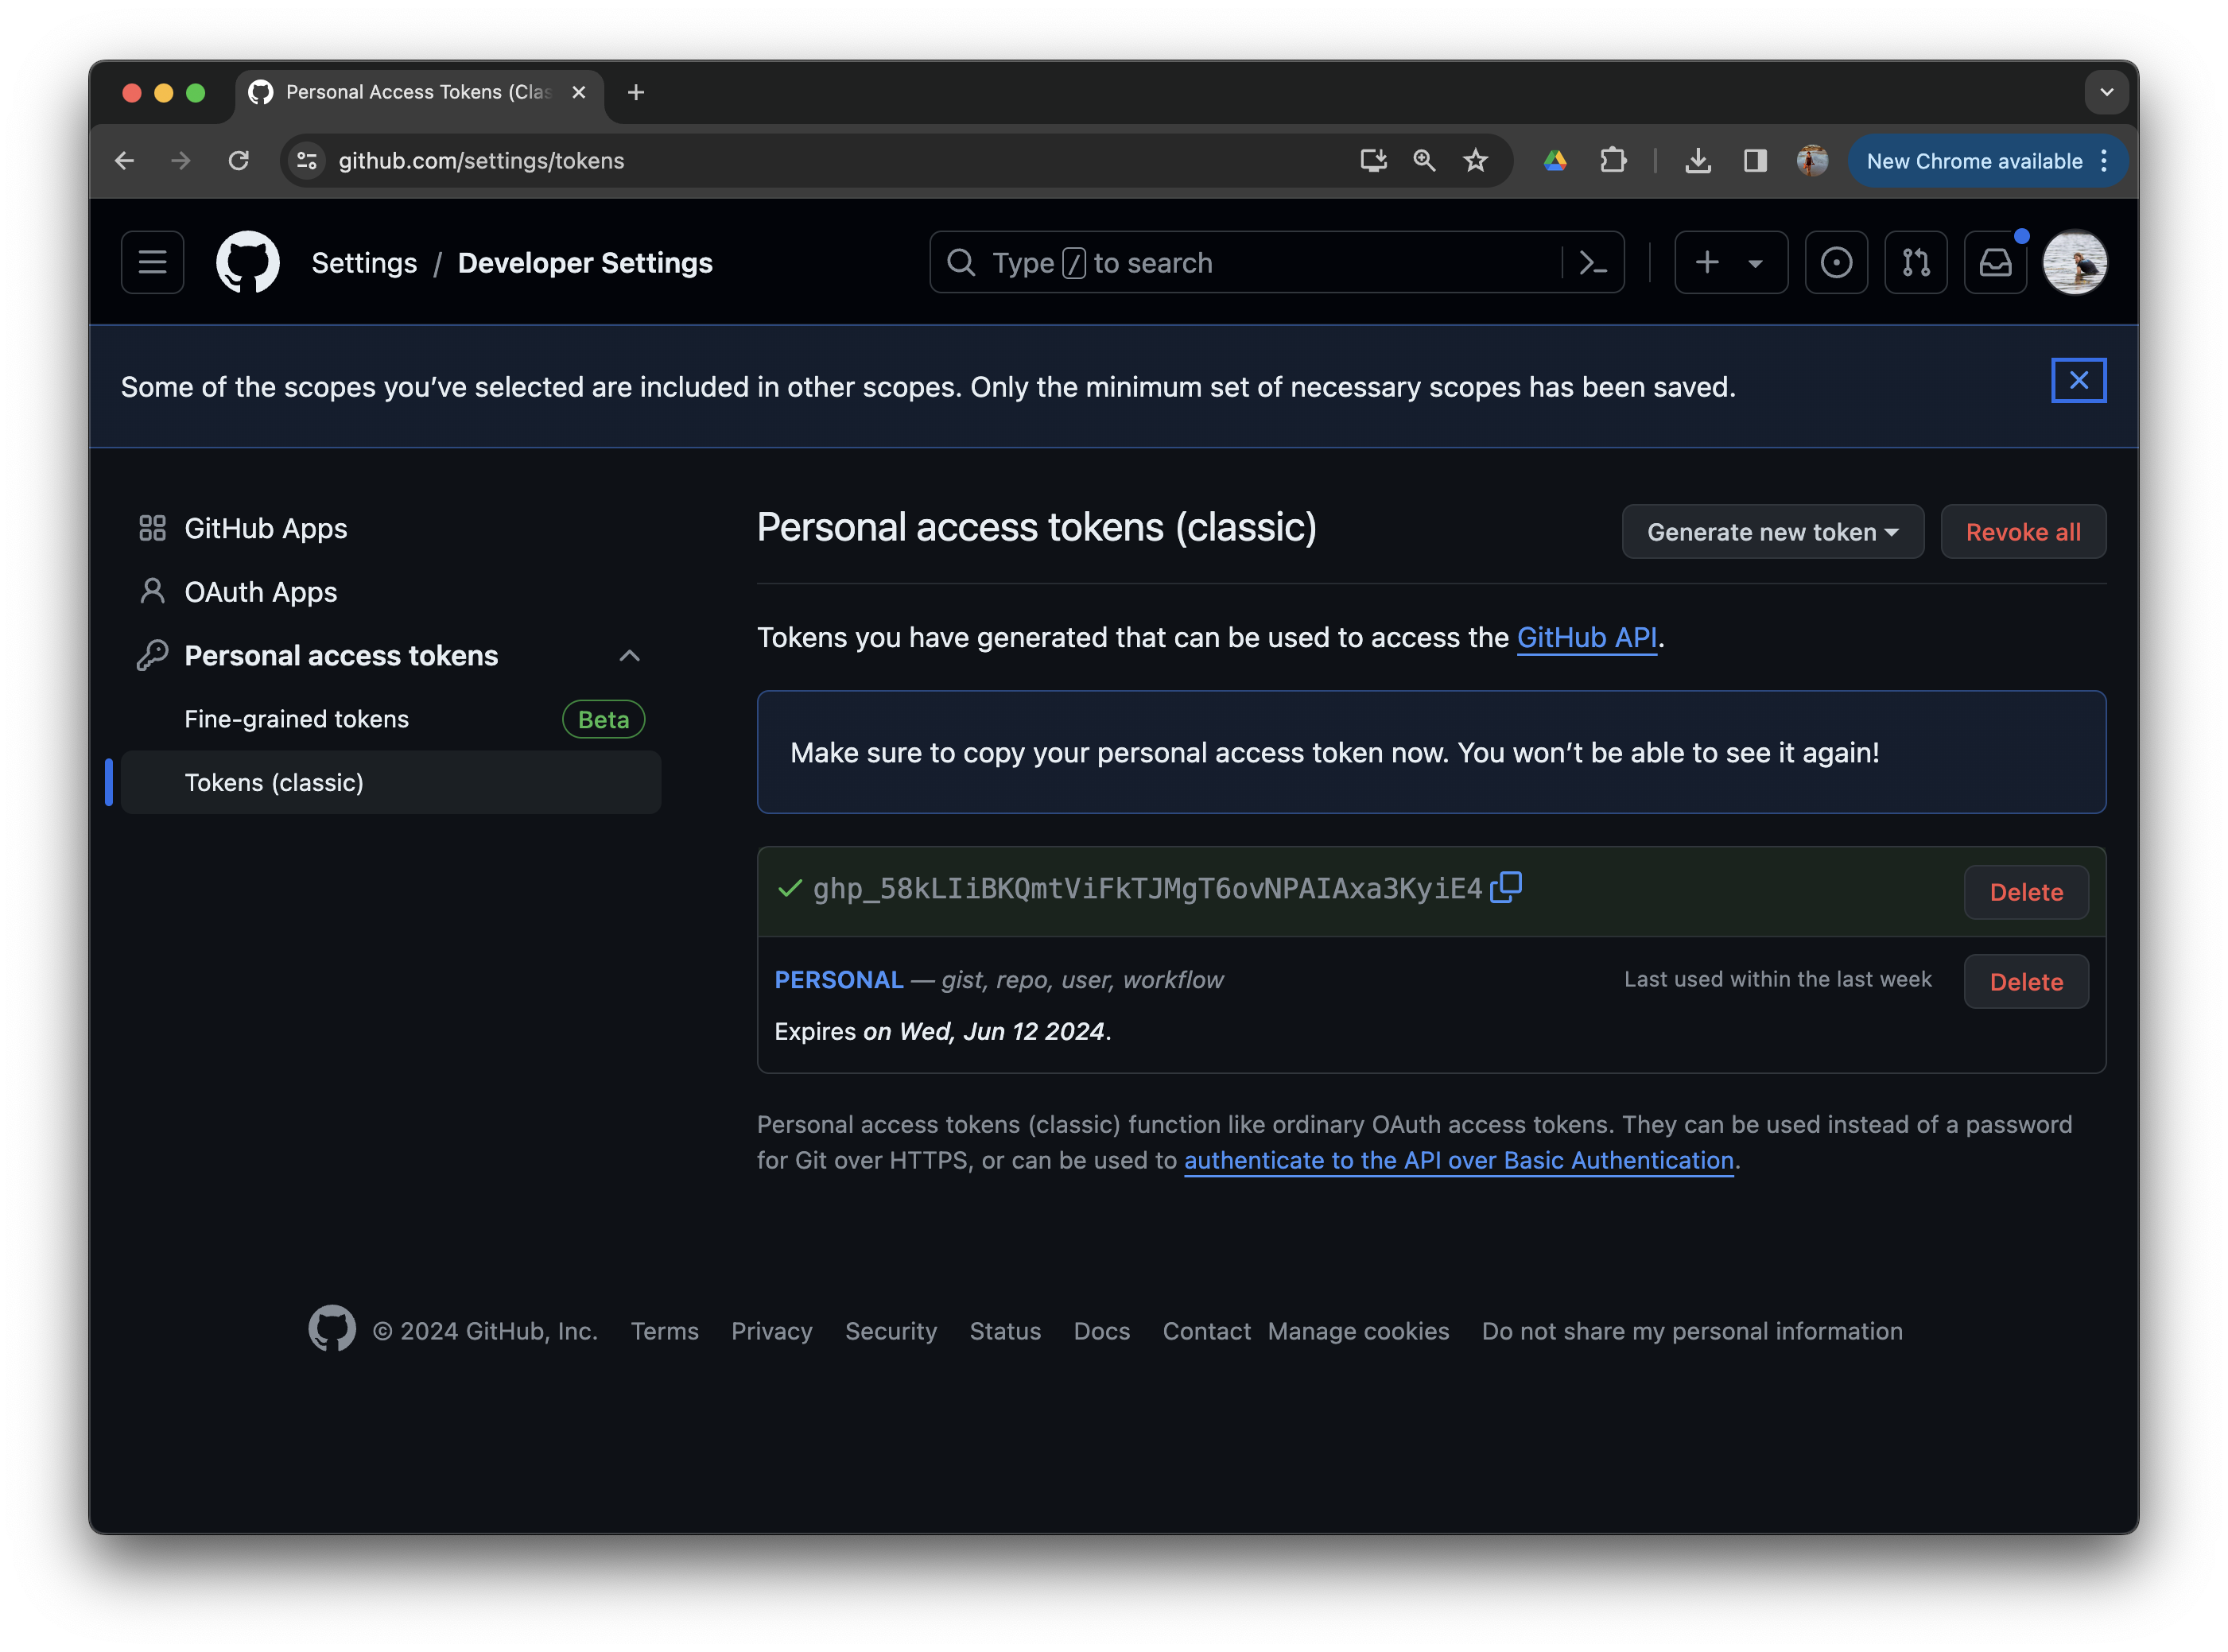
As the page warns, you’ll never be able to see this token again once you close the page, so save it somewhere right now before you do anything else.
For the duration of this course, the simplest stop-gap is to paste the token into a plain text file on your own local computer (e.g. TextEdit on Mac, Notepad on Windows). Treat that file as a strictly temporary copy: as soon as you can, move the token into a proper password manager (see the tip below) and delete the plain-text file.
Important
Do not save the PAT anywhere on Posit Cloud apart from the credential cache we’ll register it with in the next section. Posit Cloud projects can be reset or expire, so anything stored inside the project itself could be lost.
Store your PAT with a password manager
Treat this PAT like a password! Right now it lives only on GitHub’s side and in your clipboard: if you don’t save it somewhere else, you’ll lose access to it the moment you close the page.
If you use a password management app, such as 1Password (which you should), it’s highly recommended to save this PAT there as a password. That way you can retrieve it when needed and manage it securely.
If you ever generate a PAT but fail to capture it, you’ll need to generate another one. That’s not the end of the world, but you should also revoke the “lost” PAT on GitHub to keep things tidy. If you aren’t disciplined about labelling and revoking lost PATs, you’ll soon find yourself unsure which tokens are still in use.
Warning
Never hard-code your PAT into a script. A PAT should always be retrieved indirectly, for example from the Git credential store or an environment variable.
Configure GitHub credentials
Now that you’ve safely captured your PAT, we need to tell git about it so it can authenticate with GitHub on your behalf without prompting you to type the token in every push or pull. We do that by registering the PAT with the Git credential cache.
Configure with the credentials package
We use the credentials package, an rOpenSci-maintained R interface to the Git credential store (your system’s password manager for git).
The specific function we need is credentials::set_github_pat(): a one-call helper that hooks your PAT up to both the credential store and the current R session.
credentials::set_github_pat()When you run this, it does four things in order:
- Looks in your system’s credential store (macOS Keychain, Windows Credential Manager, or, on Posit Cloud, the temporary git credential cache) for an existing GitHub PAT entry.
- If no entry is found, prompts you to supply one: a dialog appears asking you to paste your PAT into the password field.
- Saves the supplied PAT to the credential store, so it’s available next time without re-prompting.
-
Loads the PAT into your current R session as the
GITHUB_PATenvironment variable, so R packages that talk to GitHub (usethis,gh,pak, etc.) can pick it up automatically.
Respond to the prompt with your personal access token (PAT).
To verify the credential is now cached, run credentials::set_github_pat() again. The second time around, it finds the entry already in the store, skips the prompt, and confirms which credential helper supplied the cached PAT (it never prints the token value itself):
credentials::set_github_pat()Using GITHUB_PAT from Anna Krystalli (credential helper: cache)Load credentials in each session
Running credentials::set_github_pat() also makes your PAT available to your current R session but it won’t be available in any new R sessions.
To make sure it’s loaded automatically in each session, we can add the credentials::set_github_pat() command to our .Rprofile file.
The .Rprofile file is a special R script that runs automatically when you start an R session. It is used to customize your R environment by setting up preferences, loading commonly used packages, defining functions, or configuring settings.
We can open the .Rprofile file for editing with:
usethis::edit_r_profile()☐ Modify /home/r1606737/.Rprofile.
☐ Restart R for changes to take effect.Now paste credentials::set_github_pat() into the file and save.
.Rprofile
credentials::set_github_pat()
Caution
For security reasons, Posit Cloud only caches the following configurations temporarily. While more secure, it does mean we’ll need to perform these steps in new projects and every 12 hours in older projects.
On your local system however, you will only need to do this once.
To allow your local RStudio application to communicate seamlessly with GitHub when pushing and pulling through the GUI, I also recommend you go a step further and setup an ssh key. This will allow you to authenticate with GitHub without having to enter your username and password every time.
See Set up keys for SSH in Happy Git with R as well the credentials package vignette for more information.
Verify your setup
With both git and GitHub now configured, let’s run usethis::git_sitrep() again to confirm everything is in place before we move on:
usethis::git_sitrep()── Git global (user)
• Name: 'Anna Krystalli'
• Email: 'annakrystalli@googlemail.com'
• Global (user-level) gitignore file: <unset>
• Vaccinated: FALSE
ℹ See `?git_vaccinate` to learn more
ℹ Defaulting to 'https' Git protocol
• Default Git protocol: 'https'
• Default initial branch name: <unset>
── GitHub user
• Default GitHub host: 'https://github.com'
• Personal access token for 'https://github.com': '<discovered>'
• GitHub user: 'annakrystalli'
• Token scopes: 'gist, repo, user, workflow'
• Email(s): 'annakrystalli@googlemail.com (primary, verified)'
── Active usethis project: '/cloud/project' ──
ℹ Active project is not a Git repoCompared to the first sitrep, two things have flipped from <unset> to ✓: your global git name and email and your GitHub PAT. The active project is still not a git repo, which is the next thing we’ll fix.
Setting up version control for your project
Turn our project into a repository
The Posit Cloud project we copied isn’t a git repo yet, so let’s initialise it now in one call with usethis::use_git():
Warning
This will try to commit everything in the repo so far in one go!
Override that behaviour by SELECTING A NEGATIVE RESPONSE WHEN ASKED.
usethis::use_git()✔ Initialising Git repo
✔ Adding '.Rhistory', '.RData' to '.gitignore'
There are 9 uncommitted files:
* '.gitignore'
* '.Rbuildignore'
* 'analysis.R'
* 'data-raw/'
* 'data/'
* 'report.html'
* 'report.Rmd'
* 'R/'
* 'project.Rproj'
Is it ok to commit them?
1: Negative
2: Nope
3: I agree
Selection: Next allow RStudio to restart when asked:
● A restart of RStudio is required to activate the Git pane
Restart now?

1: Absolutely
2: Absolutely not
3: Negative
The git panel should now be visible in the top right of your RStudio window.
Review git status
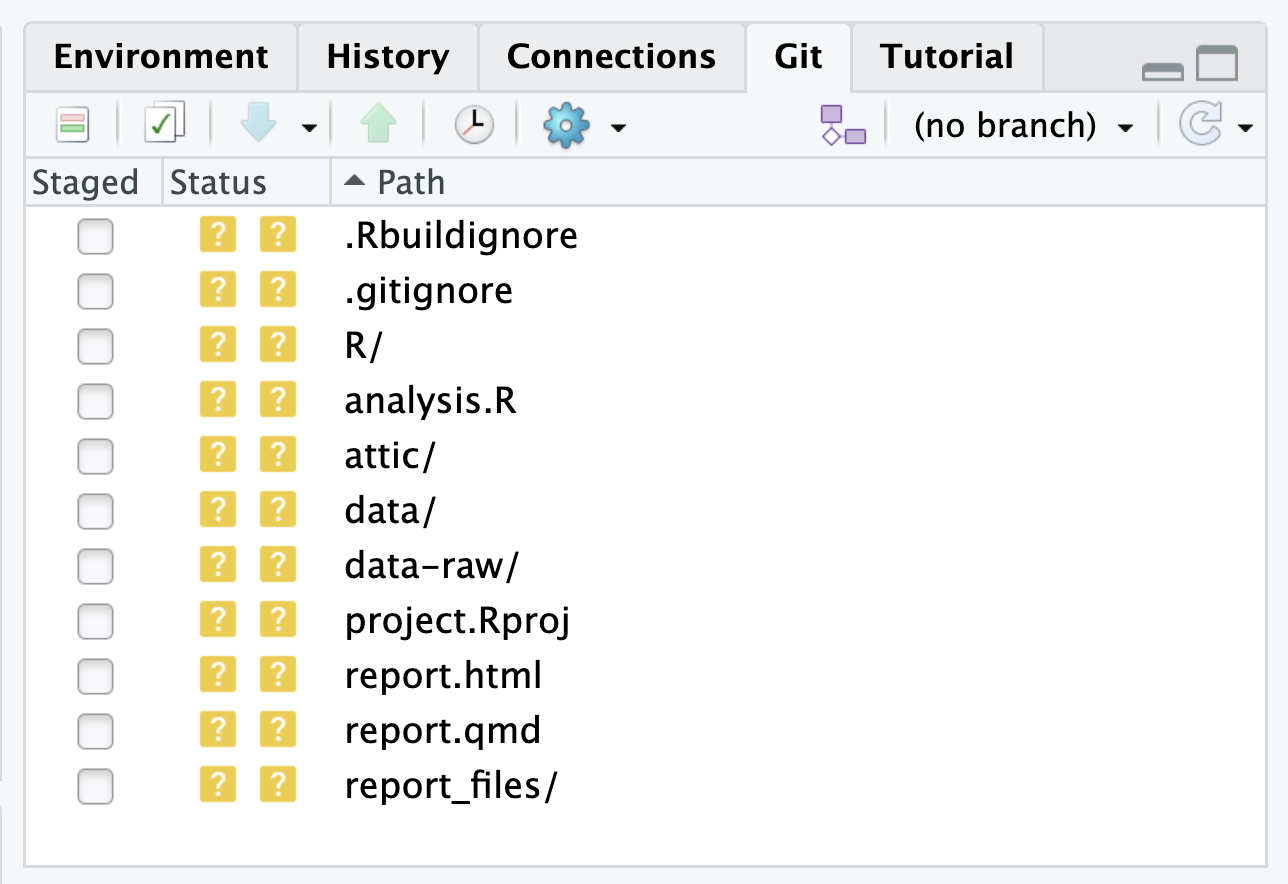
In our project, let’s have a look at the RStudio Git tab. It shows all the files currently in the root of our project that git is aware of. The yellow ? indicates none of the files have been added to git yet: git can see them, but none are being formally tracked for changes.
Ignoring files through .gitignore
The .gitignore file is a tracked, plain-text file at the root of your repository that lists patterns of paths git should pretend don’t exist. Anything matched by .gitignore won’t appear in the git pane, can’t be staged, and can’t be committed by accident. R / RStudio projects start with one already populated with sensible defaults.
There may be other files that we don’t want to commit to git, e.g.
- data files that are too large
- documents with sensitive information (e.g. authorisation tokens)
- intermediate files that we don’t need to save copies of
-
scratch or development files that aren’t formally part of the project (e.g. anything in
attic/)
We can tell git to ignore them by adding them to the .gitignore file. By doing this upfront, we minimise the danger of committing them to our project’s history by accident.
Open .gitignore
When we open .gitignore we see there are a number of standard files already added.
.Rproj.user
.Rhistory
.Rdata
.httr-oauth
.DS_Store
.quarto
These are standard files it’s best practice to never commit to version control, especially if we are going to share our repository online.
Let’s go ahead and add the rest of the files we want to ignore.
Add files and folders to .gitignore
.gitignore regex
You can use regex (regular expressions) in .gitignore files to ignore files according to a pattern.
-
directoryname/*will ignore all files in a directory. -
*.htmlwill ignore any file ending in.html. - prefixing a pattern with
!negates it (i.e. forces git not to ignore it).
So let’s use regex to:
- ignore all files in
attic/ - ignore all files in
data-raw/wood-survey-data-master/apart from the NEON logo (neon-logo.png) andreferences.bib, which are required to successfully render our report.
To do so, add the following to the bottom of .gitignore
attic/*
data-raw/wood-survey-data-master/*
!data-raw/wood-survey-data-master/neon-logo.png
!data-raw/wood-survey-data-master/references.bib
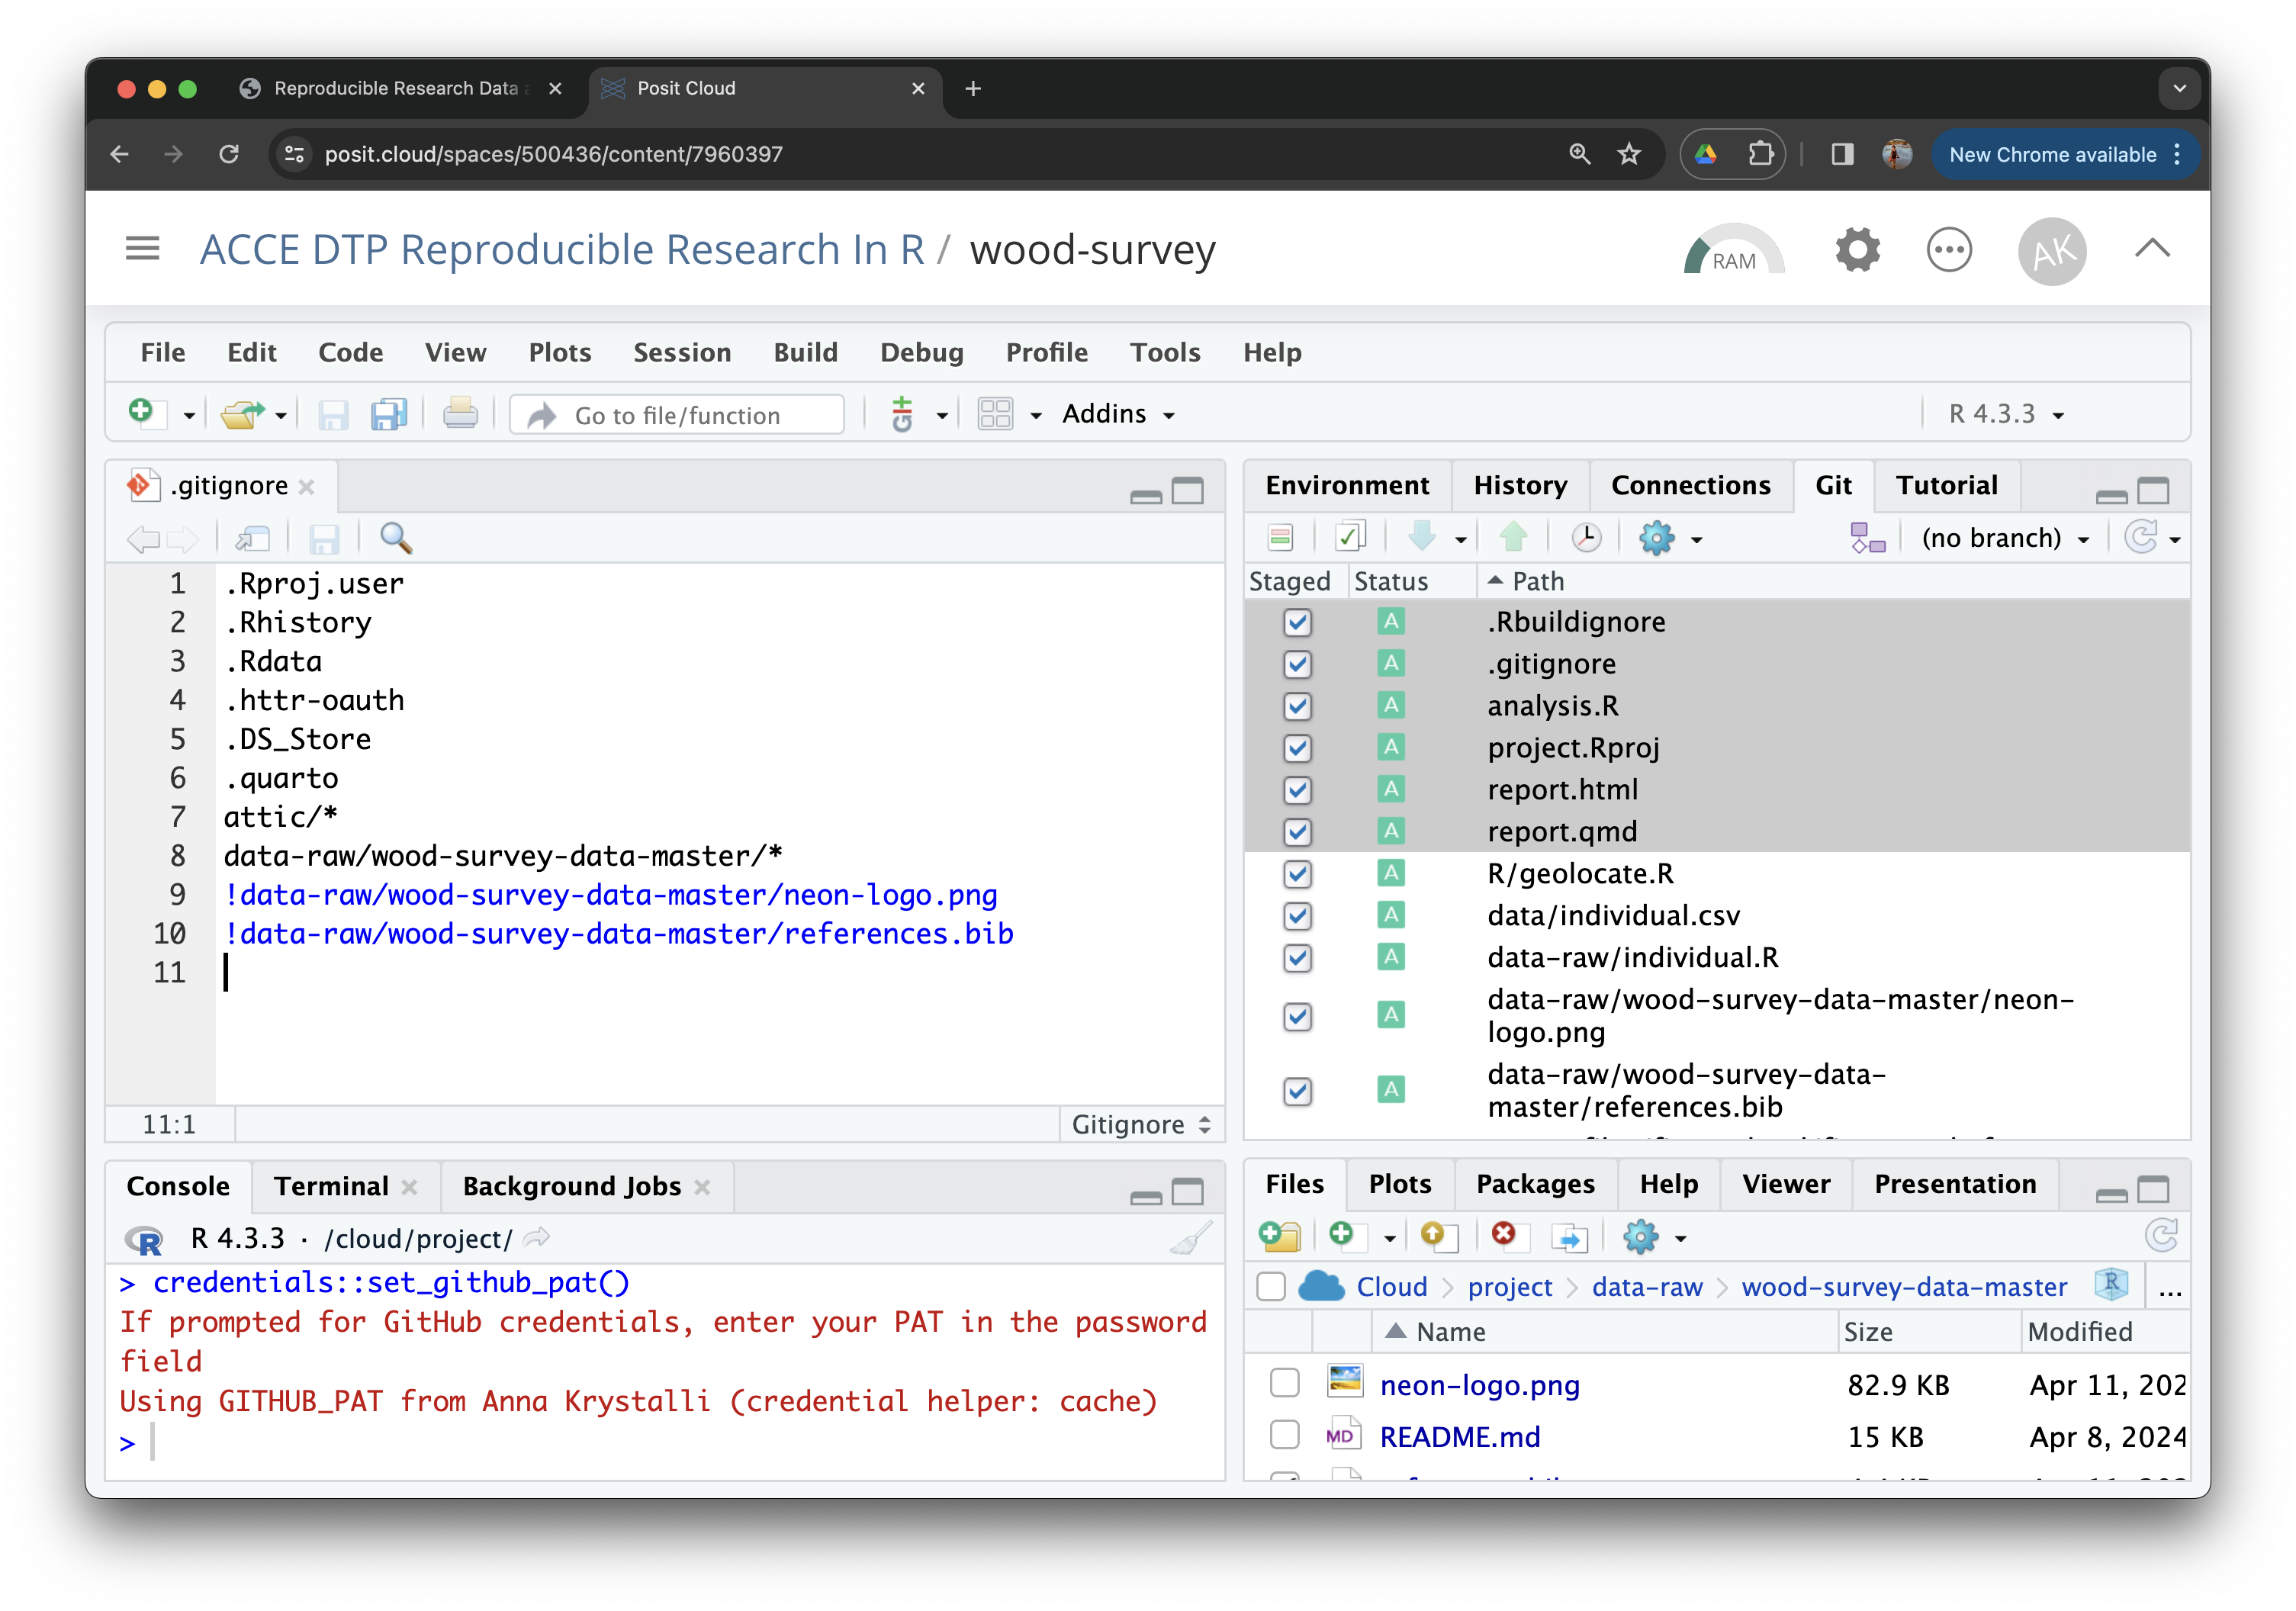
You should notice that once the .gitignore file is saved, the files and directories we’ve added to it are no longer visible in the git panel as options to add to a commit.
Commit project files
Add files
The first step of a commit is to add the files we want to be part of the commit to the staging area.
To do so, just tick the box next to any files and/or directories in the git pane.
Given we want to commit everything, and git is already ignoring the files we’re not interested in, it’s safe to add all files to the staging area in one go.
Tip
Note how when the data-raw folder is selected, only 3 files are added. That’s .gitignore in action!
Commit changes
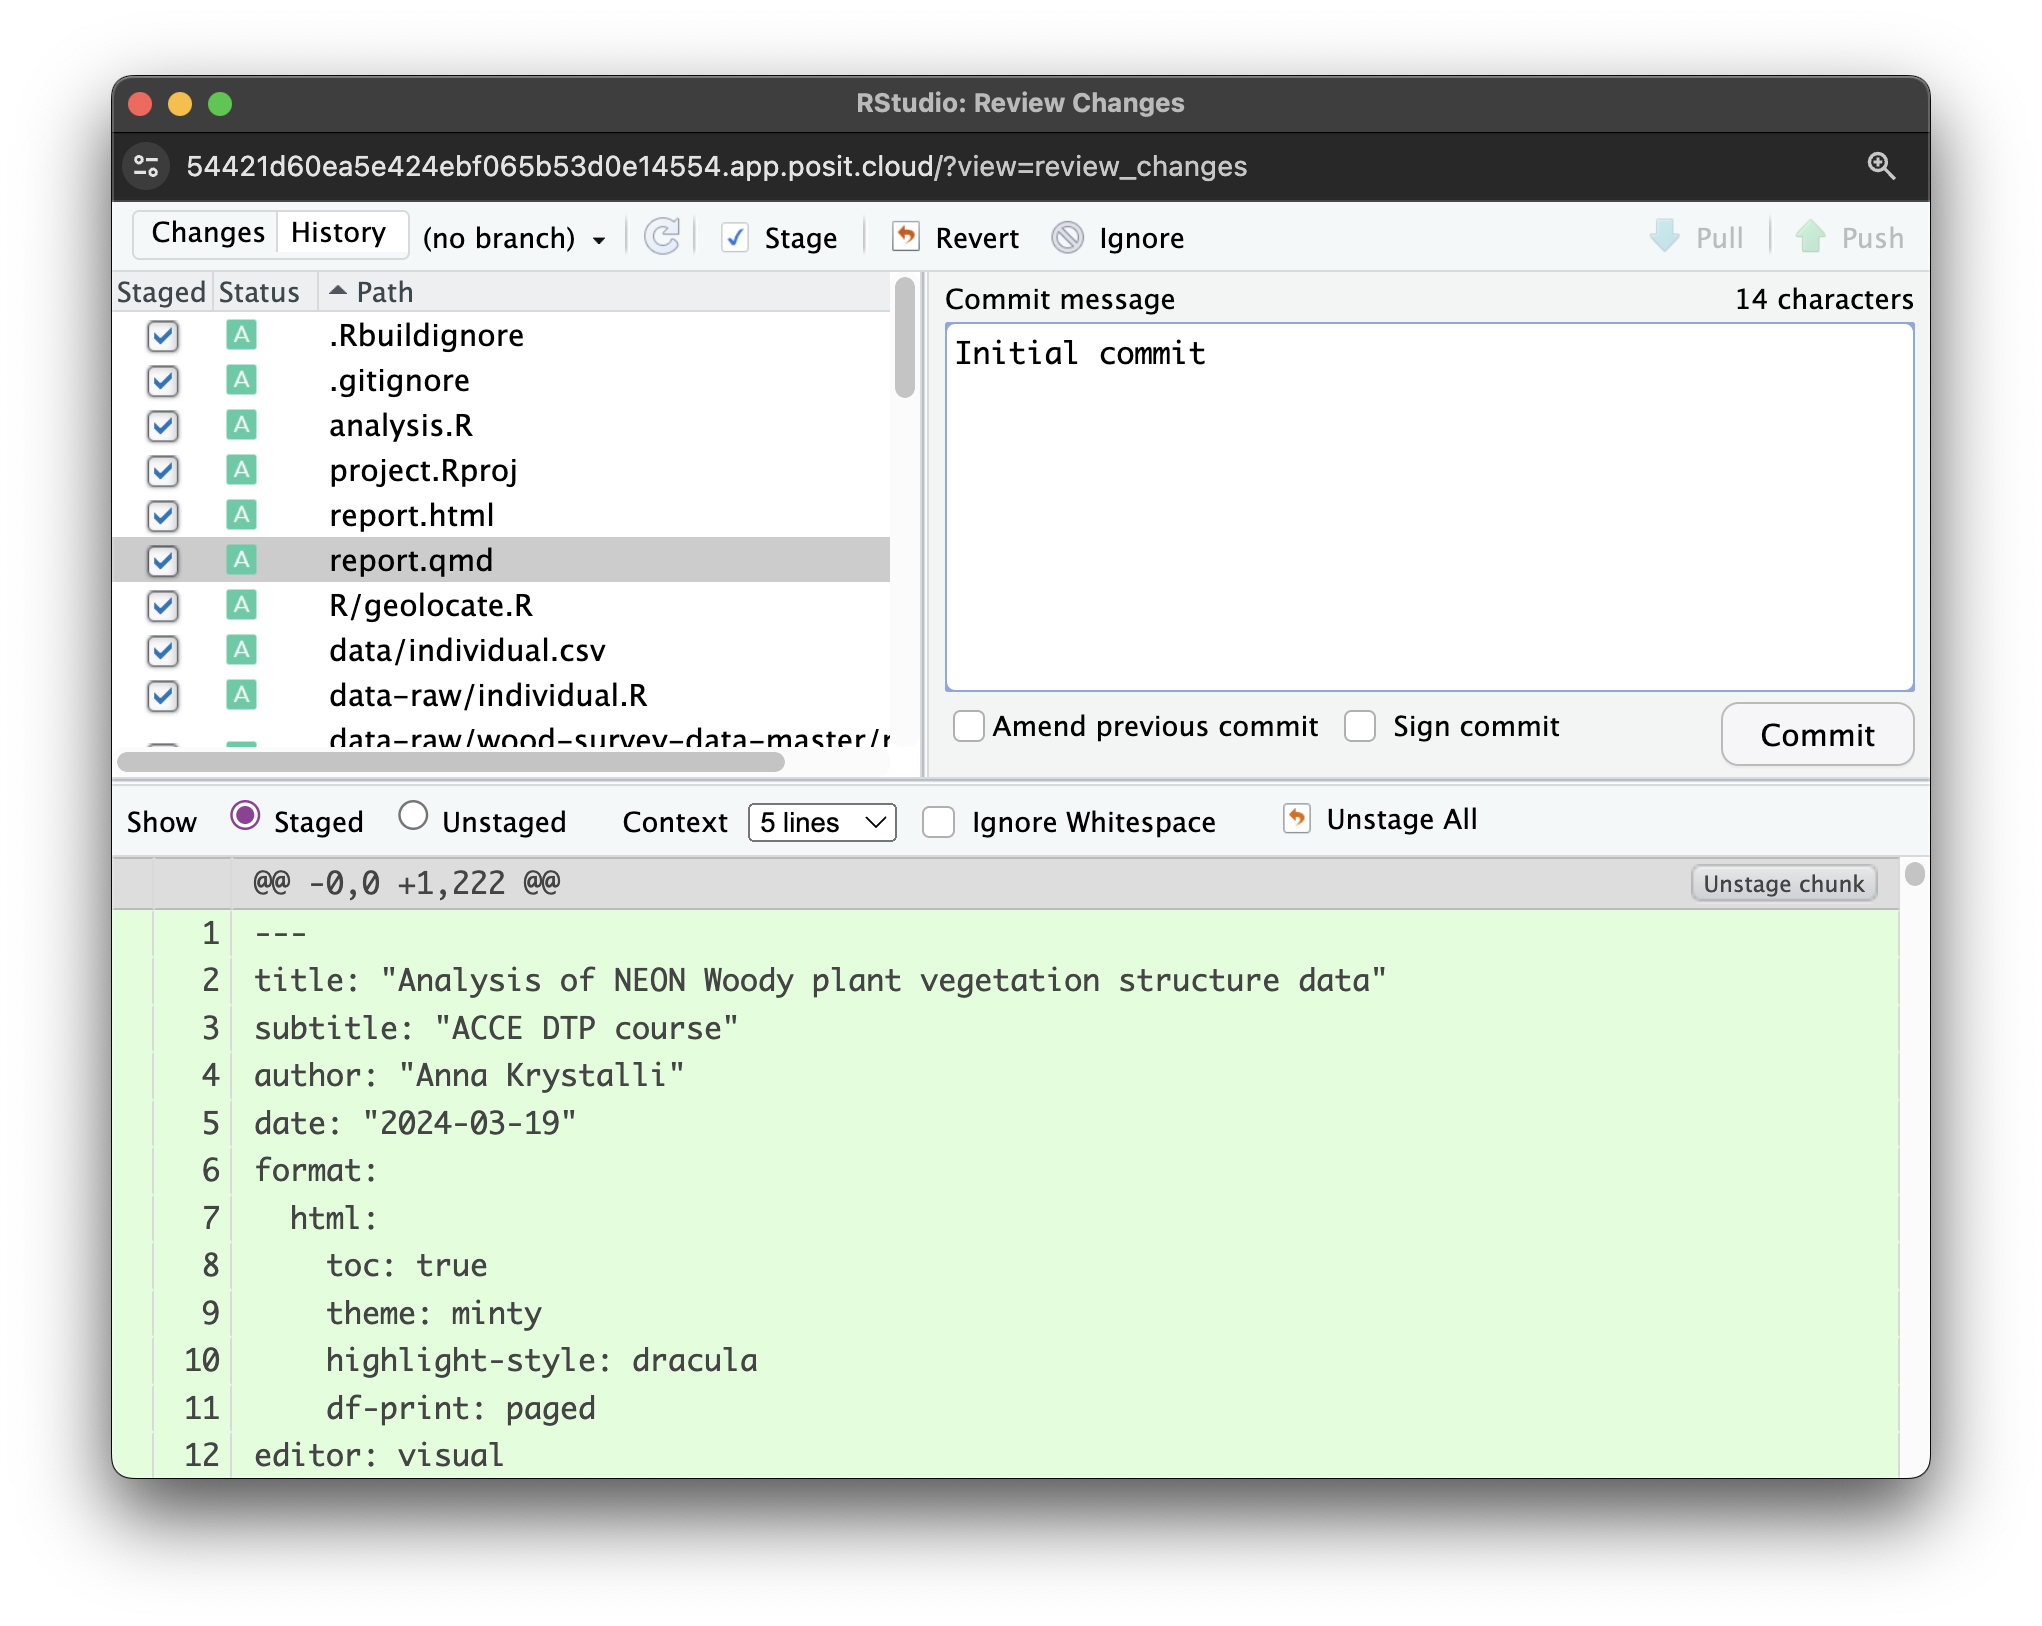
Write an appropriate commit message (e.g. “Initial commit”) and click the Commit button:
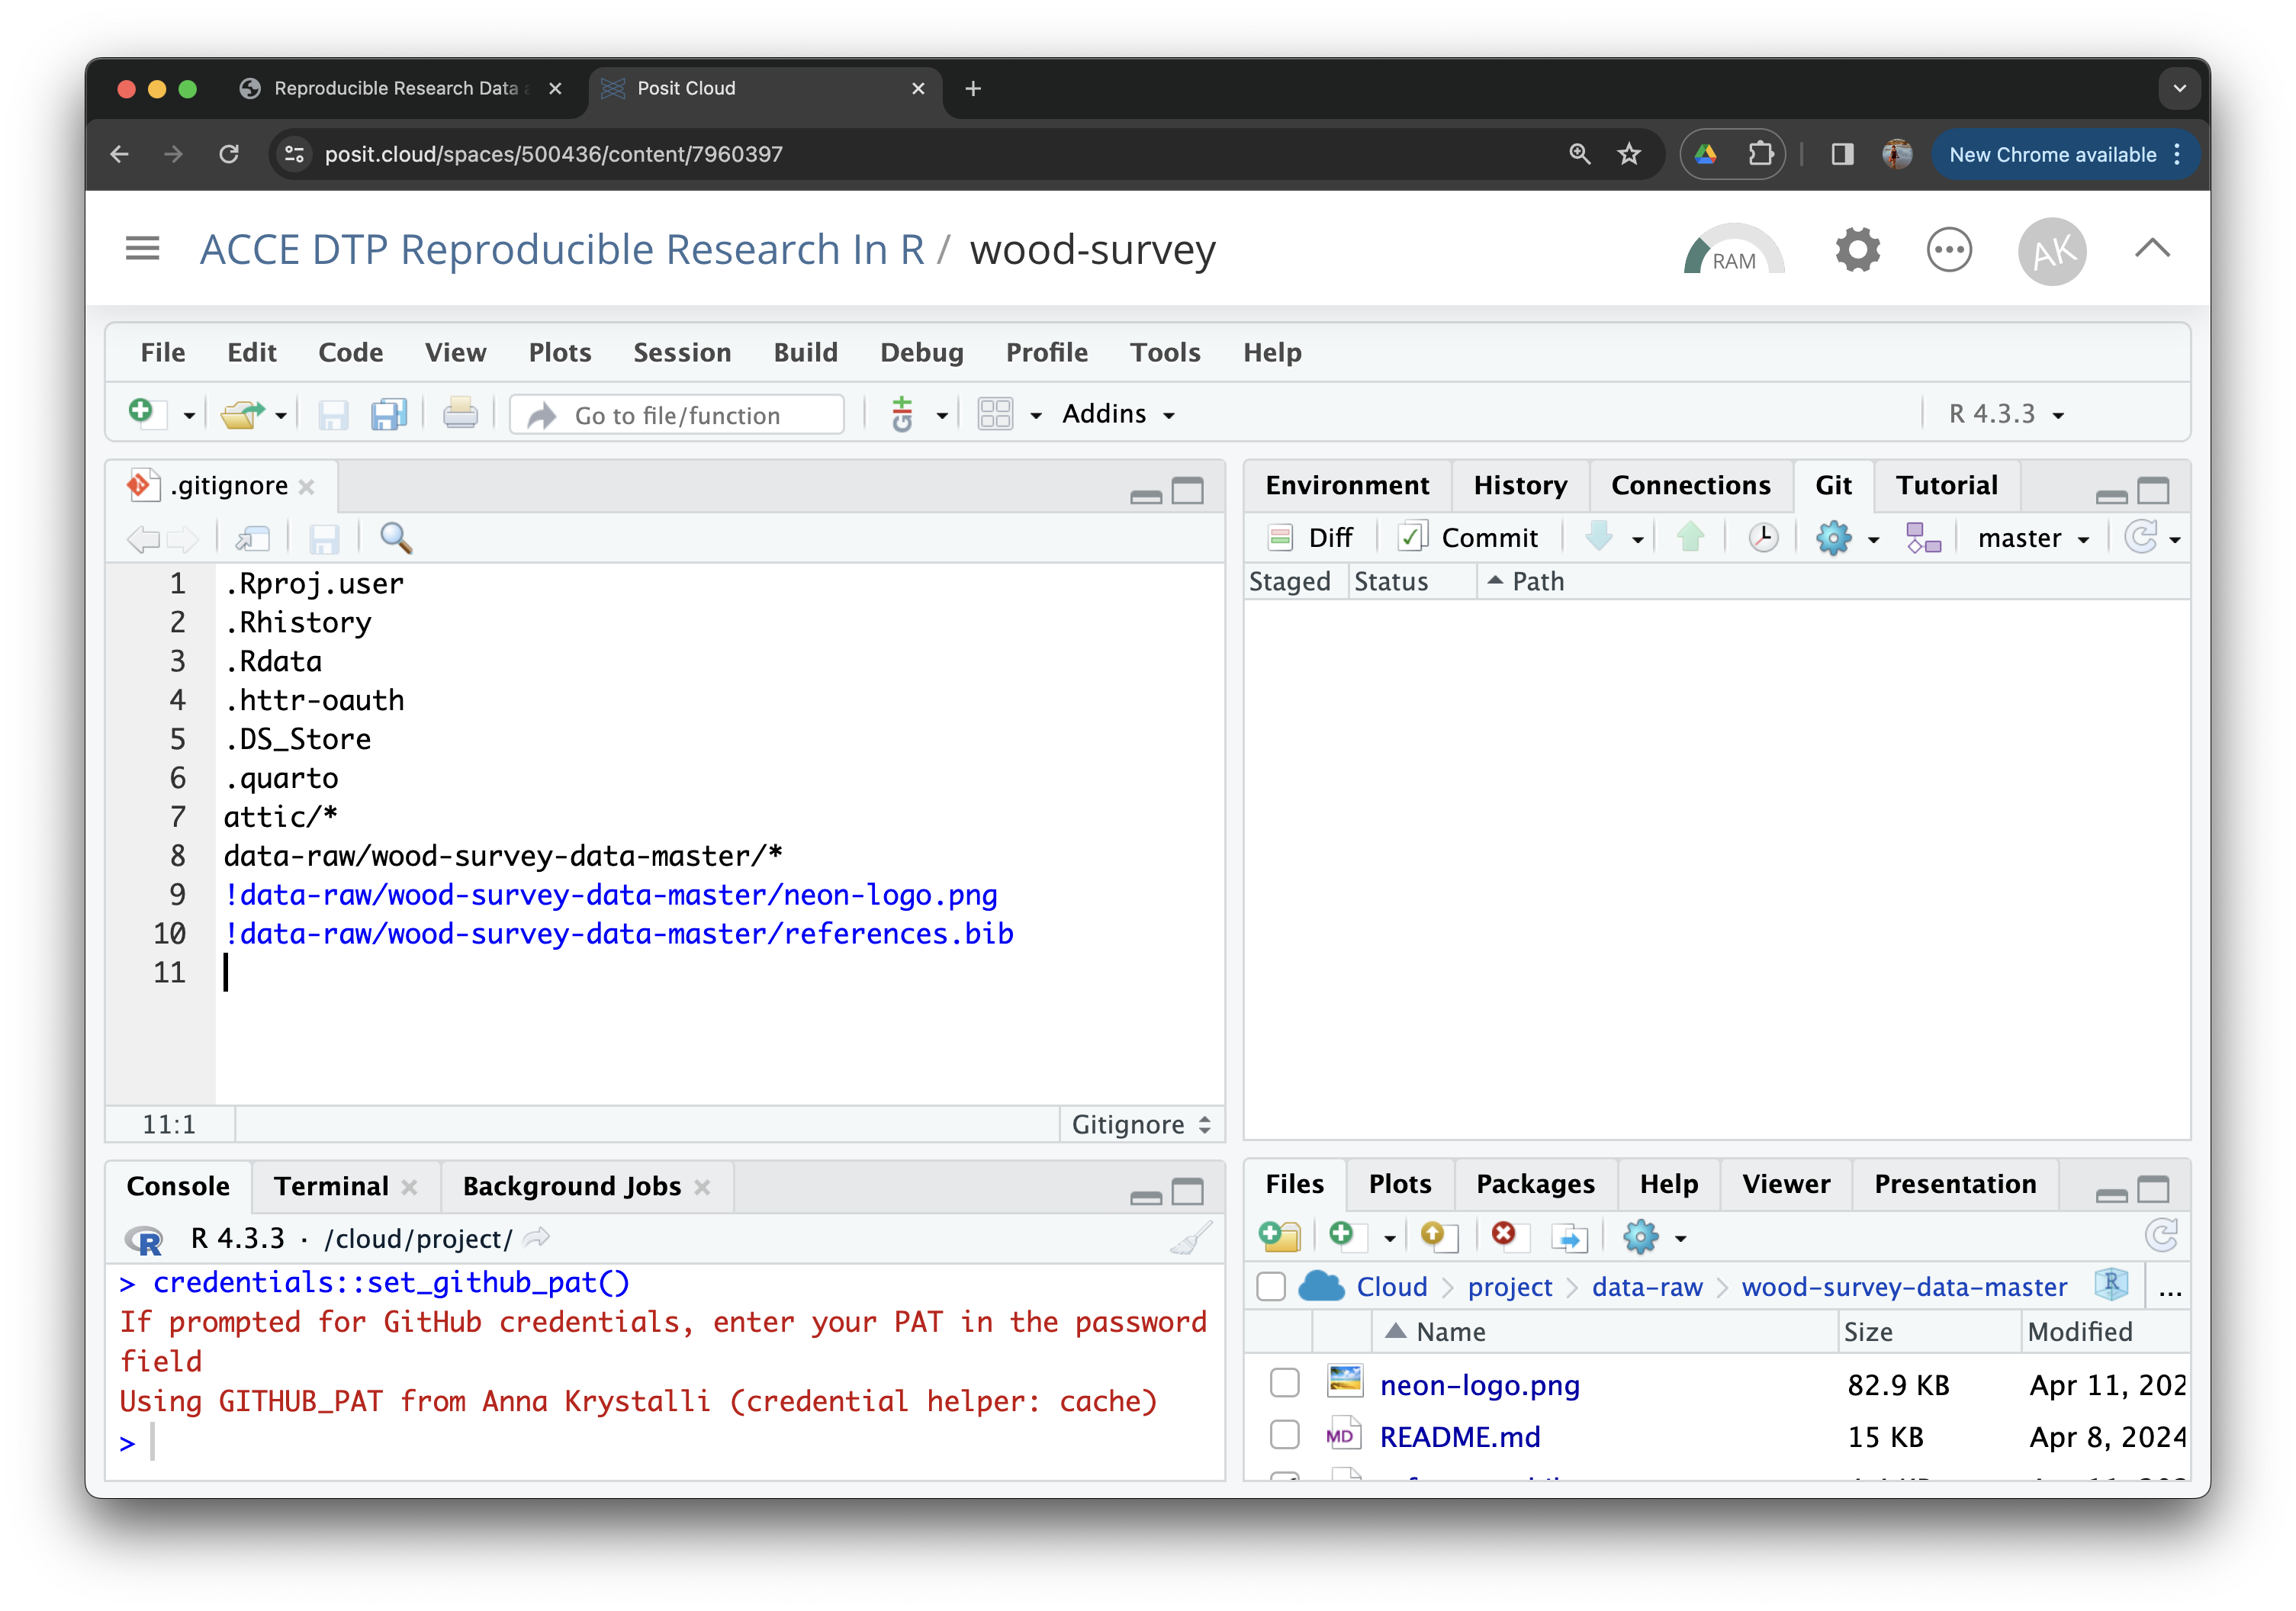
Once the commit is complete, the git panel should be clear:
Rename default branch to main
usethis::use_git() still initialises a git repo with the legacy master branch name. Now that we’ve made our first commit (so the branch actually exists), let’s rename it to the modern convention of main before we go any further:
usethis::git_default_branch_rename()ℹ Local branch "master" appears to play the role of the
default branch.
✔ Moving local "master" branch to "main".
☐ Be sure to update files that refer to the default branch
by name.
Consider searching within your project for "master".Create a README
Our repository also needs a README. We only need a simple plain markdown (.md) file for our README.
What goes in a README?
A good README answers what a new visitor (or future-you) most needs to know:
- What is this project?
- How do I install / set it up?
- How do I use it?
- How is the repository organised?
We’ll keep ours deliberately simple for the tutorial. For real projects, see makeareadme.com (general) or The Turing Way and Wilson et al.’s Good enough practices in scientific computing (academic). For a fully worked academic example built up later in this course, see the research compendium walk-through.
We can create a template using usethis::use_readme_md():
usethis::use_readme_md()Edit README
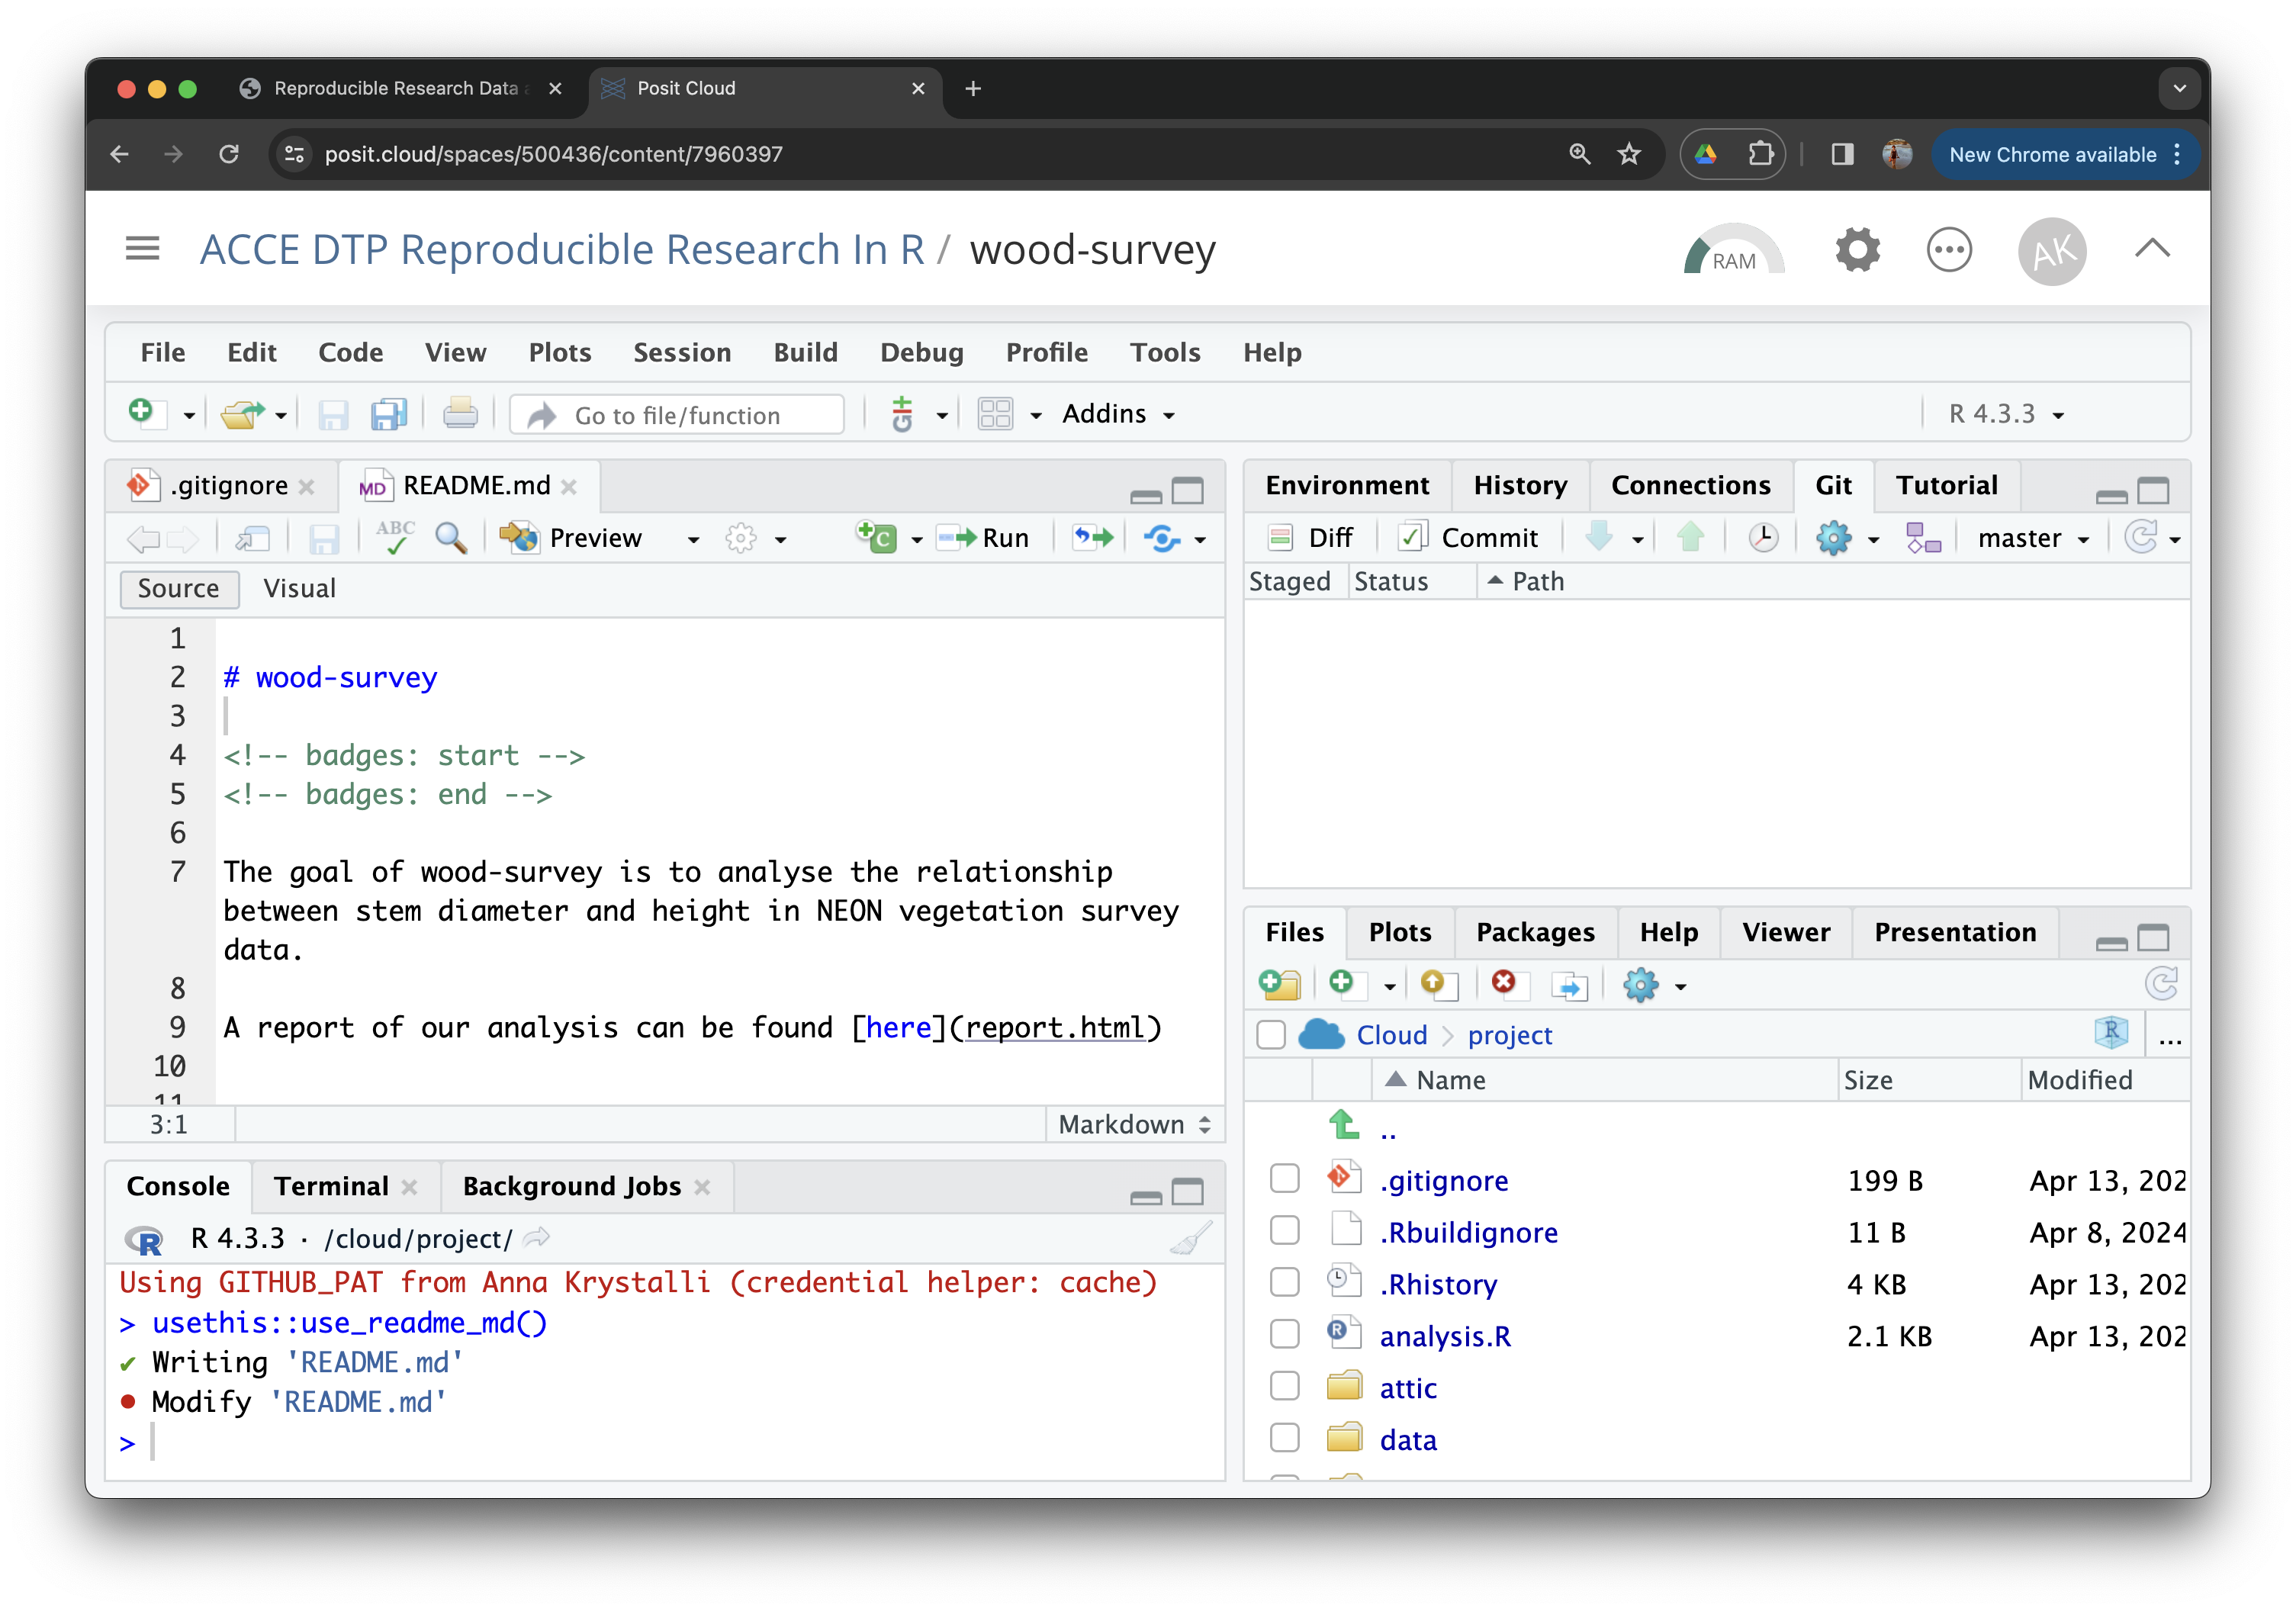
Adapt the template by adding a short description of your project, including local links to your report and dataspice information page.
I’ve added the following:
# wood-survey

<!-- badges: start -->

<!-- badges: end -->

The goal of wood-survey is to analyse the relationship between stem diameter and height in NEON vegetation survey data.

A report of our analysis can be found [here](report.html)

Details about the data used can be found [here](data/index.html)
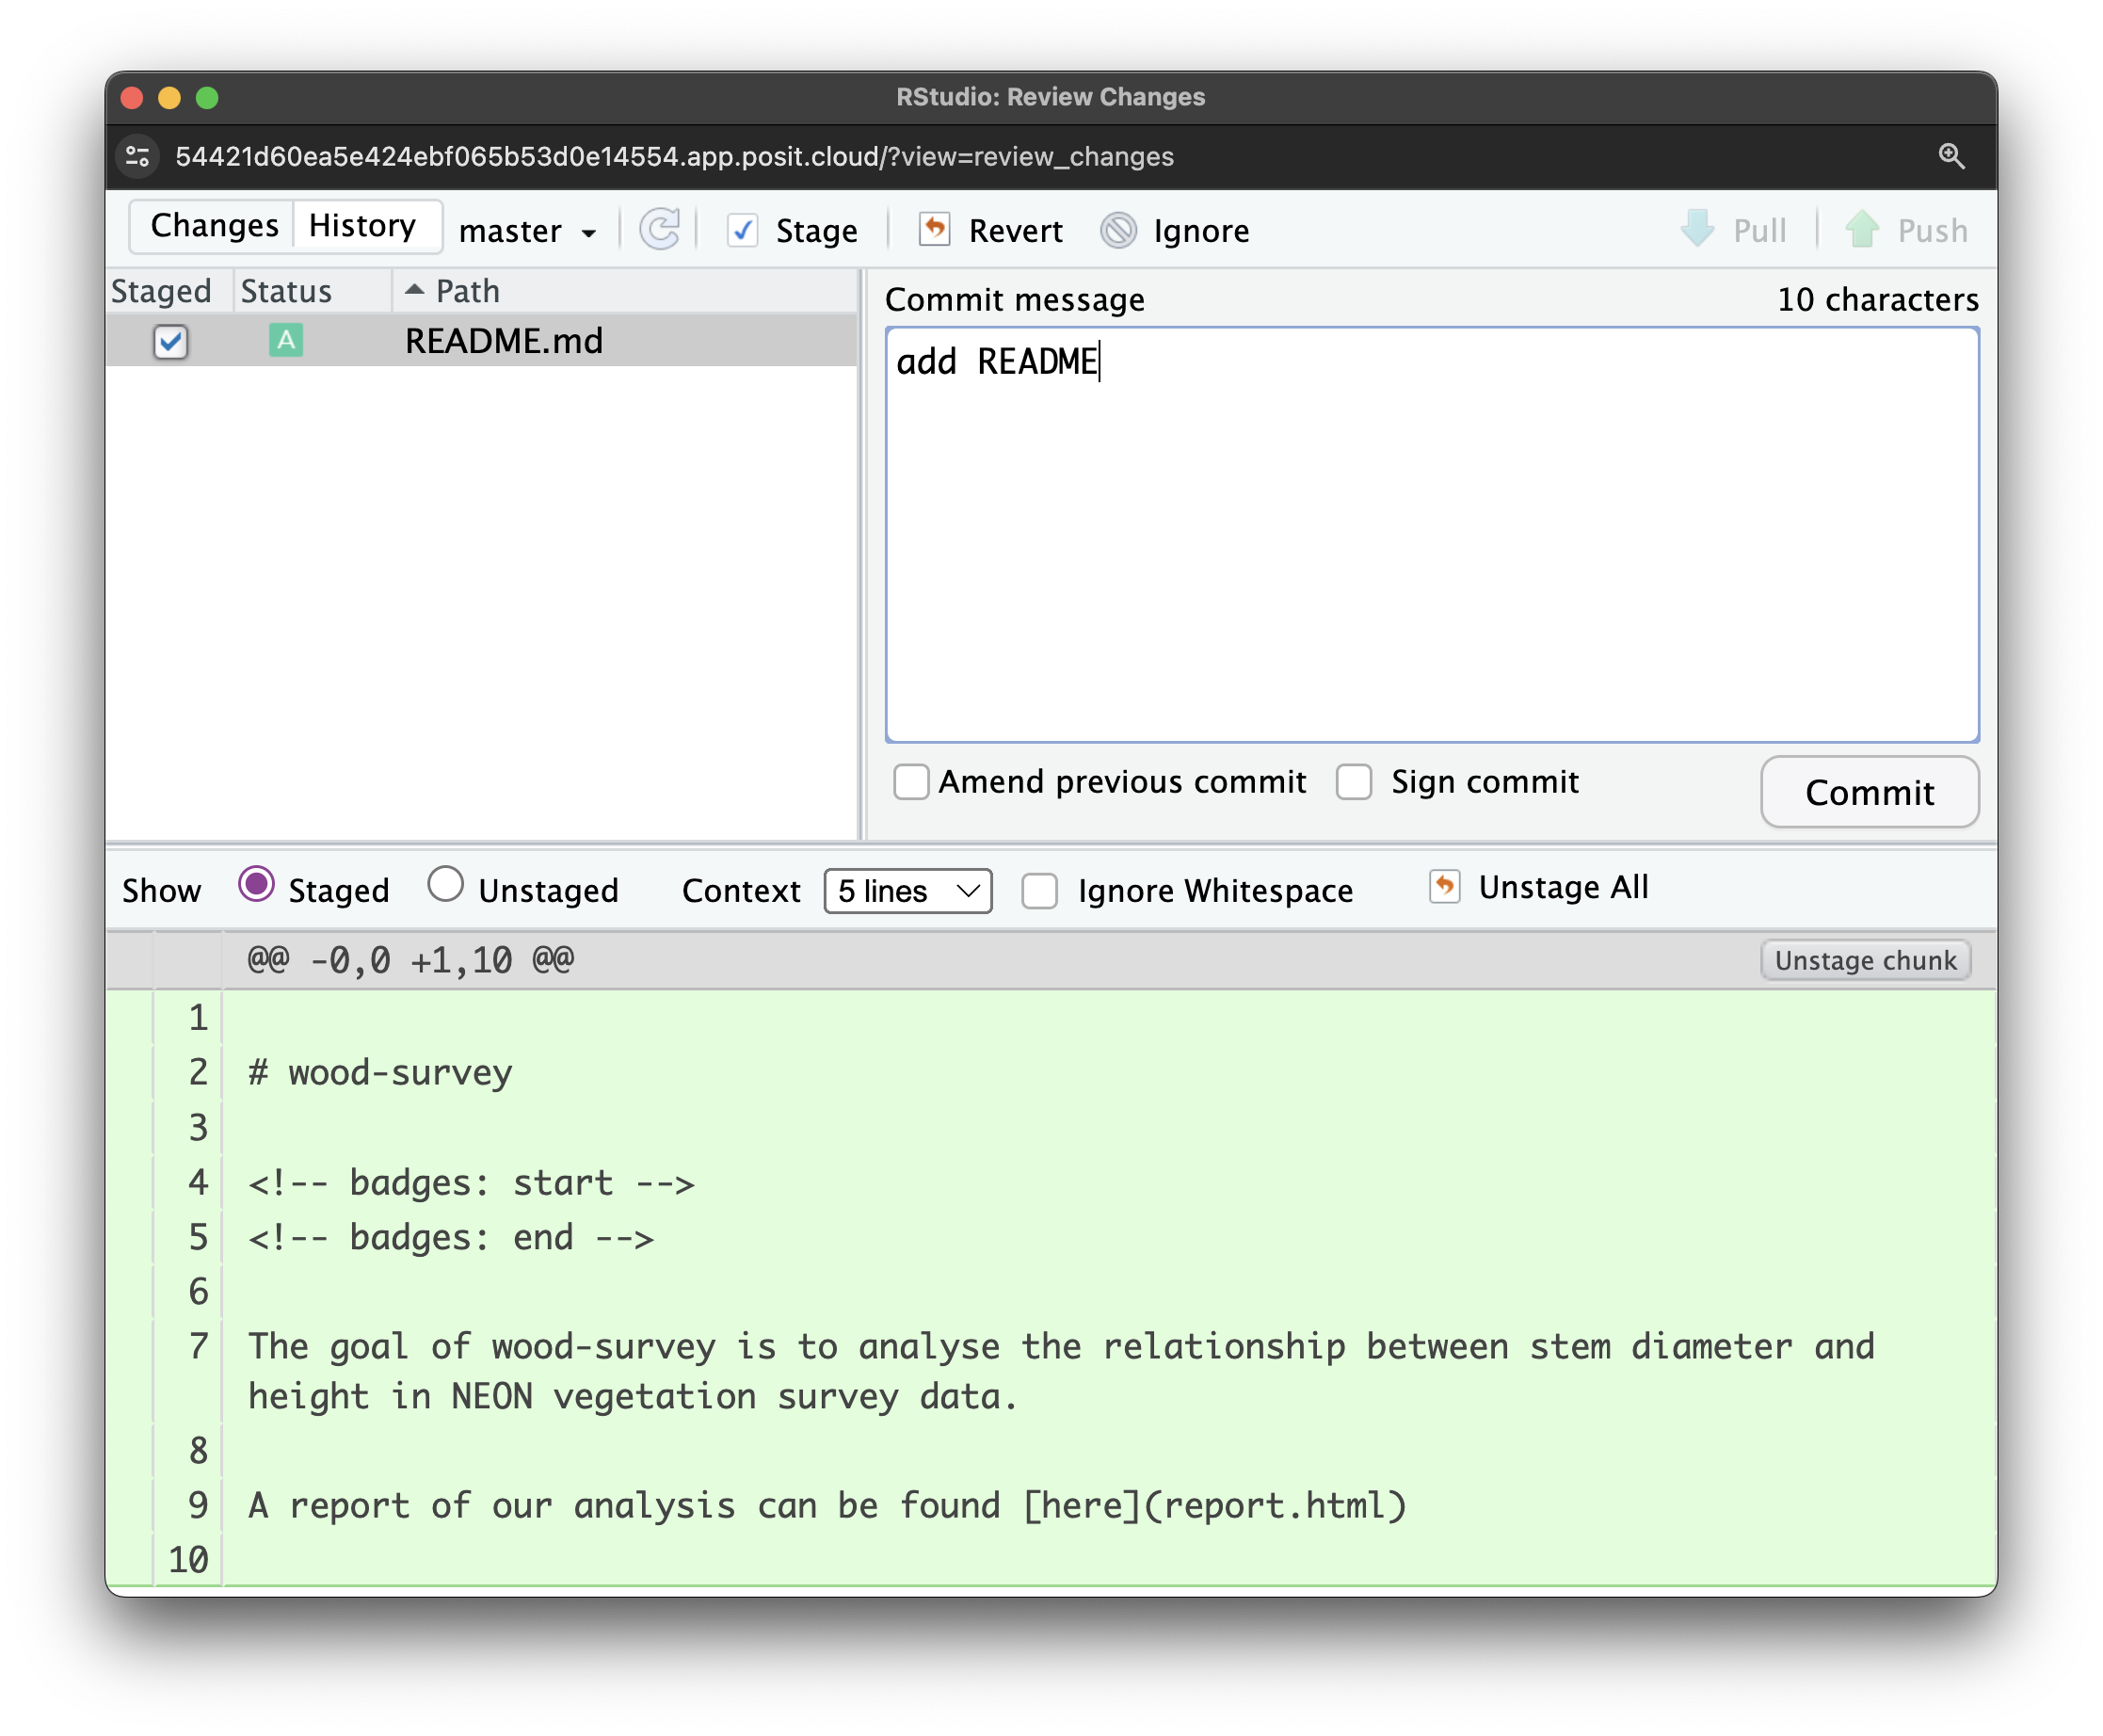
Add and commit your new README.
Create repository on GitHub
So far we’ve only been working with a local version of our project (i.e. only available to us in Posit Cloud). Now we want to share it with the world through GitHub!
Because we’ve set up a GITHUB_PAT, we can use function usethis::use_github() to create a GitHub repository for our project:
usethis::use_github(protocol = "https")✔ Creating GitHub repository 'annakrystalli/project'
✔ Setting remote 'origin' to 'https://github.com/annakrystalli/project.git'
✔ Pushing 'main' branch to GitHub and setting 'origin/main' as upstream branch
✔ Opening URL 'https://github.com/annakrystalli/project'In one call, use_github() does three things:
- Creates a new repository on GitHub under your account (authenticating with your PAT).
-
Adds a remote named
origin. In git, a remote is a named pointer from your local repo to another copy of it somewhere else (here, the GitHub one).originis the conventional name for the main remote. So now your local repo knows that “push to origin” means “push to the GitHub copy at this URL”. -
Pushes your local
mainbranch to GitHub and sets it up to trackorigin/main. Tracking links your localmainto the GitHubmain, so git knows where to push to (and pull from) without you having to specify every time.
From here on, the repo lives in two places: locally on Posit Cloud, and remotely on GitHub.
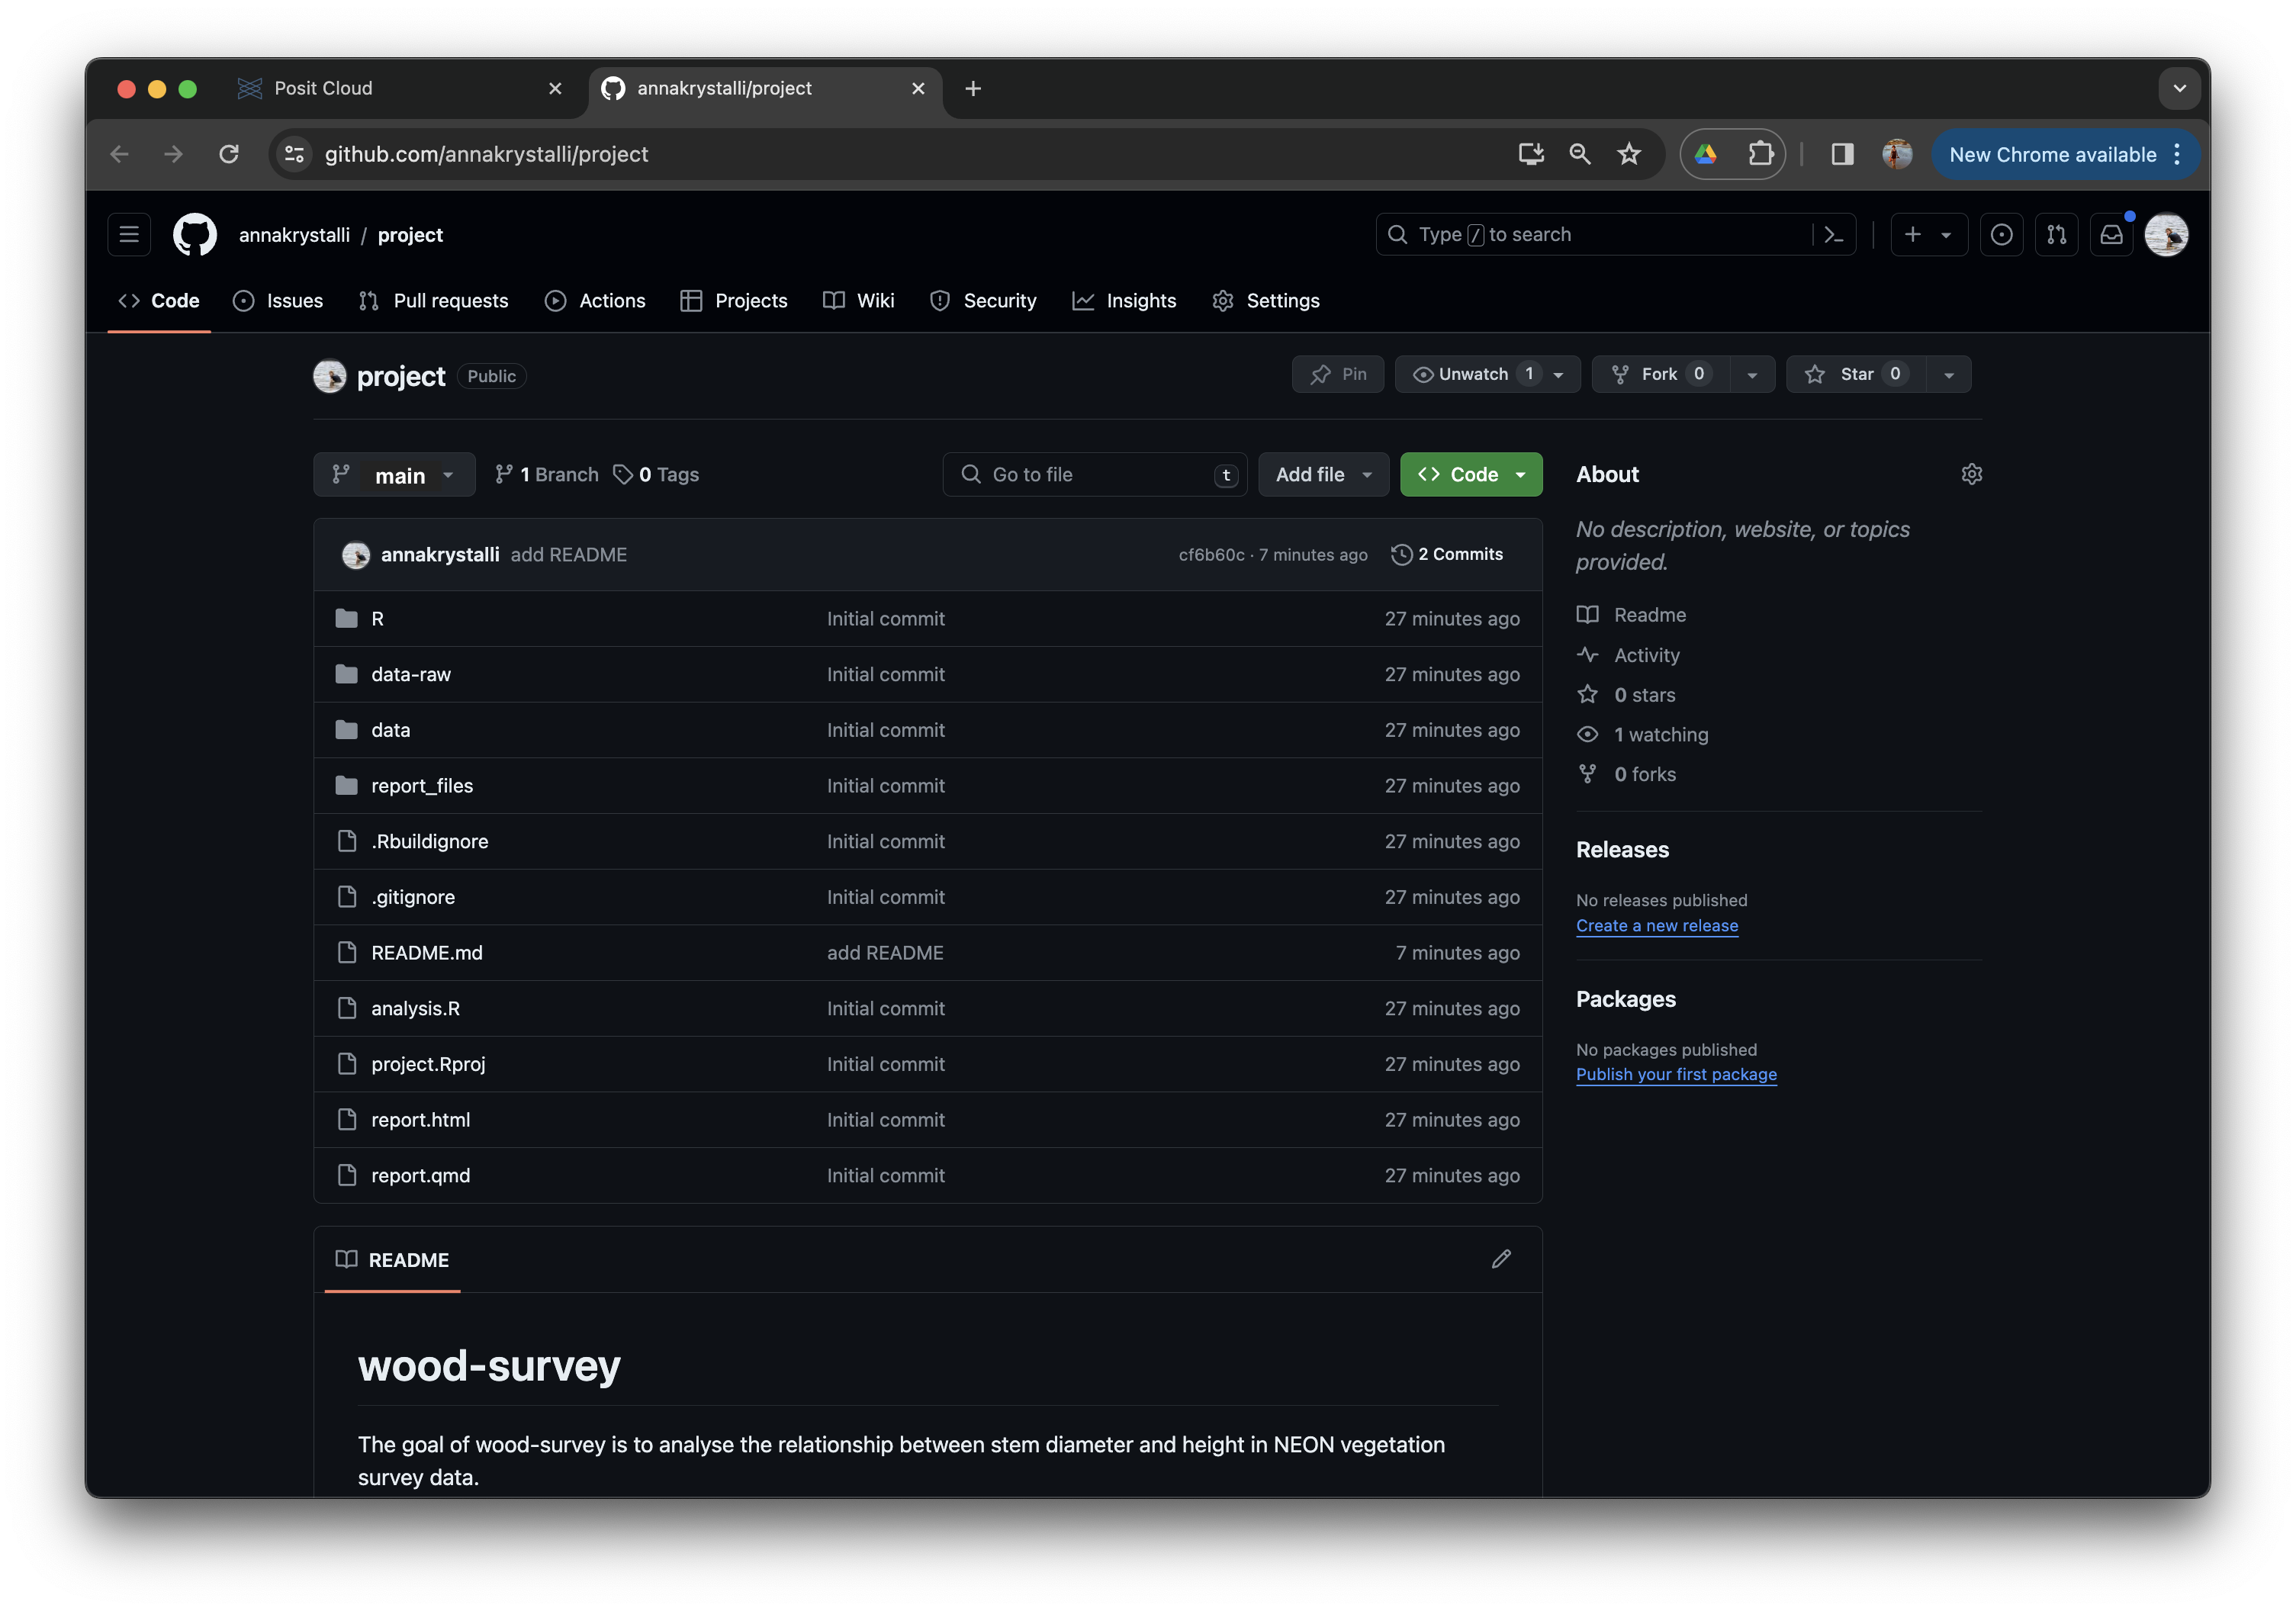
Once the repo is created and any committed files pushed, the repo is launched in the browser:
Host HTML content on GitHub
GitHub can do more than just store your code: it can also serve any HTML pages in your repo as a public website, for free. The feature is called GitHub Pages and gives every repo a URL of the form https://<username>.github.io/<repo-name>/. Since we’ve already rendered report.html (and the data documentation page) and pushed them to our repo, we just need to flip a single setting to publish them as a website.
Let’s head to the repo and have a look at what we’ve shared. To host our HTML content on GitHub, we need to enable GitHub Pages in our repository.
Enable GitHub Pages
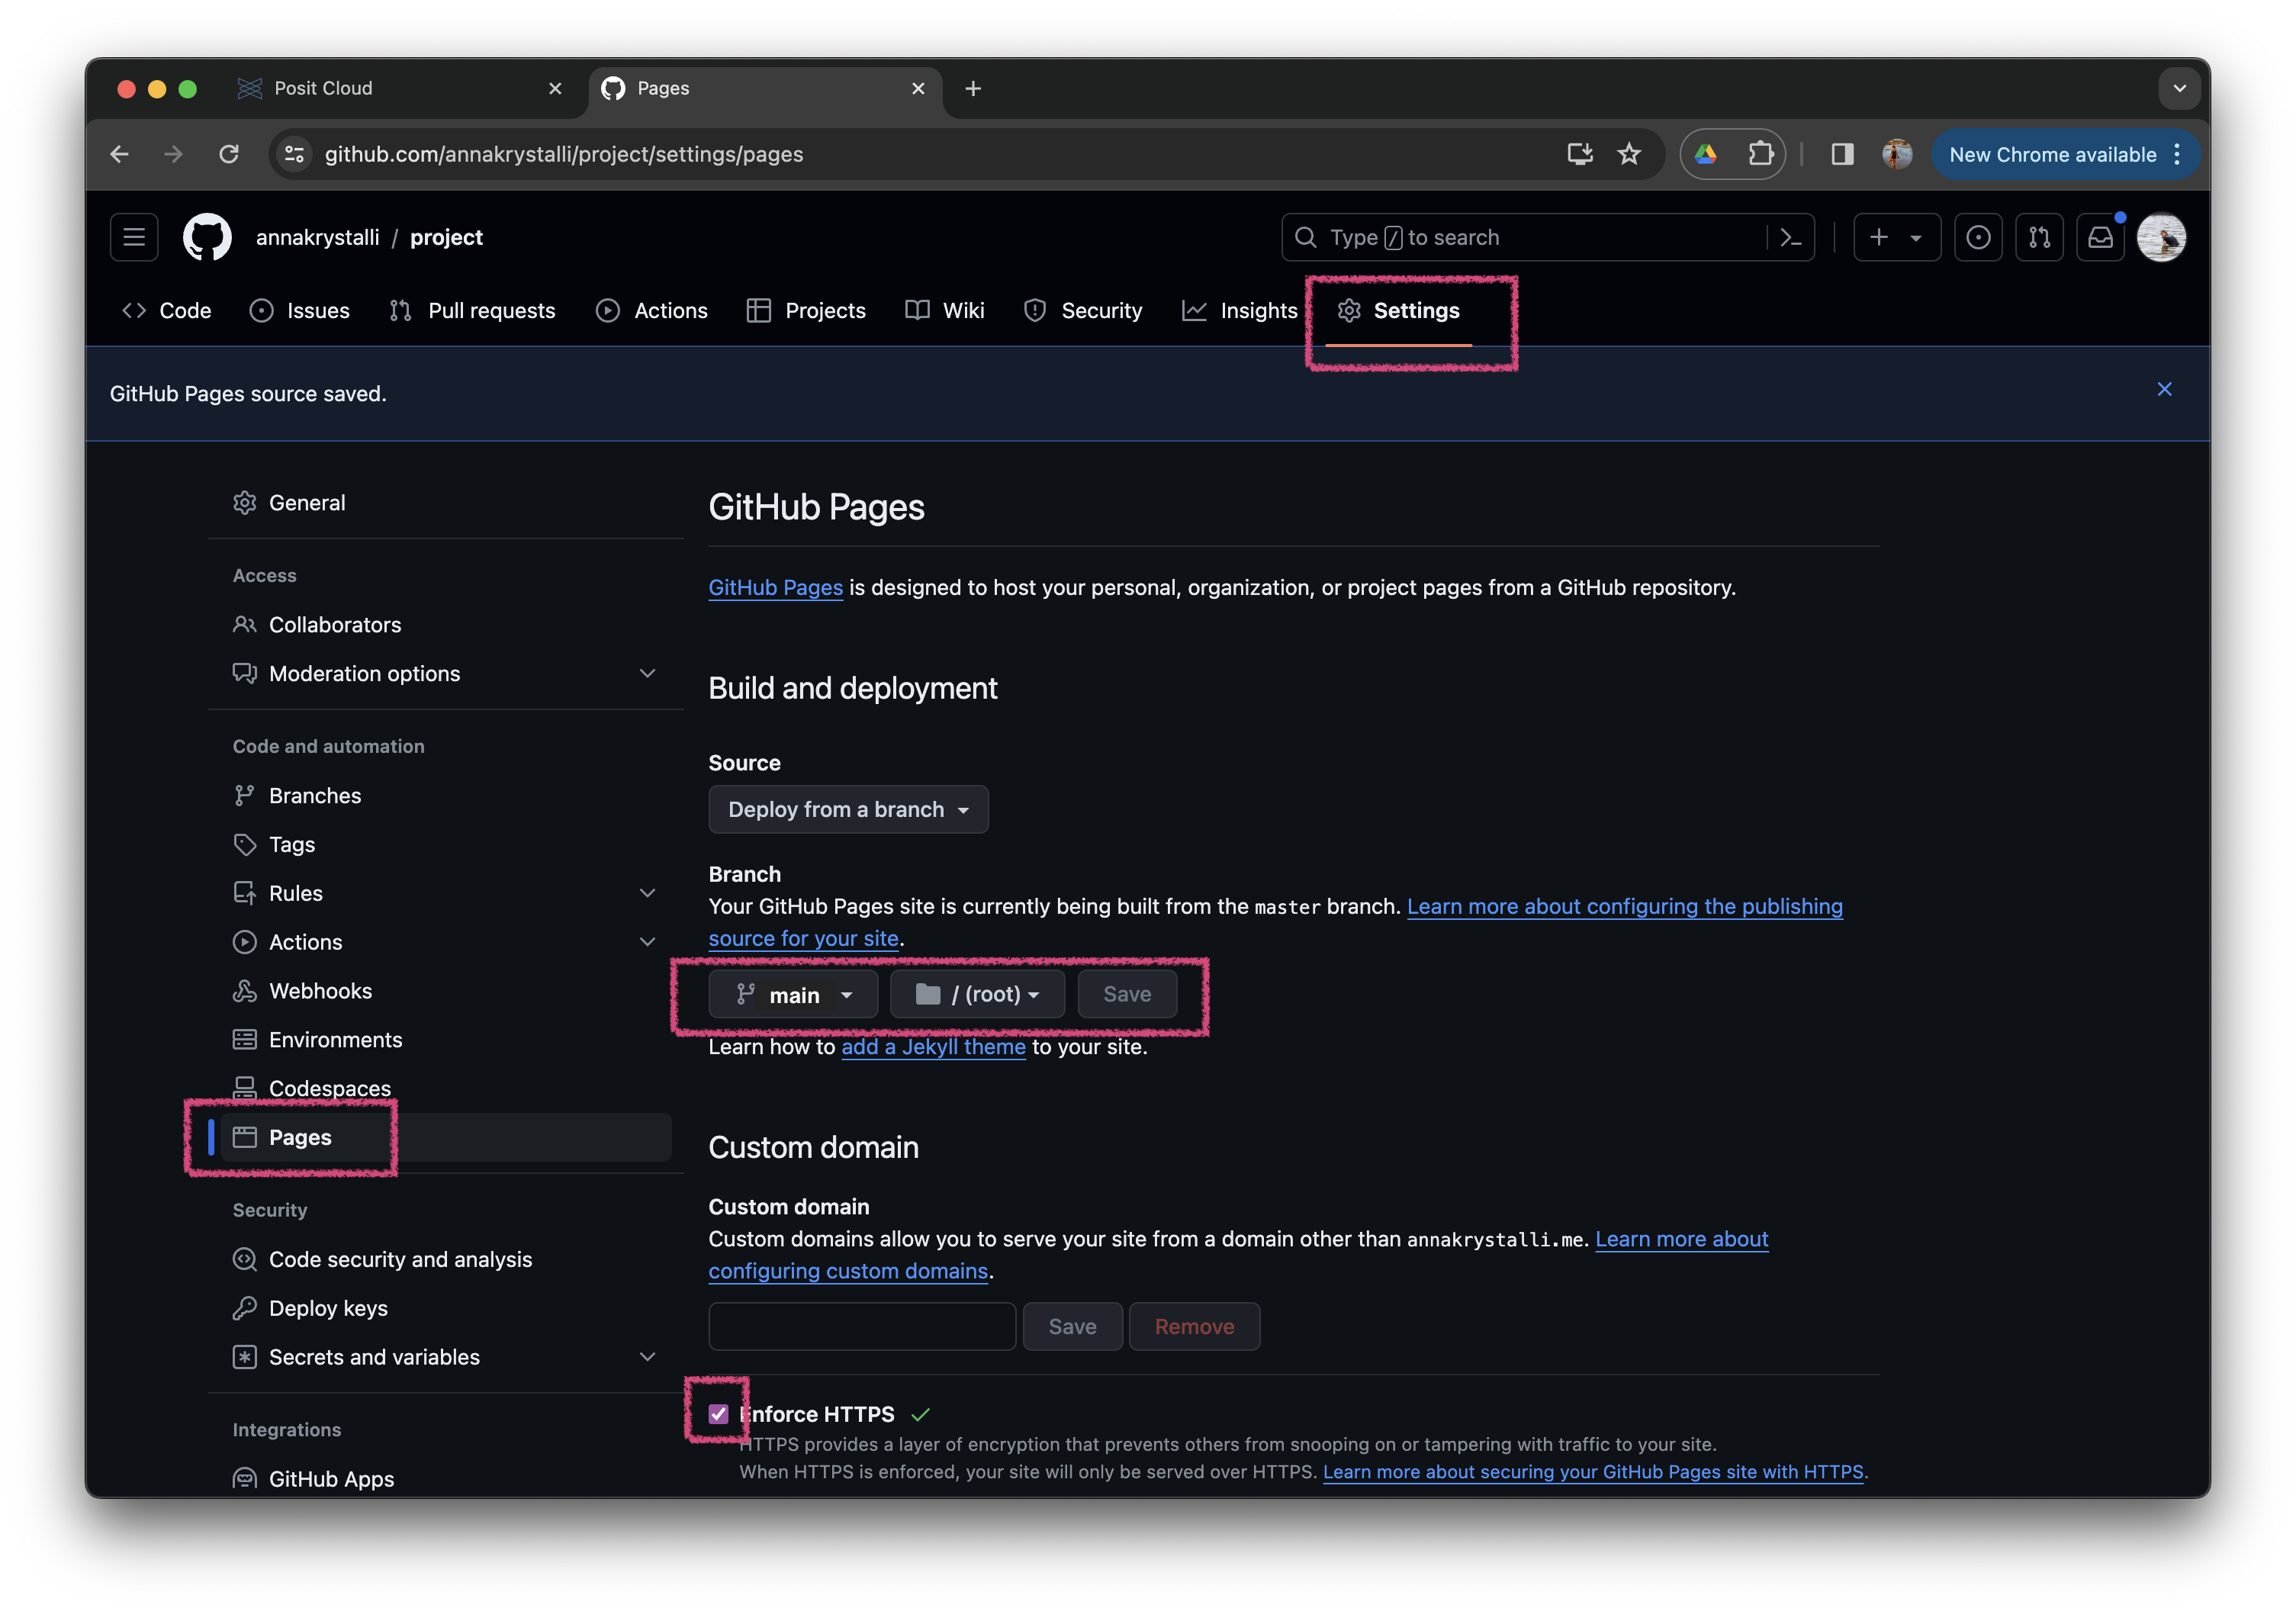
Go to repo Settings and navigate to the Pages panel on the left hand side and change your settings to the following configuration:
Source: Deploy from a branch.
Branch:
mainFolder:
/ (root)Ensure the Enforce HTTPS option is selected.
and Save
Check Deployed Site
Once the site has been successfully deployed, you’ll see a message like this (you might need to refresh the page):
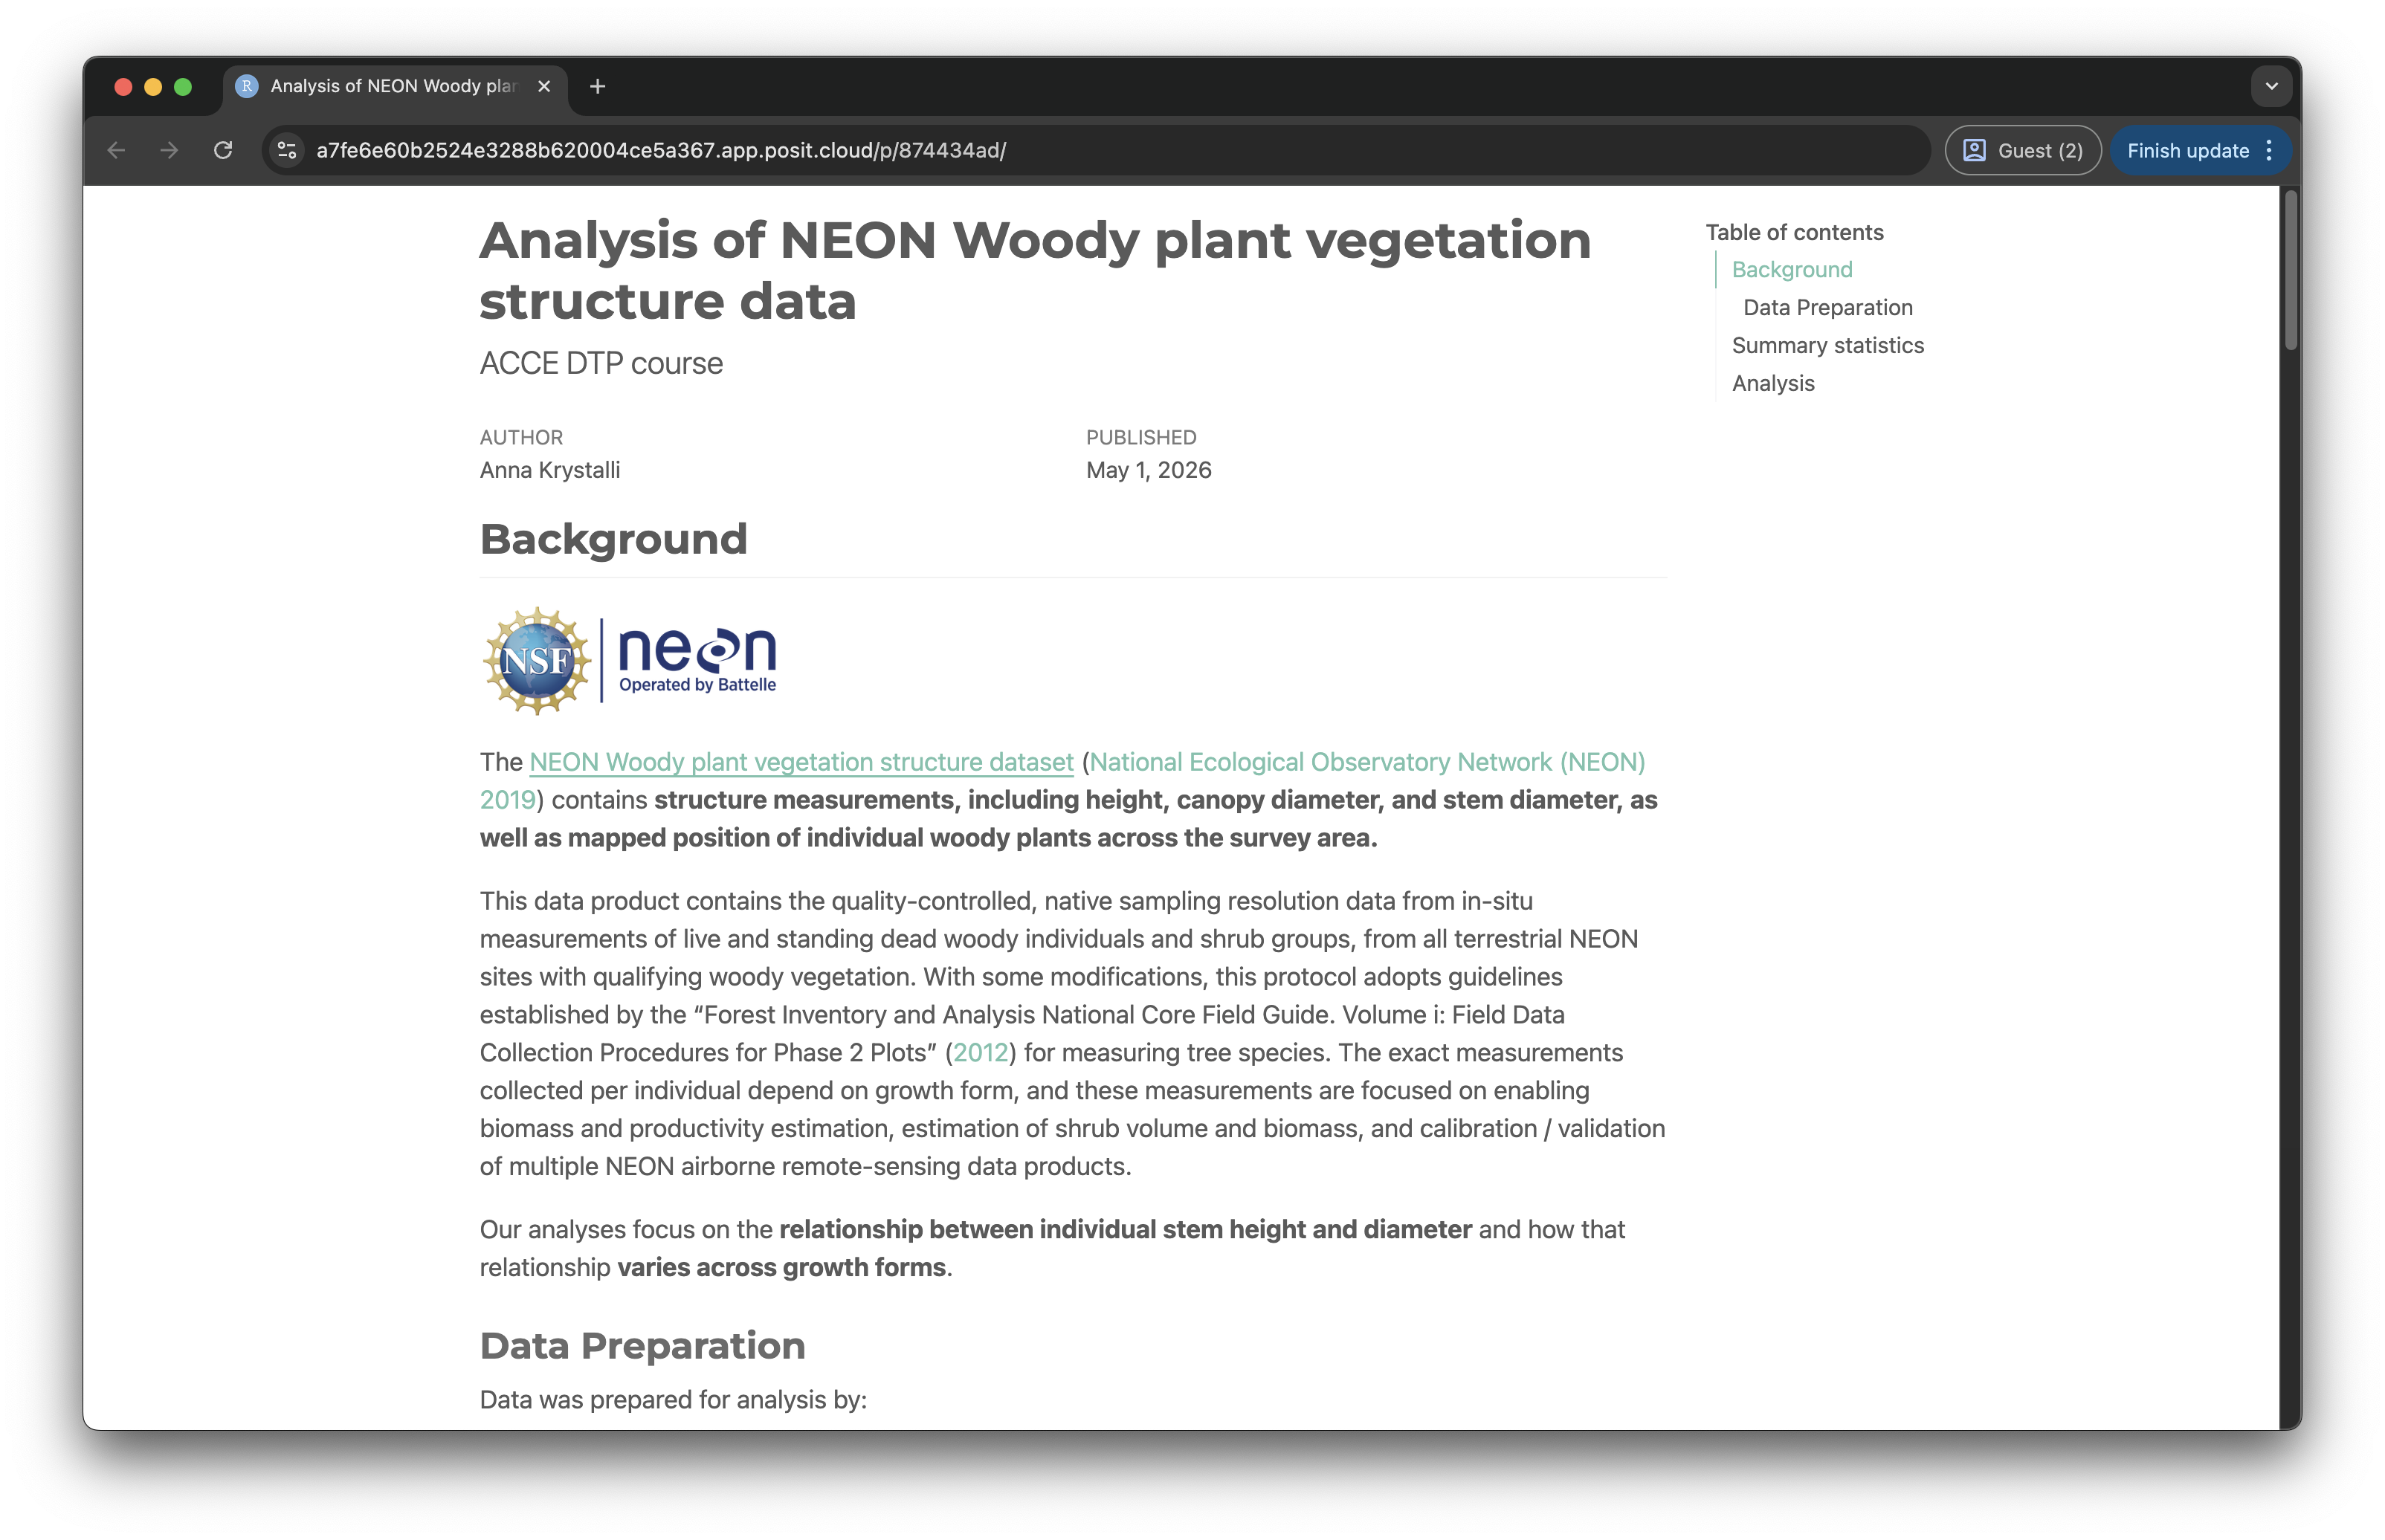
Click on the link displayed and go check out your work!
Note
Note that my URL looks a bit different to yours. That’s because I’m redirecting all my GitHub pages to my personal domain. Yours will be something like https://<username>.github.io/<repo-name>
Landing page
The landing page of your site will be the README.md file (although you could override this if the root of your project contained an index.md or index.html file).
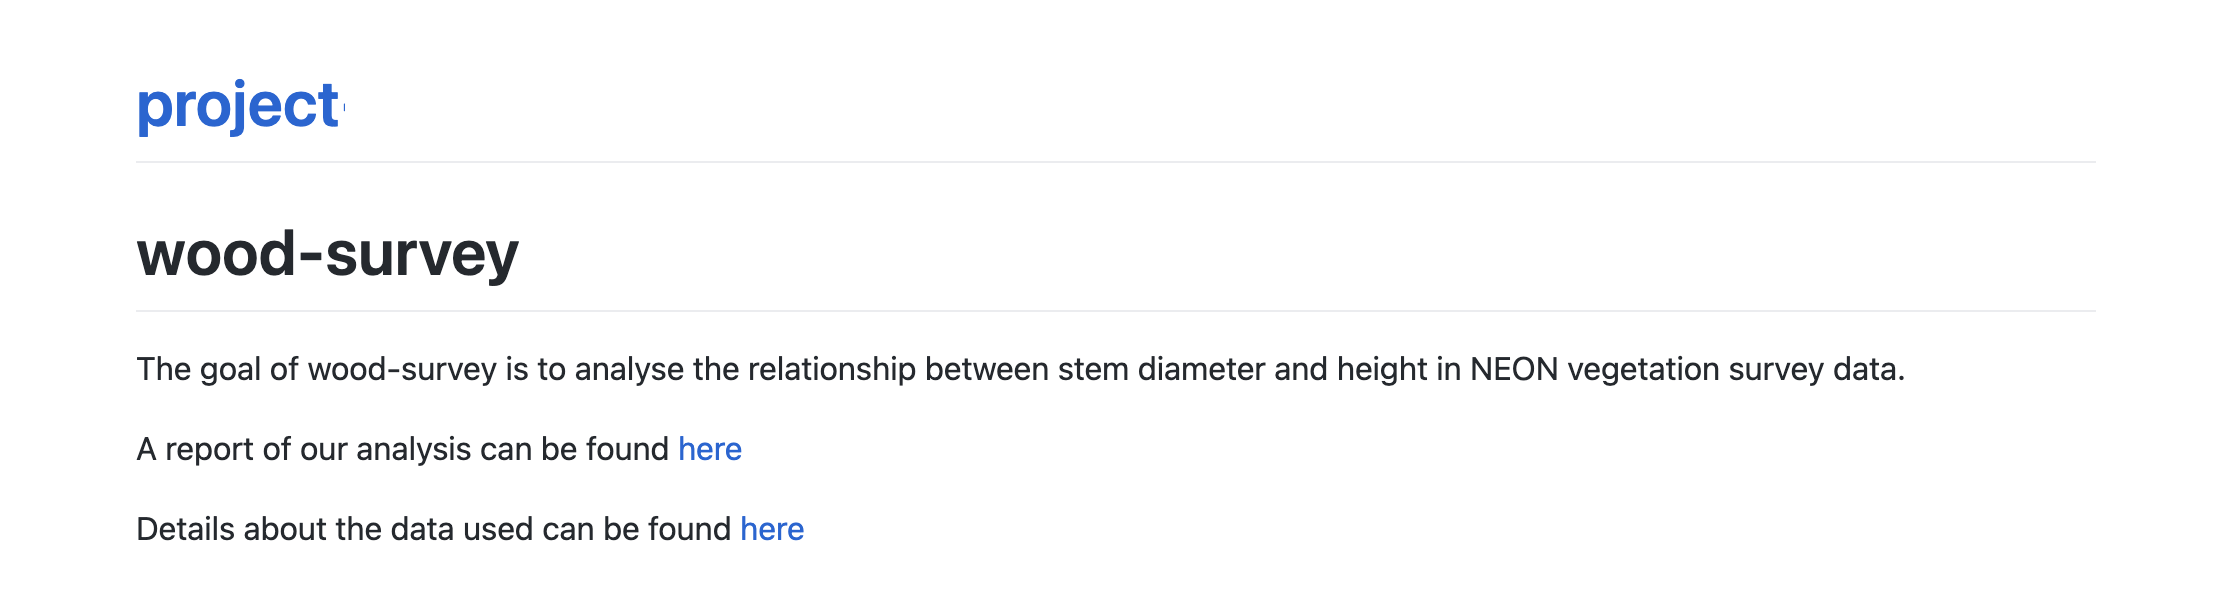 From there you can click through to the rendered report page (or add
 /report.html to the end of the URL to go directly to the report) and the data documentation page.
Report

Scroll through and check out the interactive features: table of contents, code folding, and table, figure and citation previews when hovering over their mentions!
Add URL to repo About panel
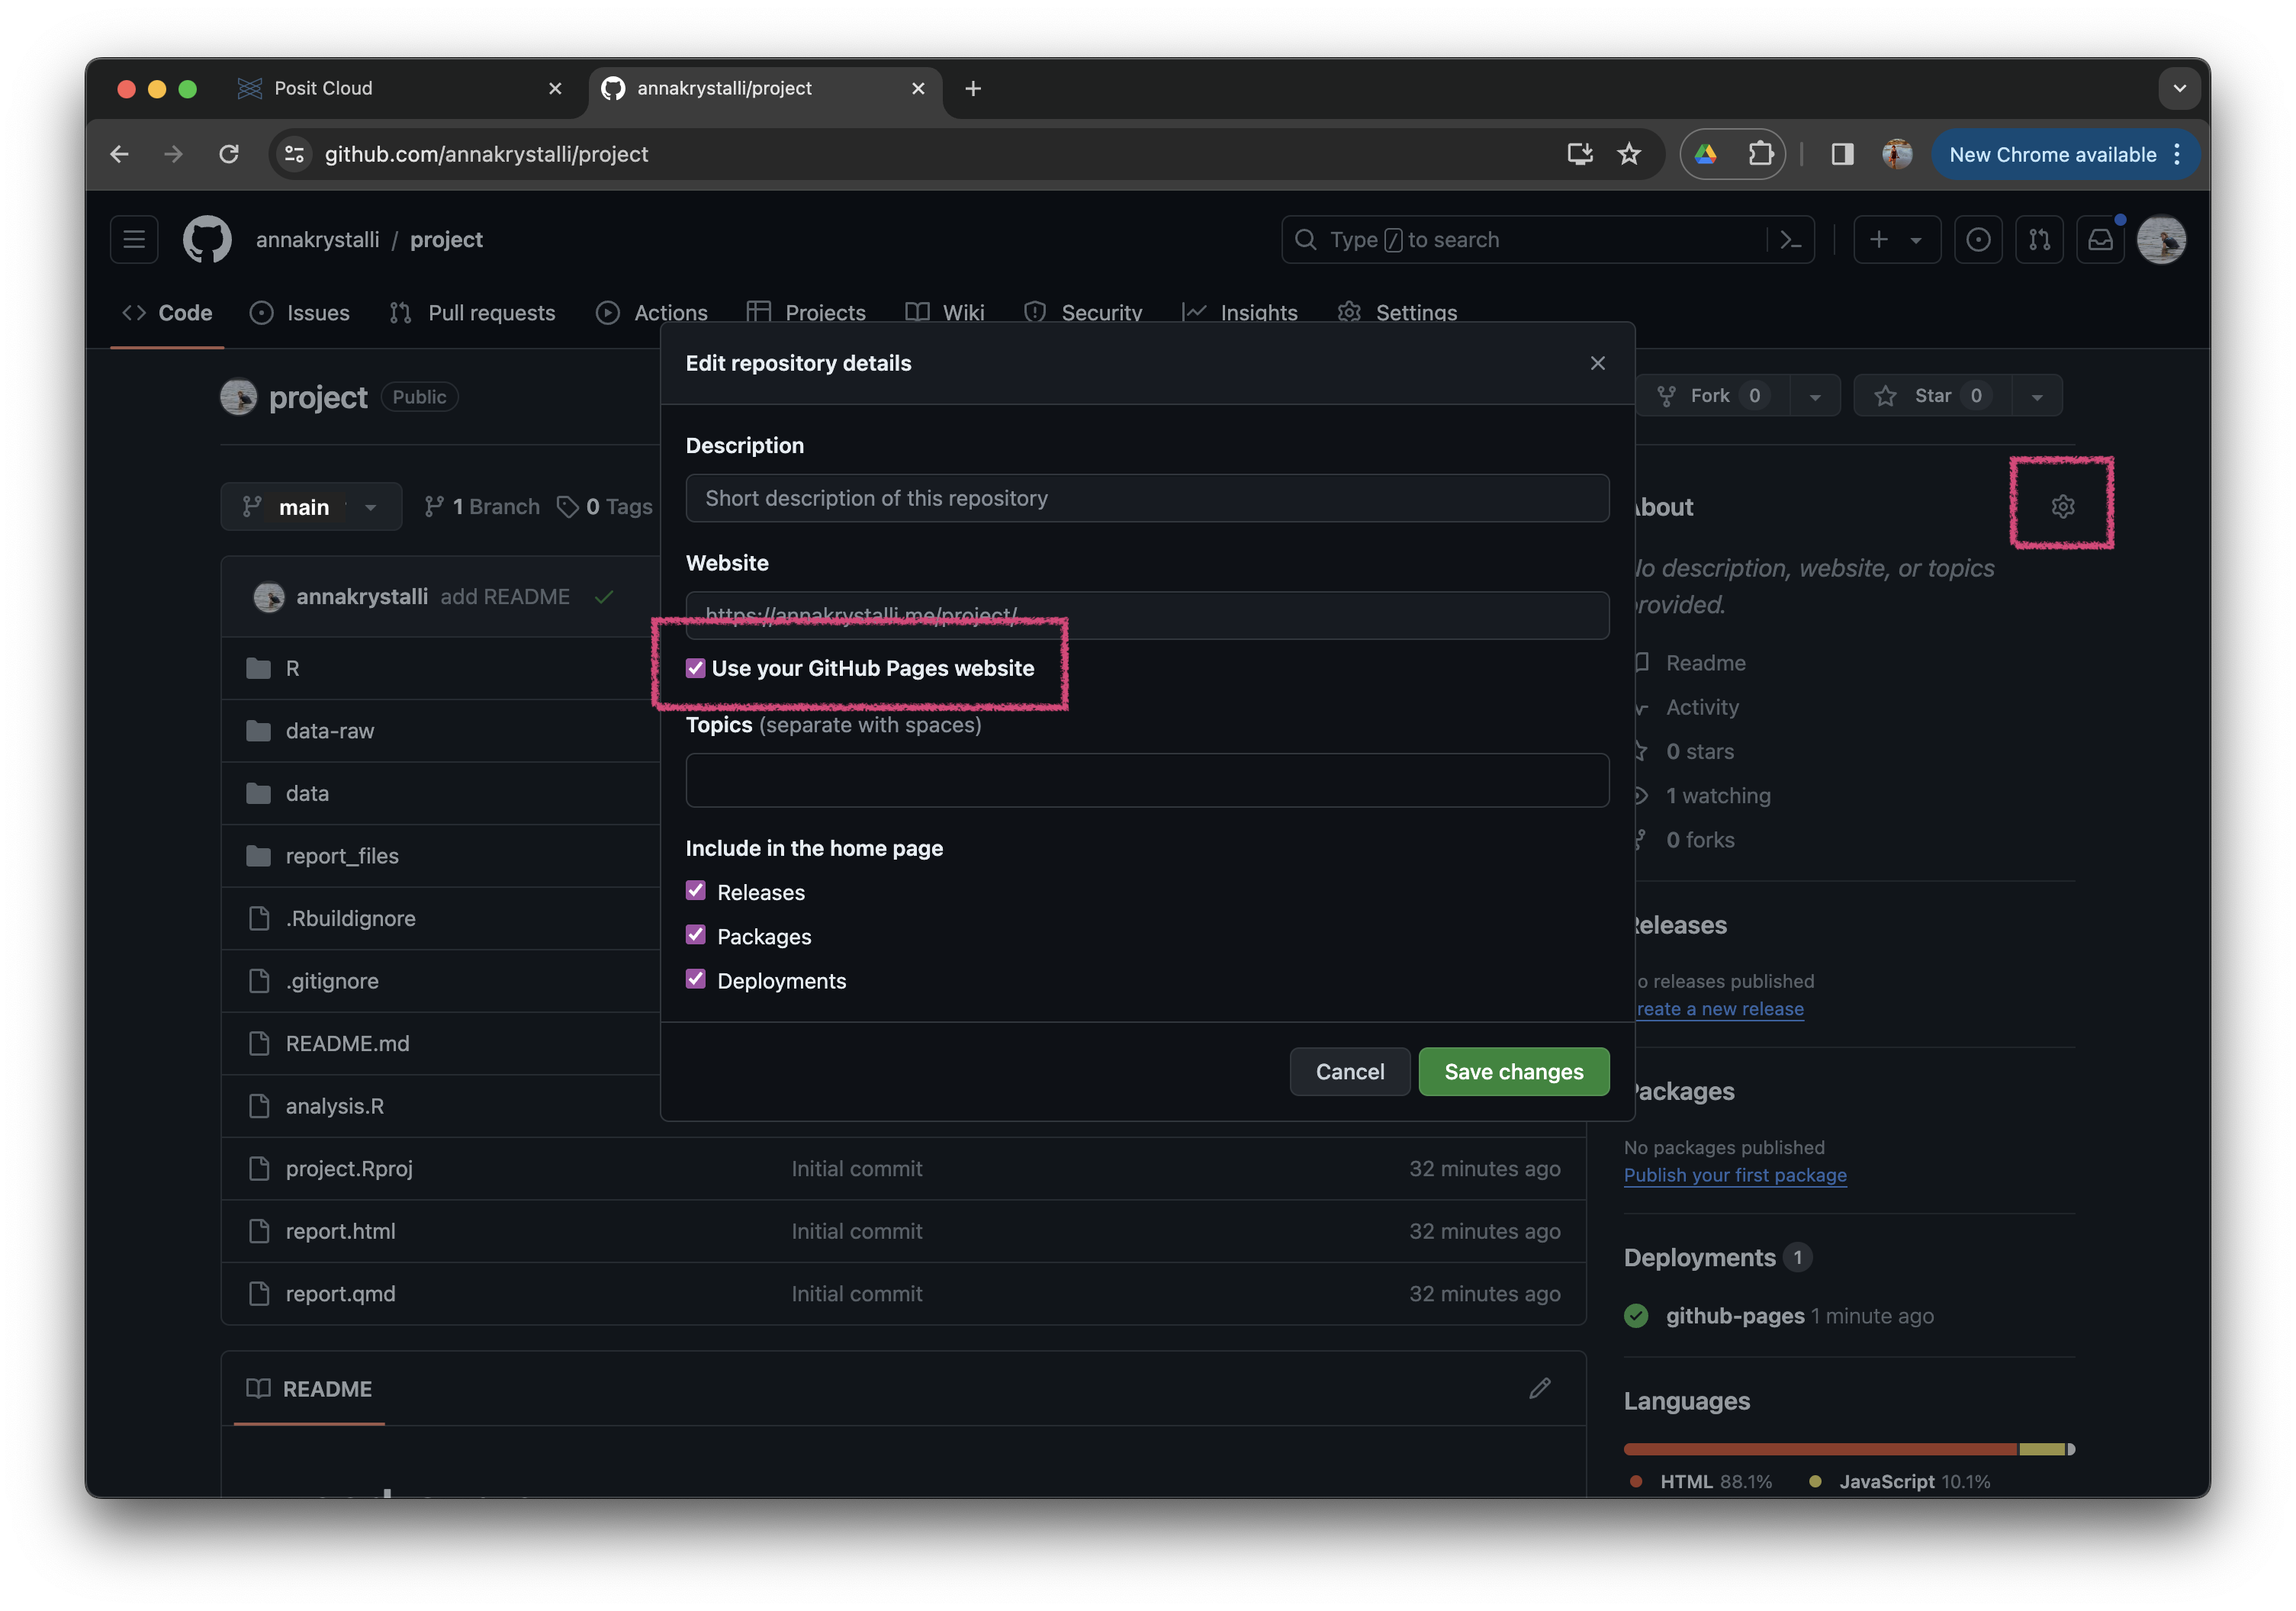
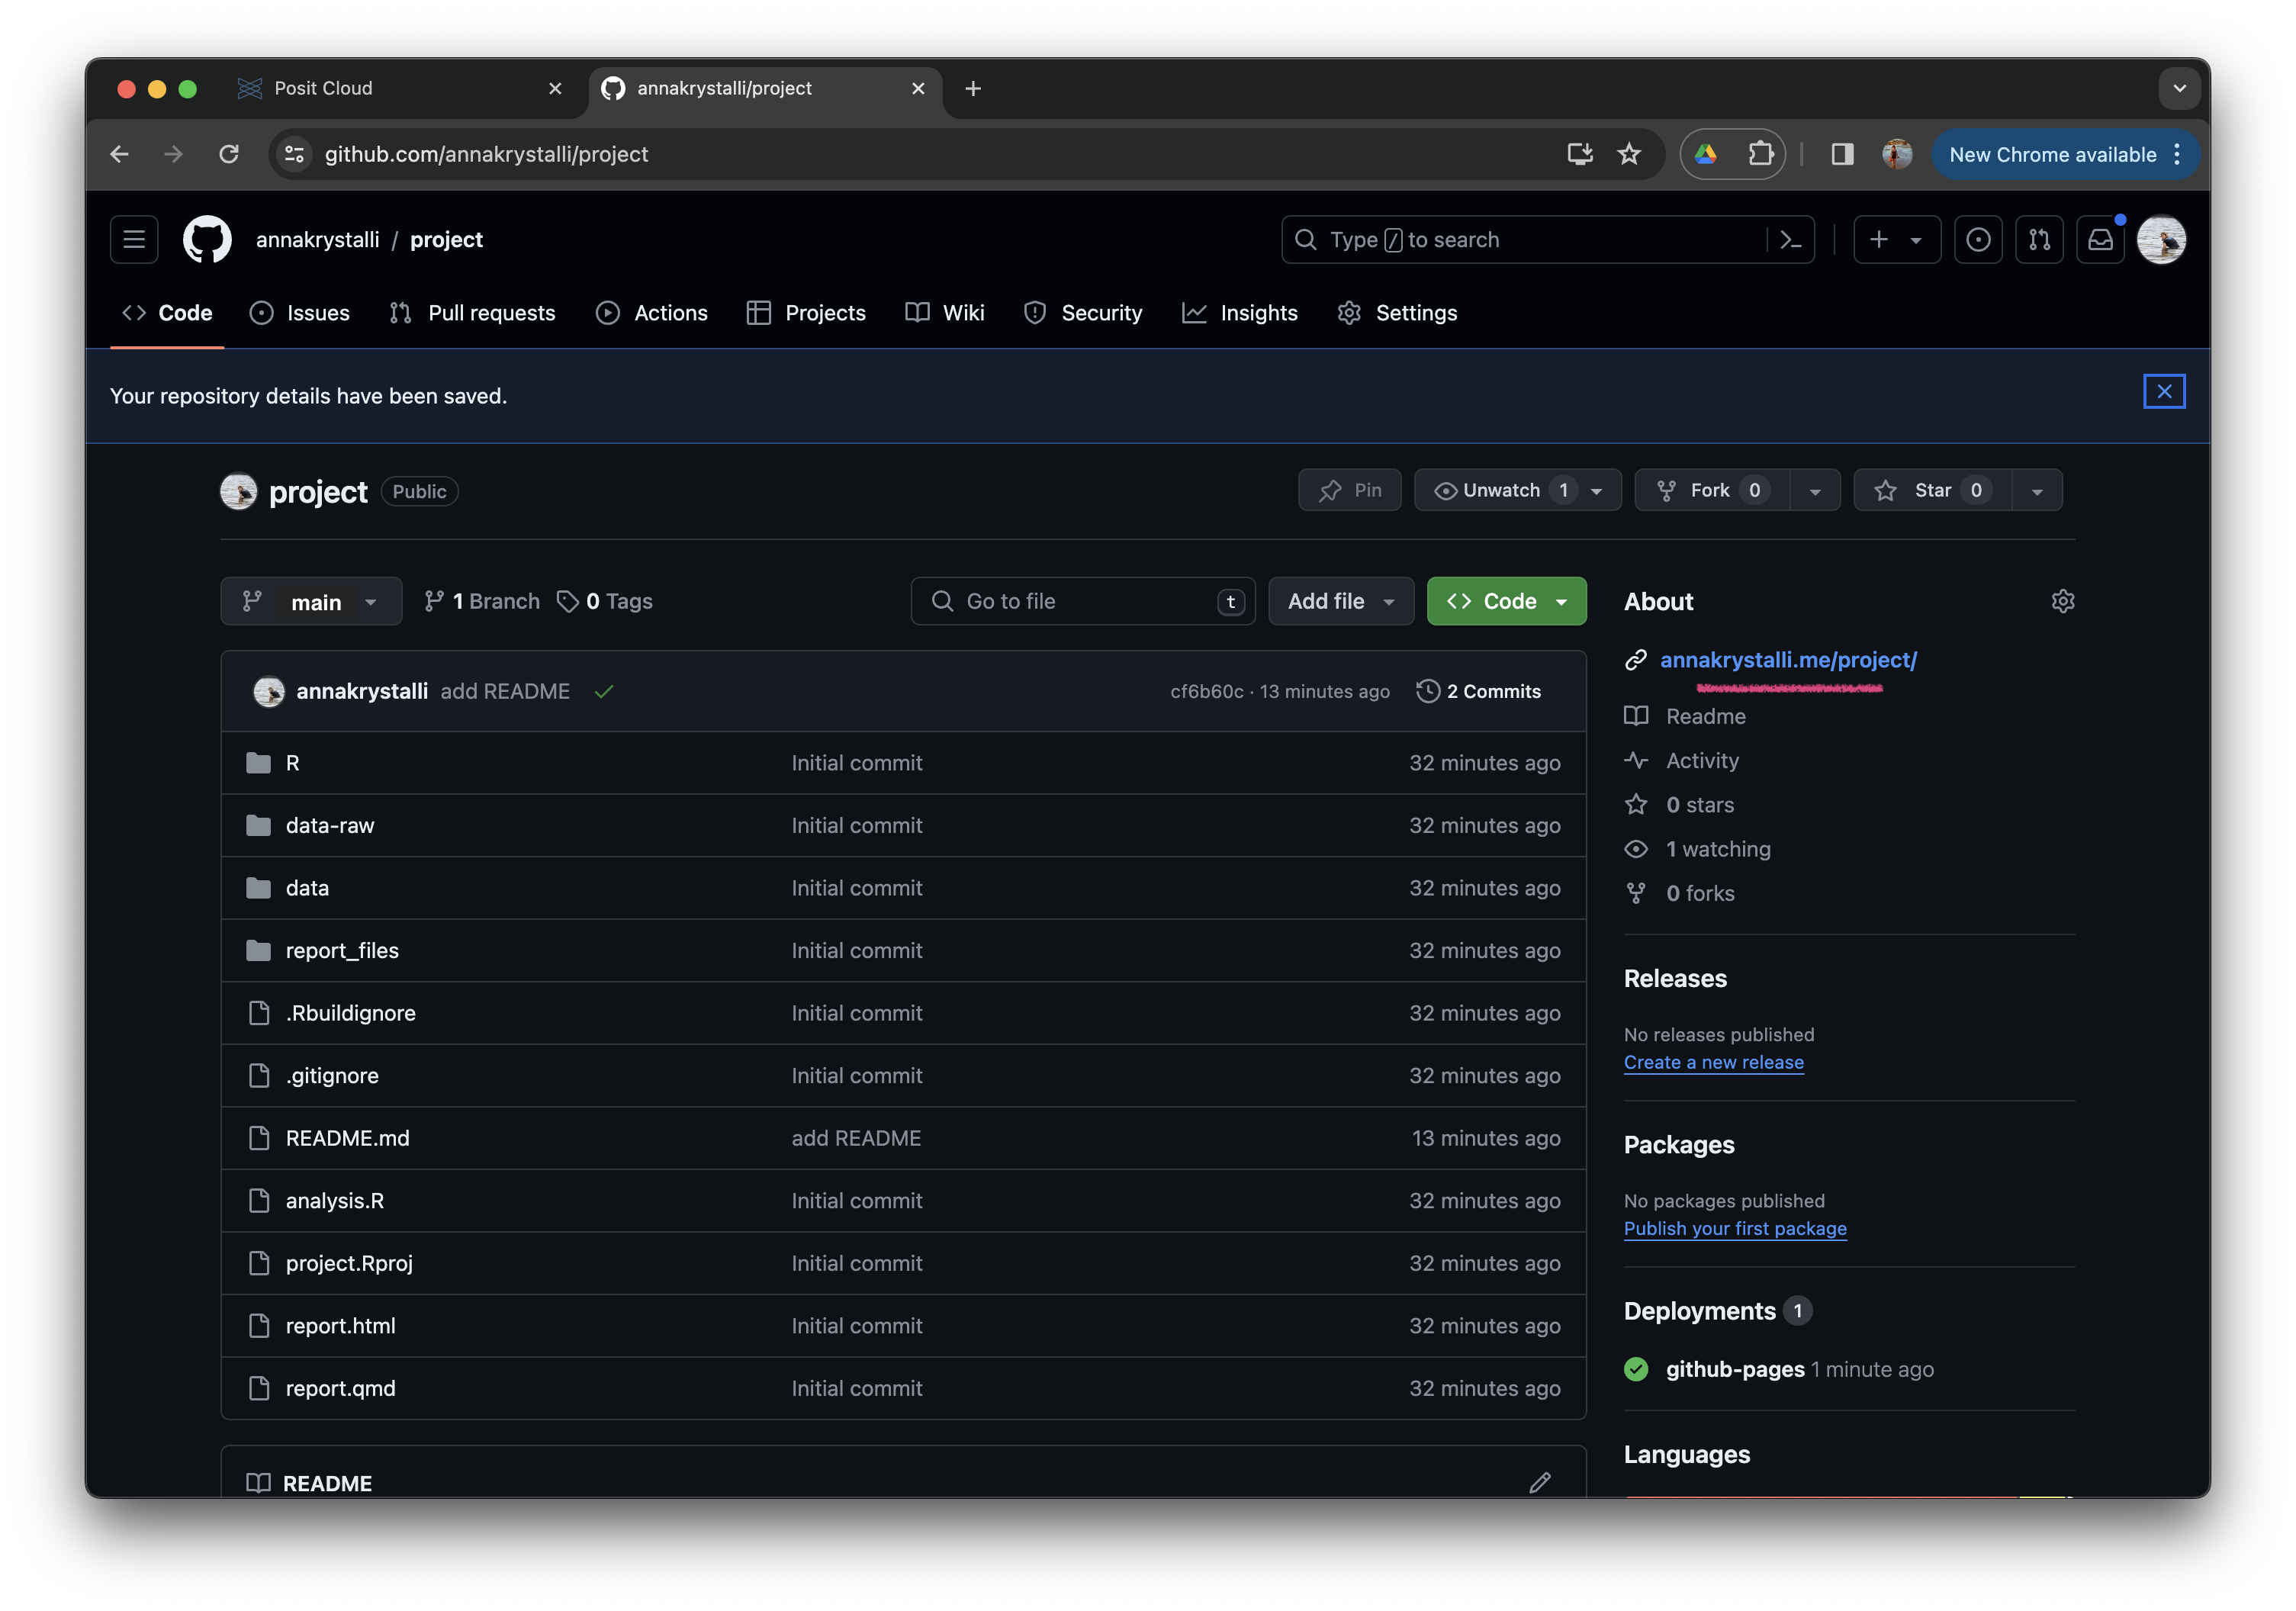
A useful feature of GitHub is the ability to include a link to any hosted content in the About panel of your repository. This is a great way to direct visitors to the rendered content of your project.
To add the URL to the About panel, click on the button next to About and check the Use your GitHub Pages website box:
 Once added, visitors can easily navigate to the hosted content from the repo landing page:
Git tips
- commit early, commit often
- commit logical bits of work together
- write meaningful messages
Further Resources
Never forget